Homemade and Unique Tools

I made this little angle/plain finder thinggamajig tool out of some tube and C channel to mount the harbor freight angle finder.

Its probably been one of the most useful tools ive made!
wv4i00.jpg

33c2gk8.jpg
 
I need a trolly almost never. I needed to pull my engine out of the xs. So to save my back. And I don't think I can pull the thing alone anyway so why try in this case.So with 2 6' step ladders,1 piece of teak that my friend gave me,wheel n tire off a wagon, some allthread nuts n washers and a cargo strap. I made a trolly for a chain hoist
 
Hey fellas!

Tech Tip from Voodoo Vintage and Monstercraftsman...

Fastest way to "re-new" that rust ridden piece of tubing prior to bending, notching, and welding...

Anyone who's bent tubing knows how bad rust will crap-out a $300 bending die after only a few uses!

You can sand your tubing by hand: Get carpal tunnel insurance!

You can use a grinder with a flap disc: As long as you don't mind gouges and waves in the surface!

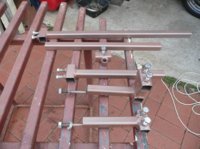
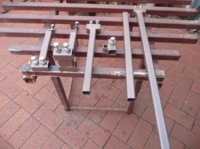
You could throw down $800 and get one of these...

sander_01.png


Or... You can modify a simple barrel sander for around five bucks!

Here's a 1.5" sanding bit from your local tool-in-the-box:

sander_02.png


Notice the rather large washers at the bottom of the above photo. You can purchase these from the same tool-in-the-box or you can fabricate your own by drilling a center hole in some rounded stock. Then, simply mount them on each side of the sanding tool like this:

sander_03.png


Guess where it goes next... That's right Einstein! In the drill!

sander_04.png


And here's the star of the show! Our length of 1-1/8" DOM that's rusted enough to make a rat-rodder proud!

sander_05.png


Up close:

sander_06.png


What we show next is a 1" x 30" oxide sanding belt you can pick up from the previously mentioned tool-in-the-box. Be sure to turn it INSIDE-OUT! INSIDE-OUT! INSIDE-OUT!

sander_07.png


Position the belt over your fancy new tube sander like this...

sander_08.png


And then loop it over your tubing like this...

sander_09.png


Be sure to keep a decent amount of resistance on the belt as you work it back and forth over the tubing and keep your drill parallel so that the sanding belt rides in the middle of your fancy new tool.

Rotate your drill over and under the tubing sanding the back, top, and bottom. Repeat the process on the other side making a complete pass over the tubing surface.

DO NOT LINGER IN ONE SPOT!!! EVER!!!

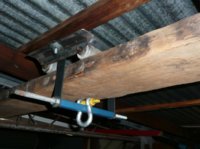
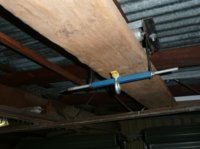
Another TIP: Have a full charge on your drill. Or better yet... Use a corded power drill like I did after my battery crapped out...

sander_10.png


And this is what our shiny new tube sanding tool will produce...

sander_11.png


Again... Here's a comparison between our clean DOM and our RUSTY $10/foot DOM tubing as supplied by our local materials depot. (Hey $&@#$#, Thanks for the quality finish by the way!...)

sander_12.png


We are in the process of developing an actual billet steel bit that fits in your 4-1/2" angle grinder. It will be based on the same theory. Stay tuned to Monstercraftsman and Voodoo Vintage for details!!!
 
This might sound dumb but a mate of mine ripped apart his kids pretend lawn mower ( the real F'ing loud ones ) and stuck magnet strips to the bottom of it. Runs it over his floor before he sweeps up. Cracks me up every time I see it but it comes in handy for ball bearings and small nuts/washers that go rolling!
 
did you machine the spindle and stay yourself?

Yes, I made all of it.... It works great, it is a lot more rigid than some of the low end ones you can buy..... I just used some 1" shaft for the spindle and used some UHMW for the spindle "bearing" or bushing....
 
Plastic 55 gallon bung tool... I need this for my drums of E85 for the Impala...

WP_000490.jpg


I made this so I can use a ratchet to turn the engine over in the Impala to run the valves...

WP_000454.jpg
 

Attachments

  • Pic%206.jpg
    Pic%206.jpg
    123.5 KB · Views: 545
  • Pic%204.jpg
    Pic%204.jpg
    86 KB · Views: 547
  • Pic%203.jpg
    Pic%203.jpg
    107.7 KB · Views: 591
  • Pic%209.jpg
    Pic%209.jpg
    127 KB · Views: 578
  • Pic%202.jpg
    Pic%202.jpg
    106 KB · Views: 538
  • Pic%201.jpg
    Pic%201.jpg
    109.2 KB · Views: 549
  • Pic%208.jpg
    Pic%208.jpg
    91.7 KB · Views: 514
  • Pic%207.jpg
    Pic%207.jpg
    78.3 KB · Views: 547
Last edited:
Steering stem nut spanners, I got tired of mashing the nut with punches.
Made with scrap steel and an angle grinder. The "extra tooth" to fit a second notch is overkill and not really needed but having two wrenches so you can tighten the nuts against each other is worth it.

Stem nut spanners.jpg
That second one was the bar from a garage door opener, the curve was awesome!

Not really a tool but a great way to remove fork seals. The white chunk is just some scrap aluminum so the tube doesn't get dented. this makes the seals practically fall out! Much easier with the iron clamped in the vice. You could grind a chunk of steel to do this if you don't have a tire iron.
fork seal removal.jpg
 
Hi,

I made this tool today to hold my clutch basket while I re-torqued. No problem getting stuff apart with my impact wrench :laugh: 
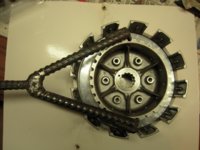
I wished I had some old clutch disks since that would be easier but no such luck :(

Bought some rebar at Home Depot this morning and cut two 5 1/2" pieces, a 10" and a couple of pieces of angle iron from a section of bed frame that I've been nibbling on for a long time. After fitting it up, trimming the angle iron bits and holding it all flat on a plate with clamps this is what I have. Good and solid and pleased with how it came out.

Glenn
 

Attachments

  • DSCN2546.jpg
    DSCN2546.jpg
    96.5 KB · Views: 559
  • DSCN2544.jpg
    DSCN2544.jpg
    162 KB · Views: 595
  • DSCN2543.jpg
    DSCN2543.jpg
    173 KB · Views: 566
Hows that carb sync tool work and how can I make one! ?
Joel:thumbsup:
Let's see some of the homemade tools you guys have made!

Sometimes when you're working in your garage or shop, the tool you need doesn't exist. Or maybe you're cheap or don't want to run to the store to get some simple tool. Maybe you can build a tool that's stronger than what you can buy. Whatever the reason, let's see the tools you've made.

Also, let's see the unique tools that you don't see in every toolbox, but are very handy to have around.

I'm sure you've seen this one before. The $2 carburetor synchronizer. Works great!
carbsync.jpg


Beefed up clutch hub holder tool. The one I got from mikesxs crumpled when getting a stubborn clutch center nut off. It's made from 4 old steel clutch plates tacked together.
clutchholder.jpg


The pieces I made for using electrolysis to get rust out of gas tanks. More info on that process.
electrolysis01.jpg


A couple of cheap ground down and bent screwdrivers and wrenches. I use the two screwdrivers on the left for removing pilot jets and mixture screws. I think I bent the cheap wrench to get at a bolt when removing an xs650 starter with the motor still in the bike.
bentgrind.jpg


These two aren't homemade or all that unique, but they come in handy and you don't see them in every tool box. The locking adjustable wrench works better than I ever imagined. It will grab nuts and bolts very tight and will even loosen ones that good wrenches will strip. The double pivot needle nose pliers are great for reaching into narrow deep places.
unique.jpg
 
Back
Top