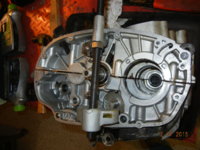
First XS650 Build, What to Look For

If you have an impact of some sort, that will usually spin the nut off without the need for a hub holder. You will need something to hold it for tightening it back up though. Yes, you will have to measure the nut size. I've found 27, 28, and 29mm nuts in there.

In your second last pic, note the dot stamped into one of the inner hub teeth (at about the 12 o'clock position). That is an alignment dot for reassembly. There is a small hole in the pressure plate that it should show through.
 
When using a rotor puller (any puller) grease the puller threads, a good spot for molybdenum grease. There will be lot of pressure on those threads and often it's cheap crappy cut threads, on an inexpensive tool.
 
More progress pics! Took the engine down to the same shop that has my cylinders and in two seconds their impact gun had the clutch hub nut off. That said, I took some pics of it and where it came from for those following along at home. See below

0uw0EJH.jpg

This is the hub nut and the shaft that sits inside of it. No idea what it's called but it goes through the center of the nut and holds in a few components. From the right to the left it's that shaft, a ball bearing (next picture) a thicker silver shaft, another ball bearing then a thinner silver shaft that sticks out the left side. Meant to take pics of this but the phone died and I stopped for the night.

The next day, I moved on to splitting the cases. Going to post this photo here because it's awesome and helped me to make sure I found and removed all of the necessary hardware during disassembly. I do not own this photo but someone does and that person is more helpful than me, so enjoy.
8c3Xhqc.png


Naturally, during the removal of bolt #9 I realized I hadn't actually removed all of the components I needed to. Here's where I got held up, if you do this yourself make sure to remove this first. I used an impact to get that phillips head screw at the bottom out. That plate it sits on comes out too. Then the small gear, then the larger gear. Larger gear only comes out after you take off that small c clip on it.
8LhAWzY.jpg


After removing that c clip however, I found this. It was sitting around the shaft but as I picked it up I realized it was two halves. Is that normal or is this broken? I saved it just in case.
jdj6Fdy.jpg


After you remove that (potentially) broken piece, you lift the gear off the shaft and you'll see the spacer (far left) and gear (2nd front left) lift off. Save all these pieces, and note the order because it must go back the same way.
l2DP4ao.jpg


Then this gear comes off the shaft, there are a lot of layers to this piece.
o9bi1lg.jpg


Now this spring...jesus, am I done taking these pieces off yet?
Gu2Xc8B.jpg


Yes, I believe that's the last piece. You can now access that #9 bolt and loosen it. A quick tip on this...use a piece of cardboard to secure all the hardware in proper order. Even better tip, own toothpicks. If I did I would have put them in between the nuts to keep them from sliding around on this thing. I figured I was going to be removing bolts, which 4 of these are, but the rest could use something to keep it stable.
HFBDNBQ.jpg


Here we go guys, time to split these things!
QfntiIQ.jpg


Just kidding, also forgot to take this thing off. Clutch adjustment star arm linkage or something. I remember seeing it in the manual but didn't realize I had to remove it until now. It has a star down at the bottom with a phillips head. I took that star off, but it doesn't seem to have any effect on removing the unit. Does anyone have the procedure or a link to it?
Hurvb8W.jpg


One final thing, I found this ball bearing on the ground after finishing up for the night. Never a good thing to find. If you read back up to the beginning of this post, you'll see I placed this missing ball bearing in between the two shafts running through the engine. I assume that's where it came from because I took the left most part of that unit out while it was facing down. If this is not correct please let me know.
2pJ0ZuD.jpg


Thanks guys! More progress pics to come as soon as I figure out how to get that clutch adjustment unit off.
 
That split washer you found is correct (it's not broken). It's held in place by the dished washer that was over the top of it.

If you look on the other side of the engine where the shift shaft comes out, you'll find a snap ring on it. Remove that and the shaft can be withdrawn out the right side. No need to remove that star, just rotate the spring loaded "claw" lever away from it. That ball is probably part of the clutch pushrod assembly. There are several of them used, where ever two pushrods come together. They are 5/16" diameter.
 
Thanks 5 twins. Always showing up with the info I need!

To confirm, there are two ball bearings which go in that clutch pushrod assembly correct?

I've drawn this diagram to illustrate my thinking, if this isn't the way it goes together please let me know so I don't assemble it wrong later on.

h0YKkOY.jpg


Splitting the cases tonight after work so expect more pictures around 10pm or thereabouts. That or a post saying "god damnit I can't get these cases apart" lmao.
 
As you may have expected, I had more than a little trouble last night trying to get those cases apart. Going to take some more clever engineering than I had time for. In the mean time I finally got that damn start gear case off!

fZgd4mq.jpg

CaqFce6.jpg

For anyone removing, be sure to keep track of the two dowels that go on this cover. On mine, one remained in the engine at about the one o'clock position, and the other came off w/ the cover at the six o'clock position. Pictured below
v6TTyKf.jpg


Next, I took some pictures of the case seal. It looks like that yamabond was applied pretty liberally. Seeing as the PO knew almost nothing about the bike I won't bother checking with him, but does this appear to be a factory job or a home seal?

At least I know these two halves are from the same engine lol. Noted by the matching numbers top and bottom. Upside down in this pic but you get the idea
4MBJgYR.jpg


rhRDcPz.jpg


NyBFpMh.jpg
 
Still working on getting these engine cases apart, rubber hammer doesn't seem to be doing much in the way of freeing things up.

In other news though, the machine shop called and said the cylinders will need to be bored to a 2nd oversize (75.5mm). Going to order the pistons below and take them down to the shop to be mated with the cylinders next week. In the mean time, the struggle continues on getting the cases apart. I've seen a few tricks, but none that seem viable for my setup. Can't use the oven or roommate and his GF will have a fit, and can't heat the engine w/ that neat tinfoil setup cause I'm down in the basement w/ very little ventilation and it's also a shared basement w/ other tenants so trying to be as courteous as possible. Might just take it down to the local shop and have them use their case splitter tool on it if I can't get it open in the next few days. Would be a quick in and out job.

http://www.ebay.com/itm/74-76-YAMAH...S-1-/131527195895?vxp=mtr&hash=item1e9fa1bcf7
 
I used a ratchet strap to the lower motor mount and attached to to the beams in my garage. Lifted the whole motor about an inch off of the ground and then gently went to work with a rubber mallet. Put a towel or a mat under the motor so that it doesn't get scratched up. Way easier this way, took about 30 sec
 
That's not a bad idea, suppose I could do something similar. How did you keep the rods on the top of the motor safe when it came loose? Worried it would fall down as the cases came apart and the rods are pointing straight down.
 
honestly my crank stayed in the lower case. but i could see it falling on to the upper case. (kind of awkward to explain because it would be hanging upside down). the good news is the studs will keep it all together. since it is only suspended an inch, its not enough space for the upper case to come all the way off. the rods will just come along for the ride haha. when it splits you'll see what i mean. you are just breaking that yama-bond apart.

If you look at the bottom of the cases.. i used the mount in the center, along the oil sump plate. once it breaks free, it will be lose, but not out of control, the studs keep it where it needs to be. (also, i wouldn't take the studs out unless you have to... I've found they prefer to be left alone haha)
 
Still working on getting these engine cases apart, rubber hammer doesn't seem to be doing much in the way of freeing things up. - - -

Hi Nick,
if you are still struggling with splitting the cases, try jacking them apart.
First, be absolutely certain sure you have taken all the fasteners out.
Then put a steel rod through an engine mounting bolt hole in the upper half and
another steel rod through an engine mounting bolt hole in the lower half.
Use your car's scissor jack on one side and borrow another for the other side to
force the rods apart.
 
Here you go easy peasy. turn buckles in the fencing section or hardware aisle about $2.00. If it doesn't come easy recheck that ALL the bolts, nuts are off!

View attachment 59526

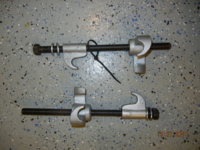
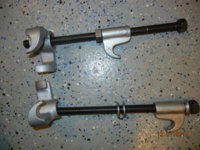
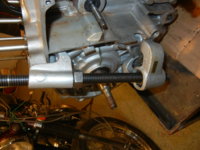
Just did this 2 nights ago. the turnbuckle also fits inside the alternator recess on the LH side a pair that will retract to about 5 1/2" will do the job they don't need to be very strong take them just snug then maybe 1/2 a turn, WAIT look at the seam if it's moved, repeat and the halves separate smooth and simple. If you've ever done a DIY strut replacement you have these;

DSCN4598.JPG

Easily reconfigured to make a case splitter!

Oops better pic on the way in a bit!
 
Hi Gary,
well, that looks simpler than effin' around with borrowed car jacks eh?
Betcha I walked past those turnbuckles at Princess Auto many times and never noticed them.
And it bears repeating:- Be sure you took all the fasteners out.
 
Awesome ideas! Don't know where I'd be without this forum to help along the way.

Going to pick up some of those turnbuckles tonight on my way home! I'll report back later this evening with the results. To confirm, the turnbuckle should be 5 1/2" when fully retracted?

Definitely have all the bolts out, if you go back a page you'll see my little bolt holding unit which has all the fasteners and their corresponding numbers. Definitely ready to split, just being a PITA lol.

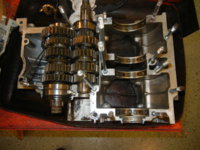
And while I've got a few people here I may as well ask...once these cases halves come apart, anything I should beware of? The engine will be upside down, so I'll be lifting the bottom off of the top, crank will (supposedly) remain in the "top" section, but I'm just worried that I'll remove the cases and find a whole mess of crap all strewn about. I've never done this before, so I don't want to disturb anything before I can take pictures of it. Fingers crossed I don't mess anything up, but hopefully it will go smoothly and I can see what's going on inside.

I'll take detailed photos of the crank and all other components as well, hopefully you gurus can guide my next step from there as I'm not exactly certain what the crank "should" look like. I just know that HHB articles scare me into thinking it's going to eventually explode haha.
 
Yes upside down lift off the bottom is the correct way to split them. I had the LH crankshaft seal stick a bit as the only "splitting issue" a light rap on the side of the seal with a dowel released it from the yamabond.

s'more pics;

DSCN4600.JPG

DSCN4599.JPG

DSCN4601.JPG

DSCN4602.JPG
 
Great pics Gary! Thanks for sharing these.

What are those splitting tools you've got there? I was thinking the turnbuckle was perfect and also cost effective, but those look a bit easier to work with.

With the turnbuckle though, do you just twist that bar in the middle to expand it? Or do I need something to keep the ends from turning with it?
 
I have couple of ideas on this and need to make a trip to town, check back before you leave work. Those are strut spring compressors. I re-arranged the parts so one is now a spreader.
 
You're going to find one little gear in there rolling around loose because you removed the starter cross shaft. You usually don't pull that shaft out unless you plan on going kick only, and even then you wait until the cases are split. The shaft and it's couple gears don't have to come out, they can be left in place. If you remove them, the electric starter can't be re-installed without splitting the cases again.
 
Back
Top