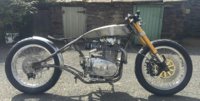
-
Enjoy XS650.com? Consider making a donation to help support the site.
XS650.com receives a small share of sales from some links on this page, but direct donations have a much greater impact on keeping this site going.
You are using an out of date browser. It may not display this or other websites correctly.
You should upgrade or use an alternative browser.
You should upgrade or use an alternative browser.
UK Board Tracker Build Thread
- Thread starter Paulrxs650
- Start date
Paulrxs650
XS650 Enthusiast
Hi 2M. Thank you so much for taking the time to do that. Very kind. Now I'm thrown back into contemplation on how to address that rear mudguard 
Last edited:
Johnt3
Still learning...
Sweeeeeet! Bike is looking awesome man.
Airwolfie
XS650 Guru
Looking ace Paul!
Is it going to be ready for the show?! Seems you got a lot still to do!
Is it going to be ready for the show?! Seems you got a lot still to do!
Paulrxs650
XS650 Enthusiast
Thanks guys! It is a canny rake - I'll see what I think when it's finished as the headstock is still tacked, in case I want to change the angle. I think it should handle ok 
I'm not sure if it'll be ready. I reckon at least another month yet then paint, chrome etc
I'm not sure if it'll be ready. I reckon at least another month yet then paint, chrome etc
ROYSTON
XS650 Enthusiast
I think you've got the rake spot b******
Paulrxs650
XS650 Enthusiast
Yep, at the moment, I see no real reason to alter it. Using this Bank Holiday to get some time on the build. Going to get the petcock fitted, the access cover for the electronics compartment fitted and the tank lined too - hopefully 
Paulrxs650
XS650 Enthusiast
So, today I got the tank lined with Caswell GT1750, which is fairly straight forward - just keep rotating the tank 
I fitted the petcock, just drilled the holes for the on and reserve tubes and another two drilled and tapped to M6 for the two securing bolts.
I also machined a 6mm polypropylene sheet for the electronics compartment cover and machined a section out to provide a little extra clearance for the coil.


I fitted the petcock, just drilled the holes for the on and reserve tubes and another two drilled and tapped to M6 for the two securing bolts.
I also machined a 6mm polypropylene sheet for the electronics compartment cover and machined a section out to provide a little extra clearance for the coil.
Nice!
For your petcock's securing bolts, did you weld in any retaining nuts on the inside? Or is your tank's lining thick enough to hold those in do you think? Just wondering really...
For your petcock's securing bolts, did you weld in any retaining nuts on the inside? Or is your tank's lining thick enough to hold those in do you think? Just wondering really...
Paulrxs650
XS650 Enthusiast
Thanks, good question. The tank base is 4.5mm thick so there's plenty of meat to thread. Otherwise I'd have to have welded in mini bosses.
Gotcha...and now that you mention it, I recall seeing the pics of your tank, and noticed the bases being pretty thick. 
Paulrxs650
XS650 Enthusiast
Yeah, to be honest initially I thought they were a bit overkill but they've served their purpose on this part 
Paulrxs650
XS650 Enthusiast
A little more achieved today. After lining the tank, I cleaned out all the ports and rinsed the tank. I fitted the gps speedo into the aperture on the tank and a nice new temperature dipstick from Dogbunny.


I also received the new see through tapper covers today from Evan at Speakeasy. Very funky


I managed to also get the ignition switch, three way headlight switch and horn button fitted to the underside of the tank, along with the fuel pipe connections to the carb


I also received the new see through tapper covers today from Evan at Speakeasy. Very funky
I managed to also get the ignition switch, three way headlight switch and horn button fitted to the underside of the tank, along with the fuel pipe connections to the carb
Johnt3
Still learning...
Dang, You've been a busy man Paul! I like those tappet covers. Looking good my friend.
Paulrxs650
XS650 Enthusiast
Thanks John! Yeah I do like the tappet covers. We're getting there 
scabber
XS650 Guru
No problem seeing if your getting oil to the valves. Like the placement of speedometer and switches top shelf. Any thoughts of paint colors.
Paulrxs650
XS650 Enthusiast
Thanks Scabber! I really need to sort the colour scheme out  . All suggestions welcome!
I keep loving the direction you're going in. Very cool. I'm surprised you didn't use brass fittings for the fuel line though...seems more appropriate vs. plastic...but what do I know? 
Keep it up!
Keep it up!
Paulrxs650
XS650 Enthusiast
Thanks Brassneck! Really appreciate the comments! I'm being very anal on weight, so I opted for the plastic connectors 


