Anyone interested in a thead about my first time?

Rogue21

XS650 Addict
Messages
227
Reaction score
1
Points
16
Location
Western Wisconsin
I bought a run down, broken, and neglected 1978 XS about 2 years ago (unfortunately I lost the pictures from when I bought it) with the hopes of turning it into a bobber. I've been doing a lot of reading and a little commenting on this forum for a while I have been working. First off- Thank you to every one on here posting information and pictures. This place has been a great resource. Secondly- I am going to try to keep all my info and pictures relatively condensed, but am very much open to opinions, suggestions, questions, and discussion!

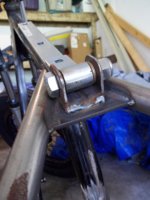
Let me just get this out in the open and say this is a hart tail build. I know there are opinions about cutting up these older bikes, and trust me, I am all in favor of keeping something original or classic, but I purposely bought a bike that was beat up and missing parts because I knew I wouldn't be restoring it to original condition.

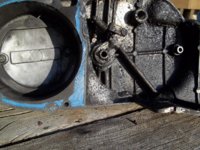
Here are some pictures of the tear down. I had the top end of the engine soda blasted and am in the process of painting and rebuilding. I know that the last picture everything is assembled backwards, please dont make fun of me, I was just excited it was clean!
 

Attachments

  • 0502112159.jpg
    0502112159.jpg
    136 KB · Views: 245
  • 0720112023.jpg
    0720112023.jpg
    125.1 KB · Views: 215
  • 101_0047.jpg
    101_0047.jpg
    266.7 KB · Views: 200
  • 101_0048.jpg
    101_0048.jpg
    304.4 KB · Views: 245
  • 101_0069.jpg
    101_0069.jpg
    181.2 KB · Views: 224
The frame has a G&L Hardtail. I went from the mag wheels to spokes, had the rims sandblasted and powder coated flat black, and replaced all bearings. I have a thing for bikes that have tires with aggressive tread so I went with the Firestone tires. Right now I have the rear fender set and am starting with painting the bottom end of the engine a flat black.

I also have half of my solo seat mocked up. Its basically made from a hinge from a gate and I welded together a mount to attach to the frame. It has a pretty big bolt on the mount, but I kind of like the industrial/mechanical appeal it has. The last picture is the what the inside of my case looked like by my drive chain sprocket...now imagine that all across the bottom of the engine!
 

Attachments

  • 101_0125.jpg
    101_0125.jpg
    265.7 KB · Views: 247
  • 101_0123.jpg
    101_0123.jpg
    307.3 KB · Views: 229
  • 101_0063.jpg
    101_0063.jpg
    190.8 KB · Views: 192
  • 101_0030.jpg
    101_0030.jpg
    167.8 KB · Views: 198
  • 101_0028.jpg
    101_0028.jpg
    294.5 KB · Views: 177
  • 101_0136.jpg
    101_0136.jpg
    312.8 KB · Views: 222
  • 101_0139.jpg
    101_0139.jpg
    221.3 KB · Views: 211
  • 101_0142.jpg
    101_0142.jpg
    194.7 KB · Views: 229
  • 101_0141.jpg
    101_0141.jpg
    175.9 KB · Views: 231
  • 101_0117.jpg
    101_0117.jpg
    149.9 KB · Views: 206
Rogue21, head questions.
Did you do the grinding on the intake tracks?
And are you planning on cleaning the up the exhaust chambers?
 

Attachments

  • Rogue head.jpg
    Rogue head.jpg
    276.1 KB · Views: 238
Are you happy with the G&L tail?
I really like the hard tail. It has great build quality and everything. The only problem is some people are having trouble with G&L because they are really backed up on work. It took me about 6 months to get the tail, and I know some members here have been waiting over 2 years for projects from the shop.


Rogue21, head questions.
Did you do the grinding on the intake tracks?
And are you planning on cleaning the up the exhaust chambers?
I did not do any grinding anywhere on the engine, however, the previous owner may have done something ridiculous and I am not trusting anything I was told. One piston had a nice gash right on the rim and a chunk of metal was missing. That piston sleeve was scored up and down. I had a machine shop bore out each side and bought oversized pistons and rings. I have no idea where those 'grind marks' came from. Do you think this will cause problems for my engine? I was hoping to clean up the chambers as much as possible before reassembly.
 
I really like the hard tail. It has great build quality and everything. The only problem is some people are having trouble with G&L because they are really backed up on work. It took me about 6 months to get the tail, and I know some members here have been waiting over 2 years for projects from the shop.

6 Months... not to mention 2 Years..... Then its time for Plan B to take effect.... Find another tail shop or make your own. Good to hear buisiness is good and they are keeping busy though. Nothing better than a custom shop making enough to tick over.

:thumbsup:
 
Last edited:
Rogue21, head questions.
Did you do the grinding on the intake tracks?
And are you planning on cleaning the up the exhaust chambers?

Sounds like you know more than me about porting the XS head.... do you know where to find some credible literature on the subject. :D
 
Sounds like you know more than me about porting the XS head.... do you know where to find some credible literature on the subject. :D

Lester you can start here. Rogue you may want to also.
Then read everything you can find by Jack and 5twins on this site, the old 650rider site and the garage. It will make your FIRST time easier.:laugh:
I just find it interesing that several heads seem to have the intake touched up.
But not the exhaust. And there are some mountians in the exhaust.
http://www.xs650.com/forum/showthread.php?t=5833&highlight=port+polish

Thanks,
on the subject of Exhaus ports I have notice the mention of exhaust port inserts... sandwiched i between the head and the exhaust pipe... supposed to help bottom end power.... (witch in my opinion it needs....LOL). Any try this?
Sorry for the high jack.... not my intent. :eek:
 
Thanks for the link, Weekendrider! After you mentioned the grinding, I started searching for more info to read up on.

Thanks,
on the subject of Exhaus ports I have notice the mention of exhaust port inserts... sandwiched i between the head and the exhaust pipe... supposed to help bottom end power.... (witch in my opinion it needs....LOL). Any try this?
Sorry for the high jack.... not my intent. :eek:

No worries, I don't consider that a high jack because I'm just as interested in it too. I still have a lot to learn so which ever direction the thread goes is good by me!
 
Just posting a little teaser on how the build is coming along. I finished rebuilding the engine today and put it in the frame. I still need to put on the ignition/ATU. I have to clean up the backer plates but I am missing the side covers. I also have to locate my front engine mount. There's still a lot of work to.
 

Attachments

  • 101_0149.jpg
    101_0149.jpg
    228.1 KB · Views: 251
Just posting a little teaser on how the build is coming along. I finished rebuilding the engine today and put it in the frame. I still need to put on the ignition/ATU. I have to clean up the backer plates but I am missing the side covers. I also have to locate my front engine mount. There's still a lot of work to.

Hey man you stole all my good ideas straight out of my head... how did you do that ? ? ? ....LOL :laugh:
Its looking real nice, I like how you have placed your rear brake stay, nice and hidden.... that ugly thing.

Could you tease us some more.... the weekend is comming up and everything... :D

Rogue, what did you end up doing with the engine.... porting, exhaust inserts any other high performance goodies????

keep up the good work!

Lester
 
We just have good taste in motorcycles, Lester! I wish I could take credit for all the design ideas, but I took inspiration from a lot of different builds and am trying to compile what I like from each.

The brake stay is slightly higher than the frame but follows it nicely and blends in well. Unfortunately, no performance upgrades on this build, but thats always an option for the next one! One of the pistons was gouged and the cylinder sleeve was scored up and down, plus the cam chain tensioner and guide were breaking apart and flooding the oil filters with plastic. That prompted the rebuild. I had a machine shop bore 2nd over on the cylinders and I installed new pistons and rings, etc.

I cleaned the heads and ports with a dremel and a wire brush attachment. I also lapped each of the valves and put in new seals. Everything cleaned up pretty good, but I forgot to snap some pictures. I also put new seals on the backer plates for the ignition and ATU. The old seals left a ring of rubber on the backer plates, almost as if the engine had overheated and melted the rubber....?:shrug: Maybe this is typical tho. I found that some Air Craft Remover (plus the dremel) made it easy to remove.

Everything is back together now, the cam chain tensioned, valves adjusted, and carbs were rebuild and larger jets added on. Tomorrow I will be picking up spark plugs for the first test start. (Tho I only have some rusty stock headers that I will have to make work for a test fire) I am moving this weekend and school starts early next week so I'm not sure how the progress will be from here on out, but will just try to keep moving forward.
 

Attachments

  • 101_0105.jpg
    101_0105.jpg
    143.2 KB · Views: 175
  • 101_0106.jpg
    101_0106.jpg
    201.2 KB · Views: 159
We just have good taste in motorcycles, Lester! I wish I could take credit for all the design ideas, but I took inspiration from a lot of different builds and am trying to compile what I like from each.

The brake stay is slightly higher than the frame but follows it nicely and blends in well. Unfortunately, no performance upgrades on this build, but thats always an option for the next one! One of the pistons was gouged and the cylinder sleeve was scored up and down, plus the cam chain tensioner and guide were breaking apart and flooding the oil filters with plastic. That prompted the rebuild. I had a machine shop bore 2nd over on the cylinders and I installed new pistons and rings, etc.

I cleaned the heads and ports with a dremel and a wire brush attachment. I also lapped each of the valves and put in new seals. Everything cleaned up pretty good, but I forgot to snap some pictures. I also put new seals on the backer plates for the ignition and ATU. The old seals left a ring of rubber on the backer plates, almost as if the engine had overheated and melted the rubber....?:shrug: Maybe this is typical tho. I found that some Air Craft Remover (plus the dremel) made it easy to remove.

Everything is back together now, the cam chain tensioned, valves adjusted, and carbs were rebuild and larger jets added on. Tomorrow I will be picking up spark plugs for the first test start. (Tho I only have some rusty stock headers that I will have to make work for a test fire) I am moving this weekend and school starts early next week so I'm not sure how the progress will be from here on out, but will just try to keep moving forward.

Cheers mate,
I agree, we have real good taste and a real good forum to pick and choose from.
I have been systematically collecting pictures of spesific things I like about a bike and saving them in individual folders with apropriate names like: "brakes and wheels", "Bars and controls", "frame" and so on. For once in my life I am planing something... figured if I get it all planed out and do most of the big shopping soon I will be able to get the build done over the winter... gets pretty cold and dark up here.
Best of luck with school.... work hard it pays off later
:thumbsup:
 
Oh no, you didn't! That was a '78 reverse head Roberts Special! One of only three ever released to the public. Collectors have been looking for that 1 bike for years. You just chopped up a million dollar motorcycle!
 
Back
Top