Punkskalar
Hugh's HandBuilt
Ok, so this post is gonna be a little misleading. I'm not gonna teach you how to make a weld-in bung from a chunk of soap, or how to carve one out of an old fencepost. I am going to show you how to avoid the annoyance that is standard bungs.
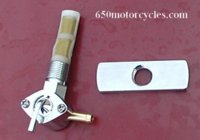
Most of us have bought bungs at some point or another. They are cheap, easy to use, and just make sense. But, I have found that most of the cheaper bungs on the market look like the ones pictured below.

There ins't much wrong with this style, they do the job. But, how many of us have played the "Put a bolt in the Bung, try to hold it in place, tack weld it, twist and tug on the bolt to line up the bung to exactly where we want it, break the tack weld while doing so, and then repeat the whole process" game?
No need to answer that one, I think that anyone who has used a bung like this, especially in a piece of tubing, has run into that problem. I can't think of how many times I have drilled too large of a hole and dropped a bung into the tubing or had to play the above game to get it lined up exactly where I want it. The other problem with most prefab bungs, is that they are larger than 1/2" OD, but how many of us own bigger drill bits? While working on a fuel tank mount this week, I decided to build a whole new style of bung. Here comes the DIY part
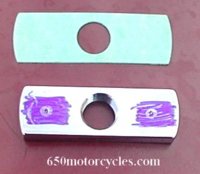
Since I was mounting a fuel tank, I was planning on a standard 5/16-18 thread. I cranked up the lathe, and made a few bungs just like pictured above. Then I decided to turn down the main section of the bung so that it could easily drop into a 1/2" OD holes (something I could drill with my standard drill set, and a hand held drill)

With this style bung, you CAN do it yourself with nothing more than a 1/2" Drill Bit, and a welder. Even if you don't own a welder, you can use some Silicon Bronze Filler (sold at most welding supply stores) and use a map gas torch.
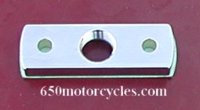
Here you can see that the bung drops into a 1/2" Hole just fine. The larger OD keeps it form dropping into the hole, and so long as you have drilled the hole in the right location, you won't need to twist, pull or pry the bung into the proper location.

Look ma, no hands!

Now you just need to weld it in. (Silicon Bronze filler was used on these, but you can MIG, TIG, MAPP and Silicon Bronze, Coathanger, whatever you are comfortable with)

I went ahead and finished out the front tank mount just the same.

Most people would probably like the bungs to sit lower on the frame, but for a tank mount, I like to keep some room under the tank. These give a nice 1/8" or so under the tank for wiring, zip ties, foam, etc... If that doesn't work for you, then once you have the "Do It Yourself" bungs installed, you can grind them down lower to the tube.
If you need a set of these bungs, feel free to PM me or check out my Blog. I'm hoping to keep doing more Tech How-To's and Tips for us here as well. Have something you want done or think needs a tech How-To?? Email me or contact me and I'll see if I can make it happen... I really think that the Tech on this site is amazing, and we need to keep it going.
Hugh
http://hughshandbuilt.blogspot.com/
Direct Link to Blog Post for more details - http://hughshandbuilt.blogspot.com/2011/01/fabricator-parts-do-it-yourself-bungs.html
Most of us have bought bungs at some point or another. They are cheap, easy to use, and just make sense. But, I have found that most of the cheaper bungs on the market look like the ones pictured below.
There ins't much wrong with this style, they do the job. But, how many of us have played the "Put a bolt in the Bung, try to hold it in place, tack weld it, twist and tug on the bolt to line up the bung to exactly where we want it, break the tack weld while doing so, and then repeat the whole process" game?
No need to answer that one, I think that anyone who has used a bung like this, especially in a piece of tubing, has run into that problem. I can't think of how many times I have drilled too large of a hole and dropped a bung into the tubing or had to play the above game to get it lined up exactly where I want it. The other problem with most prefab bungs, is that they are larger than 1/2" OD, but how many of us own bigger drill bits? While working on a fuel tank mount this week, I decided to build a whole new style of bung. Here comes the DIY part
Since I was mounting a fuel tank, I was planning on a standard 5/16-18 thread. I cranked up the lathe, and made a few bungs just like pictured above. Then I decided to turn down the main section of the bung so that it could easily drop into a 1/2" OD holes (something I could drill with my standard drill set, and a hand held drill)
With this style bung, you CAN do it yourself with nothing more than a 1/2" Drill Bit, and a welder. Even if you don't own a welder, you can use some Silicon Bronze Filler (sold at most welding supply stores) and use a map gas torch.
Here you can see that the bung drops into a 1/2" Hole just fine. The larger OD keeps it form dropping into the hole, and so long as you have drilled the hole in the right location, you won't need to twist, pull or pry the bung into the proper location.
Look ma, no hands!
Now you just need to weld it in. (Silicon Bronze filler was used on these, but you can MIG, TIG, MAPP and Silicon Bronze, Coathanger, whatever you are comfortable with)
I went ahead and finished out the front tank mount just the same.
Most people would probably like the bungs to sit lower on the frame, but for a tank mount, I like to keep some room under the tank. These give a nice 1/8" or so under the tank for wiring, zip ties, foam, etc... If that doesn't work for you, then once you have the "Do It Yourself" bungs installed, you can grind them down lower to the tube.
If you need a set of these bungs, feel free to PM me or check out my Blog. I'm hoping to keep doing more Tech How-To's and Tips for us here as well. Have something you want done or think needs a tech How-To?? Email me or contact me and I'll see if I can make it happen... I really think that the Tech on this site is amazing, and we need to keep it going.
Hugh
http://hughshandbuilt.blogspot.com/
Direct Link to Blog Post for more details - http://hughshandbuilt.blogspot.com/2011/01/fabricator-parts-do-it-yourself-bungs.html
Last edited:
 Great idea!