Appalachain Chopper Build Thread

electra_boogaloo

XS650 Enthusiast
Messages
59
Reaction score
87
Points
18
Location
Asheville
Bought my first xs650 a few days ago and so far it's been a hateful bitch. It's been sitting for a few years and it doesn't want to wake up. The previous owner cafe-d it and i'm not feeling it at all. I'm going to attempt to get everything all happy happy and get the wheels spinning, collect some parts, and start down the long road of making a chopper. The bike isn't in "survivor" condition. it needs a lot of reworking and dressing up, so i don't feel bad about hacking off the ass. I'm starting this thread as a personal journal to post where i am and where i've been.
My immediate plans are:
- get brakes functioning front and rear
- get a new gas tank and clean the carbs
- flip bars/replace bars
- check in on the clutch
- ditch the shit mufflers
- figure out how to charge the weird ass gel battery.
- ride it.

My long-term plans are (in no particular order):
- PMA kit / capacitor
- Ardcore Ardtail Kit
- maybe put speed-holes in the wheels. maybe change them for spokes.
- new rear fender
- some sort of sissy bar.
- definitely new cooler bars.

That being said, here's a pic of the bike as I received it.

6yGPGCE.jpg


This is my starting point. It will be fun to see where i wind up with this project.
 
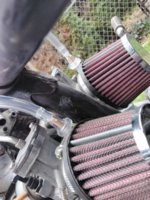
At first look it looks like some decent parts there that you can help re-coup some money for your chop build. You have drilled rotors all the way around, what looks like a HHB fork brace, that tank is somewhat desirable in the cafe world (possibly the seat too). It looks like those are PWK carbs. I have no experience with them but have not read good things. Others may chime in but you may want to consider finding a set of stock carbs to put back on it. And get rid of those pleated pods. They are notoriously bad for tuning. Get yourself some UNI foam filters. Changing out the carbs and filters may fix a lot of your running issues.
 
Thanks for the welcomes guys!
Willis, it's a stock brace that's been powder coated, the carbs are a kit from Mike's xs, the tank has been poorly repainted and the petcocks are shot and the brace on the bottom is messed up. I'm sure it's worth something though. I'll look into the foam filters. My running problem as of right now is I can't put gas in the tank because of the leaky petcocks.
Bigfeet, I've met high before. Good guy. I plan on giving him a lot of money.
JimD54, I will make sure to add as many pics and processes as possible. I will also check out your build soon.
 
insignificant update. i've charged the battery somewhat, flipped the bars to their upright position so i don't have to reach as far, and removed the ugly megaphone slip ons that were touching literally everything on the bottom. I installed the tank and threw a little gas in. tried to start it for about 10 minutes but i found that there's no spark. PO installed a mikes xs coil (the one with two wires coming out of it). there's nothing at the plug cap. i don't know much about electrical stuff so i guess that's on my list of shit to learn this weekend.

I have also noticed a significant fraying in the clutch cable so that will be added to the list. the clutch plates were very sticky but i managed to loosen them up with some gentle rocking and cursing. clutch pull seems extremely heavy. not sure if that's a characteristic of the bike or something wrong. I need to find a manual.

on the plus side, the front brakes magically fixed themselves. i only had a tiny amount of bite at the very end of the lever travel when i started on it. must've knocked something loose when i was flipping the bars because the reservoir went from full to 1/3 full. That would've been EXTREMELY useful to have front brakes when i unloaded the thing off my truck, but i'll take what i can get.

on another high note, i've settled on a high tunnel wassell tank from tc bros. haven't decided on how i'm going to plumb the fuel yet as it has a 3/8" and two 1/4" petcocks. i think running the two 1/4" in the rear would look pretty cool as i have the mikes xs carbs on it.

That's all for today. Will check in with significant news as it happens.

all hail the mighty xs.
 
I'll point you to a manual if you'll tell us what year XS you have. You might also want to add that info to your "signature" so's we don't always pester you for it.;)
 
on the plus side, the front brakes magically fixed themselves. i only had a tiny amount of bite at the very end of the lever travel when i started on it. must've knocked something loose when i was flipping the bars because the reservoir went from full to 1/3 full.
I'd strongly suggest you investigate that further... at minimum a good flush. It could just as easily magically "un-fix" itself.... and probably at a time when you need them most.
 
Here's a manual that covers 78 thru 80. Looks like your bike falls into those years...
 

Attachments

  • XS650.pdf
    6.5 MB · Views: 453
Thanks Jim, it is a 1980. i'm not sure what exact sub model though. and i do plan on flushing the front and rear again to make sure everything is good.
 
Welcome aboard.
Looks like it's a stock TCI ignition (no wire out of RH cam cover), TCI and bike looks like it's been welded on, is often a BIG problem. theres about a bazillion threads on troubleshooting TCI
 
Raining early today. Couldn't get much done. Went to watch black panther. Pretty good movie. By the time I got home everything is dried out. I did some multimeter testing. I'm still not sure about the coil, the magnets from the alternator were dead matched with each other. I do some searching to try and find where the PO put the ignition unit. Found it under the battery tray. Pooped off the cover and found this...
IMG_20180225_171917.jpg


Okay, so I'm not an electrical savant, but this looks like that there cap has blown it's load all over the board. I'm pretty sure it took all those other components out with it. This could by why I'm getting no spark. Anyone care to weigh in or help me find a good one?
 
Have a read through this thread. You'll see that in some pics, the boards have the same stuff on em'. I've seen that tan(ish) stuff on perfectly good elec. boards before. Not sure what it is, but it's not necessarily bad. Check Out that thread and see if it helps.
 
Good eye! as soon as i saw to goop i just considered it shot. i took a look at that thread and the first pic he has had the same goop coming from the same cap. weird. theoretically that should be fixable.
 
Checked the board with a flashlight today, the zener diode that looks burned in the picture is actually fine. It just had a build up of the waxy substance on it that makes it look burned in the photo. The solder on the rear looks very good too. I ordered a new coil just to see if that helps. I've also lost my starter so I'm not sure what's going on there. Battery still charged. If the new coil doesn't give me any spark I may start on a complete rewiring since the PO left me a rats nest. Will update when I get the new coil.
 
Done something productive today. Pulled off my old broken and gross filters and fuel lines and put on new filters with cool clear fuel line. Then I charged my battery for a while and poked around in the wiring for a minute.
IMG_20180310_165421.jpg
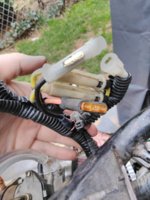
I finally found my fuse box...
IMG_20180310_163005.jpg
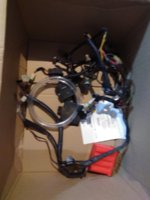
Only the open one had a blown 10a fuse. Sigh. Then I had a brown out and cut a million zip ties and pulled the entire harness and put it in a big box.
IMG_20180310_182320.jpg
So now I will be making my own harness to put back in. There was a one plastic connector that had melted or broken goin to the regulator and I will need to replace it. Any where I can find an appropriate plug to replace it with? On the plus side I got a cool new toolbox with a work surface so I have plenty of room to work on the new harness. The picture of the toolbox left my phone for some reason. But it's a nice husky wood top.

As per last post, I did get a new coil and it didn't fix my no spark problem. Hopefully the new harness will fix all my woes.

Will update again after progress is made. Peace all.
 
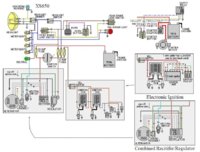
This is the diagram i will be following. I recognize most of the parts but there are a couple of spots that have me stumped. I have circled them in green. one is labeled "PWR OUTLET" and the other is just a rectangle with two wires ending there but no label. can anyone help me out with these two?

i'm also assuming that a starter button would be along the red/white wire labeled "START," is this correct?

xs650 simplified wiring diagram question.jpg
 
Last edited:
Ok, Lets start by saying, "Welcome to our little slice of the XS650 life."
In that diagram the "Power Outlet" is just that, A place to plug in stuff, like a cell phone charger.
The box down by the alternator is the brushes for the alternator. The brushes carry the current to magnetize the rotor. This magnetism is what creates the current flow to charge the battery.
On the starter the key switch is the start button. Like in a car you turn the key one position to on, then turn to the next positon to crank the starter. The key springs back to on when you release it.
Not the way I would do it but it works.
I like this diagram, It shows a basic points igition with the seperate reg a rec. It has the later TCI and combo reg/rec of the later models. just swap the boxes somatch what you have.
The starter is up in the upper right corner.
On charging your battery use a small battery charger. If buying one new they often have a mororcycle on the box. Max current should be 1.5 amp.
Use of a car charger with it's much higher charge rate will cook a small battery.
There are many out there I like the Schumacher SEM-1562 It sells at most anyplace that sells batteries. They probaly sell for arou d $40-$45 now.
Battery Tender is another popular brand. There are many cheaper ones but are not realy reccomended. The charge rate may be ok but te charge voltage can go very high. Ok, if you monitor as you charge to insure the voltage won't go high.
On your failure to get spark, the TCI box needs a good 12.5 or better volts on the red/white wire. The coil has the same needs on the red/white wire. Much less and the TCI can't function.
There are a set of pick ups on the altenator stator. These pick ups sense the passage of a magnet in the rotor. These magnets get weak over time and the pick ups can't read them well. The strength of the rotors magnetic feild can over power the magnet. Unplugging the re/rec disables the current flow through the rotor.
Dooing this lets the pick ups read the magnet better. If you do, this then get spark. You need to add a stronger magnet to the rotor. This isn't hard to do. Radio Shack was the go to place for magnets but not so much anymore.
You can find them on Ebay, A small round magnet about 3/16 inch in diameter by about 1/16 inch thick. I like JB Weld. Just mix up a small dab and glue the new magnet right on top of the old one.
If you can't get the stock TCI working then there are good aftermarket options out there. Our Own Pamcopete designed the Pamco and it's a good one.
I wouldn't do too much more to the bike untill I heard it run. At this point I would get it together enough to ride and ride it around to figure out what if any running issues crop up. You might find other issues to fix as well. Such as charging issues.
Leo
 

Attachments

  • 314w9s3.jpg
    314w9s3.jpg
    135.4 KB · Views: 328
Back
Top