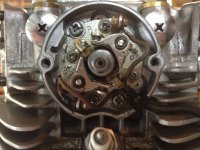
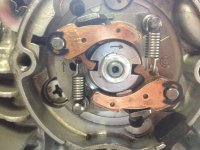
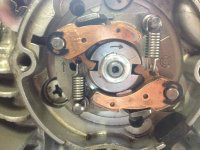
No, you were correct when you said you thought it would be OK. As you spin the motor to start it, the drag (from the points) will pull the advance into the full retard position.... even if the springs didn't pull it all the way. That's a good thing.Are you thinking this is a potential problem?
-
Enjoy XS650.com? Consider making a donation to help support the site.
XS650.com receives a small share of sales from some links on this page, but direct donations have a much greater impact on keeping this site going.
You are using an out of date browser. It may not display this or other websites correctly.
You should upgrade or use an alternative browser.
You should upgrade or use an alternative browser.
Mailman’s XS2 a full on restoration
- Thread starter Mailman
- Start date
Ok thanks, whew! 
I am working on the points/advance as well. New O rings and gaskets behind the plates, ( I left the cam seals until I can see if they leak, easy enough to replace then). Rod cleaned and greased,(no offence), weights, pivot posts and points cam cam cleaned, polished and lubed. New springs, shims and e clips, (Mikes). Put it all back together and it doesn't quite "snap" but I'm staying confident. As usual, Bob, I follow your lead with avid interest. You ask the right questions, take the illustrating photos and the experts on this forum respond with more detail than I can understand half the time.
Am about to try setting the points - off to the tech section. Don't know duckshit about this stuff!!!


Am about to try setting the points - off to the tech section. Don't know duckshit about this stuff!!!


Attachments
I am working on the points/advance as well. New O rings and gaskets behind the plates, ( I left the cam seals until I can see if they leak, easy enough to replace then). Rod cleaned and greased,(no offence), weights, pivot posts and points cam cam cleaned, polished and lubed. New springs, shims and e clips, (Mikes). Put it all back together and it doesn't quite "snap" but I'm staying confident. As usual, Bob, I follow your lead with avid interest. You ask the right questions, take the illustrating photos and the experts on this forum respond with more detail than I can understand half the time.
Am about to try setting the points - off to the tech section. Don't know duckshit about this stuff!!!
View attachment 129944 View attachment 129945
Atta Boy David! We’ll master this antiquated ignition together!
What you mean, we...... Kemo Sabe?
What you mean, we...... Kemo Sabe?
 Hi ho silver.....
Looks good, guyz.
In addition to lubing the flyweight posts, you'll want to pack the slotted disc notches with a heavy MoS2 (Molybdenum DiSulphide) grease. MoS2 has a high impact tolerance, and will cushion the jackhammering on the flyweight ears.

The angular velocity of the camshaft isn't constant, and has jitter. Not only from actuating the valves, but due to the crank's speedup/slowdown (energy interchange with reciprocating pistons). This jittery action bangs the flyweight ears inside the disc notches, and if left neglected, will wear them down, as in this severe example:

In addition to lubing the flyweight posts, you'll want to pack the slotted disc notches with a heavy MoS2 (Molybdenum DiSulphide) grease. MoS2 has a high impact tolerance, and will cushion the jackhammering on the flyweight ears.
The angular velocity of the camshaft isn't constant, and has jitter. Not only from actuating the valves, but due to the crank's speedup/slowdown (energy interchange with reciprocating pistons). This jittery action bangs the flyweight ears inside the disc notches, and if left neglected, will wear them down, as in this severe example:
I've got Moly Grease EP 3%. I assume that's the same. I'll push it into the slots with a small flat head screwy. Hell, I have never started the old girl but it sounds like the vibration will effect my prostrate.
Thanks 2M.
Thanks 2M.
What a beauty. As happy as I am with mine, I can say with confidence that I’m a bit jealous of your new project! Yours already runs, and looks to have a few more shiny pieces than mine, nevertheless. I’m sure there’s time to be spent on it. Super cool bike!Hello my friends,
I’m sure many of you now know I am the proud new owner of a 1971 XS2. I have long admired the classic red and white XS2, in fact it was the first Yamaha 650 I ever recall seeing. A friend of mine in high school had a Suzuki dual sport 185, he traded it in and one day he pulls into the high school parking lot on a shiny new red and white XS2, I absolutely loved the way that bike looked and sounded. It’s totally different from my ‘77.
So without further ado, here is the background story of my new bike.
I constantly search Craigslist for interesting old bikes, especially XS650’s . A couple of weeks ago, not one but two XS2’s show up for sale near me. The one I bought was located at a business, an auto wrecker / junk yard to be precise. The owner/ proprietor of the wrecking yard had only owned it a few months, he’s not a bike guy, could care less in fact. He had no emotional attachment to it, he bought it at an auction. He said he thought it came from an estate sale. We walked out back to an open air shed to go see it. Here you are seeing it for the first time with me.
I told him to shut it off. This bike sat for 32 years. After winning the bike at auction he had to go pick the bike up in the town of Yarnell, a small sleepy little town about 70 miles from Phoenix. He said it was crammed into a back corner of a garage and so covered with dirt he couldn’t even tell what color it was!
He wanted to have it start and run so he could sell it, so he took the carbs apart , cleaned them, replaced the gaskets, replaced the petcocks. Flushed the gas tank ( more in that later!) and added a couple of fuel filters. He did none of the rituals that a caring owner would do when trying to awaken a sleeping beauty. He did it quick and dirty, I’m truly impressed it would run at all, but I was concerned he might do more harm than good so I told him shut it down.
The bike is going to be a lot of work, but it looked worth saving, so we struck a deal.
Two hours later it was being picked up by a motorcycle towing service, by 4:00 pm it was in my garage.
View attachment 114373 View attachment 114374 View attachment 114375 View attachment 114376 View attachment 114377 View attachment 114378 View attachment 114379 View attachment 114380
Manufactured in November of 1971, I had just turned fifteen. It still has the 46 year old sticker from the dealership that sold it.
View attachment 114381
So, I am super stoked to begin this project, what I have in mind, primarily , is preserving this old girl. It has lived in the desert it’s whole life, zero corrosion, but every peice of rubber and plastic is dry rotted and cracked.
I want to make it mechanically sound and rideable and really clean and polish her up,
but I’d really like to save the original paint if possible. It photographs better than it looks in person up close, but one thing I have plenty of is time and elbow grease.
So there you are, you know as much as I do at this point, I hope you’ll join me and God knows I need to be pointed in the right direction now and again. I think it’s going to be a lot of fun.
Until next time
Bob
Next up: An inititial inspection ( photo intensive!)
What a beauty. As happy as I am with mine, I can say with confidence that I’m a bit jealous of your new project! Yours already runs, and looks to have a few more shiny pieces than mine, nevertheless. I’m sure there’s time to be spent on it. Super cool bike!
Thanks!
With my bike in a hundred pieces, it’s sometimes hard to see the light at the end of the tunnel. But hey, I wanted a hobby!
Indeed, but hey, I'm sure you'll agree there are far worse things we could be spending our time and money on, lol.
Oh yeah!
Truth is, go back about a year or so and I was pretty much finished working on My 60th birthday present and I had started sniffing around the Triumph dealership. I think my wife was aware I had new bike fever. She very wisely realized I needed a hobby and suggested that I buy another bike to restore.
You gotta love a woman like that. That’s why I married her!
Last edited:
“ Private Mailman! Do you plan on finishing this build sometime this century!!? “
“ Yes Drill Seargent! I’m doing my best!”
“ Save your best for your mama!! You make me sick you maggot!! “

A little update then,
The motor is all together. There are still things to be done, set cam chain tension, fill with oil, set the points, adjust the valves , install the plugs and finish torquing the head. Having said that, these can wait until the motor is back in the frame and I have a rolling chassis.
Which brings me to what I’m up to now. I need to get my frame ready to put the motor in. I intend to sand , clean up some of the welds and paint the frame. I’ve already cleaned the frame with engine degreaser and water.
So to get started today, the first thing I did was to knock out the races from the old ball bearings. I already have new tapered bearings ready to go in.


But then I noticed something that looked odd to me. It looks like someone took a hammer and went all around the top of the steering head neck, to do what? Tighten that upper race in the head? It wasn’t exactly hard to knock out, but it didn’t feel loose either.


Here’s an image from when I was tearing the frame down and you can kinda see some of the battery acid / rust issues I had on my lower frame.

I’m removing all that rust and corrosion and hand , wet sanding the whole frame. It’s slow going. I know I could’ve just used stripper , but I don’t really want to remove all the old paint, just smooth out any chips or damage and scuff up the rest. Then clean, clean, clean, probably the most important part of the whole job.

I also removed about 3 pounds of dingle berries ( welding spatter to you civilians ) , and then worked on smoothing the welds somewhat, I didn’t get crazy with it, even though the OCD was pulling hard on me. That little voice in the back of my head kept saying, “ Did you see what Jim did to his frame?”
I’ll be working on this for a while. Hey by the way, just a brief product evaluation. Harbor Frieght wet sand paper SUCKS! I bought a couple packs the last time I was there because the price was low, but it just falls apart as soon as it gets wet.
Looking ahead, after I get my frame done, I need to finish assembly of my forks, get my swing arm installed ( the swingarm bushings have already been changed ) and get my shocks back on, install the front end, throw the wheels back on and I can have a rolling chassis again.
So, I have a plan and I am doing my best to make progress.
“Your best ain’t good enough maggot!! “

Sorry, Sarge.....
Till next time, Bob
“ Yes Drill Seargent! I’m doing my best!”
“ Save your best for your mama!! You make me sick you maggot!! “
A little update then,
The motor is all together. There are still things to be done, set cam chain tension, fill with oil, set the points, adjust the valves , install the plugs and finish torquing the head. Having said that, these can wait until the motor is back in the frame and I have a rolling chassis.
Which brings me to what I’m up to now. I need to get my frame ready to put the motor in. I intend to sand , clean up some of the welds and paint the frame. I’ve already cleaned the frame with engine degreaser and water.
So to get started today, the first thing I did was to knock out the races from the old ball bearings. I already have new tapered bearings ready to go in.
But then I noticed something that looked odd to me. It looks like someone took a hammer and went all around the top of the steering head neck, to do what? Tighten that upper race in the head? It wasn’t exactly hard to knock out, but it didn’t feel loose either.
Here’s an image from when I was tearing the frame down and you can kinda see some of the battery acid / rust issues I had on my lower frame.
I’m removing all that rust and corrosion and hand , wet sanding the whole frame. It’s slow going. I know I could’ve just used stripper , but I don’t really want to remove all the old paint, just smooth out any chips or damage and scuff up the rest. Then clean, clean, clean, probably the most important part of the whole job.
I also removed about 3 pounds of dingle berries ( welding spatter to you civilians ) , and then worked on smoothing the welds somewhat, I didn’t get crazy with it, even though the OCD was pulling hard on me. That little voice in the back of my head kept saying, “ Did you see what Jim did to his frame?”
I’ll be working on this for a while. Hey by the way, just a brief product evaluation. Harbor Frieght wet sand paper SUCKS! I bought a couple packs the last time I was there because the price was low, but it just falls apart as soon as it gets wet.
Looking ahead, after I get my frame done, I need to finish assembly of my forks, get my swing arm installed ( the swingarm bushings have already been changed ) and get my shocks back on, install the front end, throw the wheels back on and I can have a rolling chassis again.
So, I have a plan and I am doing my best to make progress.
“Your best ain’t good enough maggot!! “
Sorry, Sarge.....
Till next time, Bob
...But then I noticed something that looked odd to me. It looks like someone took a hammer and went all around the top of the steering head neck, to do what? Tighten that upper race in the head? It wasn’t exactly hard to knock out, but it didn’t feel loose either...
There have been some members reporting loose bearing shell fits, but you've already said that it doesn't seem loose.
A history of loose stem adjustments, with severe neglect, could allow the top triple to rattle about, and the protective cup atop the upper steering bearings could have been banging on the upper neck...
Well that’s an interesting thought. That’s kinda my impression , that someone was trying to tighten things up. It didn’t seem loose, but it sure wasn’t hard to knock out either.
As far as I'm concerned, 3M paper is the only way to go.Hey by the way, just a brief product evaluation. Harbor Frieght wet sand paper SUCKS! I bought a couple packs the last time I was there because the price was low, but it just falls apart as soon as it gets wet.
Some center punch marks inside that neck would tighten it up, while bracing the neck (something to hit against).
Scott
Scott
Keep those old races and sand the sides down just enough so it slides in and out of the neck with ease and use them to install the new tapered bearings. Put the new bearings in the freezer for a few hours to make installation easy. But you probably already know this.
Keep those old races and sand the sides down just enough so it slides in and out of the neck with ease and use them to install the new tapered bearings. Put the new bearings in the freezer for a few hours to make installation easy. But you probably already know this.
Oh yeah, I saved them! Keep everything until you’re sure you don’t need it. Freezing helps for sure.

