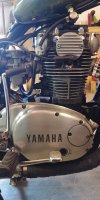
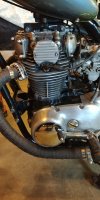
What have you done to your XS today?

Put on my Banggood braided brake line, what an amazing deal. I bought a similar hose for my Norton, $130. Banggood, $9. Does make the caliper and spokes look ratty, though...
Not ratty that's patina.:)
They don't due much for the rim either.:p
Engine looks GREAT!
 
Hi,
A Fazer 600 oil filter is the correct size, part numbers:
K&N: 508774961
Champion: F047
Yamaha: 5DM-13440-00

For future reference!

I'm shocked. American Anodizing out of Fort Wayne, Indiana. They've been in business a very long time, have a great reputation. One of the few businesses that do small-batch jobs any more.

They were very apologetic, offered to remove all coatings, and return them free of charge.

I'd never heard of this "die cast doesn't take anodizing" before, and I've done a bunch of reading on it, as I had contemplated doing this myself.

Unsure of what I'm doing next. I didn't like how the gas cap or carb tops turned out with the gold spray paint. Maybe powder coat them all gold? Still undecided.

On to more positive things. I got my filter adapter plate from xs650shop.de and wanted to determine the correct filter for it before I installed it. I don't want to be stuck having to order from Europe every time I need one.

My initial guess was a Smart car. Man, I was right! 2018 Smart Fortwo 1.0 liter naturally aspirated. A Wix 57207, $15 shipped:

46244045002_c649e0503f_b.jpg
IMG_1576 by michael delage, on Flickr

These were filters that didn't fit well, but would work in a pinch (less than 2 turns engaged on threads, will hang down too low, etc)

46244043152_4f71750a4f_b.jpg
IMG_1560 by michael delage, on Flickr
 
Got my Brembo front mod done and is awesome. As it is stated a 12.7mm MC has a little more travel but alot resposives without that '''wooden' feeling. PITA to bleed took sometime but got it .Droped a disk and two heavy calipers and replaced with a super light Brembo and front end feels really great.
Torn into my shift shaft seal tonight and stuffed if i can find my replacement:umm::umm: i have never replaced it but...gone... This is my last leak...for now!!
New seal and some button head bolts for the carb top plates thanks to 5T on that tip again. Bolt shop right next door to seal shop 10 mins from home!
 

Attachments

  • 20181223_202235.jpg
    2.6 MB · Views: 195
  • 20181223_202249.jpg
    3.2 MB · Views: 205
Oh very nice and not a bad price too gggGary. I was going to drill but this looks super sexxxy!!
So with the spacer you mentioned will this be added to the one already fitted to this mod? It is the pandomonium kit i have.
haven't used one with the Brembo mod but with 7MM spacer it matches the stock rotor offset.
This shot is a spacer with a mikes rotor but it has the same offset.
brake rotors spacer poa 013.JPG

if the spacer is deeper than 7mm it needs to get a Z shaped centering flange a more complicated machining project.

This kit has been designed to be used with STOCK ROTORS we cannot guarantee it to work with other ROTORS..
 
Last edited:
haven't used one with the Brembo mod but with 7MM spacer it matches the stock rotor offset.
This shot is a spacer with a mikes rotor but it has the same offset.
View attachment 131895
if the spacer is deeper than 7mm it needs to get a Z shaped centering flange a more complicated machining project.
Awesome well it is mounted now but just used the depth gauge on my verniers and the spacer is 5mm. I might just have the room up to the fork housing.
5mm spacer
6.7mm current disk thickness
2.11 gap between forks
Kit came with 2 x .78mm spacer and 2 x 1.55mm spacers
So what is the of thickness of these rotors?
I might just get away with a small 2mm shim on the caliper without a whole new 7mm spacer.
Good news and i am on it!
Thanks gggGary and Merry Christmas!
20181223_214308.jpg
 
I made a cap for my gas cap. So a gas cap..cap lol. (Ghost Cap?) Goes right on, sort of "clips towards the bottom of the real cap. The other feature that hides the key is magnetically held on to the actual steel cap.

I could do much better if I had better tools & materials. I can make more if anyone is interested. Not this specific design, but I can work with you.
 

Attachments

  • bike cap steps.jpg
    bike cap steps.jpg
    283.5 KB · Views: 209
  • bike cap.jpg
    bike cap.jpg
    155.5 KB · Views: 191
20181224_205109.jpg
Christmas Eve Quick Fix.
I needed to check over and do a clean up of a set of BS34's for the '83. I did not separate them as I did not want to chase those little choke rod balls all over the work space, that may have been a false economy though, as it made the work harder and probably not as effective.
Second last machine screw going into the top of the carb would not tighten - stripped. The better fix would be to tap it one size bigger, but I found a nut and completed the job.
Before I install these, I will have to connect all the wiring in the headlight bucket and see how noisy is the starter. Then a compression test, etc. etc.
 
10D87A37-F64E-4CD0-BDCF-C650512BB790.jpeg
I recieved this hex head clutch spring retainer kit from amazon yesterday. Now I just have to wait until the Vessel impact screwdriver arrives and I’ll be all set to replace the clutch springs and trash stock screws. I got a 50.00 gift card for Mike’s from my sister so I’m a third on my way to new commando mufflers. Then “all I’ll have left” to do is the swingarm bushings, tapered neck bearings, and new shocks.
 
View attachment 131946 I recieved this hex head clutch spring retainer kit from amazon yesterday. Now I just have to wait until the Vessel impact screwdriver arrives and I’ll be all set to replace the clutch springs and trash stock screws. I got a 50.00 gift card for Mike’s from my sister so I’m a third on my way to new commando mufflers. Then “all I’ll have left” to do is the swingarm bushings, tapered neck bearings, and new shocks.

I’ve put that exact setup in two clutches now, it’s a really nice set up! You’re getting there!
 
If I’m lucky, I’ll be able to “finish” these updates with enough time to ride it a season before I have to take the jugs off for a top end job. The last oil change weilded metallic oil again, so I fear despite the perfect compression and tuning, that at some point the plastic wore completely off the cam chain guide and that’s where my metal is coming from. Since there’s no way to see it without taking it the jugs off, I don’t want to just keep pushing it and hoping for the best. Maybe next winter.
 
If I’m lucky, I’ll be able to “finish” these updates with enough time to ride it a season before I have to take the jugs off for a top end job. The last oil change weilded metallic oil again, so I fear despite the perfect compression and tuning, that at some point the plastic wore completely off the cam chain guide and that’s where my metal is coming from. Since there’s no way to see it without taking it the jugs off, I don’t want to just keep pushing it and hoping for the best. Maybe next winter.
Since winter is just starting you may want to consider looking into the metal problem now.
 
Since winter is just starting you may want to consider looking into the metal problem now.
The thing is I don’t have the resources, (Time, Money, OR workspace) to get into removing the jugs. The two oil changes prior to this one were totally clean. I DID however forget to check the sidecover filter, and I also had to use the starter a few times on the last oil, so it’s possible that some starter gear shavings got ground up in there. In any case, my options are- keep the bike and take it easy on her or don’t ride her next summer, and get into the jugs after I have found a new stable career and moved in with my girlfriend (tentatively future life partner), OR sell the bike this spring at a loss of about 1,000.00, and the lifelong regret of letting my first running bike; an absolute beauty and depandable gem of a bike at that, get away. I’ve already got a few of those heartaches under my belt, (78 Ford LTD and a ‘70 Fleetwood) so I’m shooting for the former.
 
Of course I realized I should have snapped a picture right after threading in the last case screw, but I succesfully replaced the clutch springs and screws with the new kit I had. That “vessel impacta” screwdriver was amazing! I stripped out one of the screws the first time I attempted to replace the clutch springs months ago with my regular american impact driver, and the vessel sunk down deep into the stripped “x” and turned the screw out on the third hit! Had the whole kit buttoned up within about 45 mins.
 
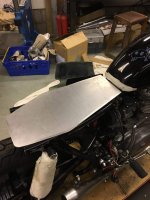
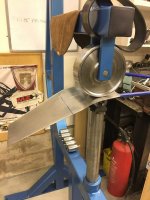
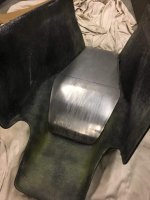
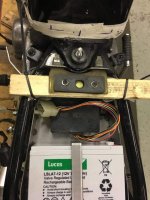
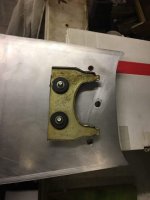
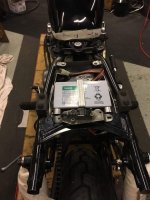
Attached a steel plate to the base of my new fibreglass seat, with the help of an English wheel.
The original front clip has been re-used and located at the front of the plate, and a Ducati has given up is seat latch at the rear. The Duke item was chosen because it stands off the frame, and does not require and cutting of the XS plate.
Riv-nuts were used on the plate to provide a neat way of attaching the latch.
It will use a simple cable pull to release the seat, rather than a lock/lever
received_643064856096154.jpeg
received_1009520502566117.jpeg
received_1143968352426520.jpeg
received_965309650330302.jpeg
received_274952483375410.jpeg
received_735068563534746.jpeg
 
Got to install these finned cam covers since getting them last winter. Scotchbright the fins and surround and left the bead blasted inner. I have 2 others for valve covers (3 hole) but cannot find the 4 hole cover. They are stamped made in Canada. Any idea who made these? Wonder when thry were made?
?20181230_113108.jpg 20181230_113318.jpg
 
Finally painted seat bottom and started the XS1, seems my leg doesn't kick through as well as in the past. The XS did start before I ran out of juice and then I went to start the King... alarm sounding... dead battery in the fob, don't need battery in sugar checker... King started... check engine lite on, aw crap. Time to drink a Dew and take a nap.
 
Back
Top