What have you done to your XS today?

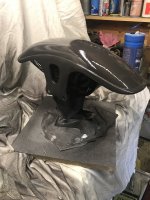
Just a shot of the shop when it's actually not completely cluttered. I'm putting another coat of bomb can on the tank. I just got my new Honda coil yesterday, so I'll be able to get that mounted up this weekend. I'd like to finalize tuning the point of being able to ride it one of these days...

2019010305174628-IMG_5730.jpg
 
Canadian Tire store had this base cabinet on sale last week. I think it is a strong sturdy item so will see if it withstands an engine build.
This motor is from my blue 77 (matching numbers fwiw). The first repair is to replace the kick start return spring anchor before going any further.
There is a thread here about doing it so that is my first read.
 

Attachments

  • 20190105_194506.jpg
    2 MB · Views: 197
Canadian Tire store had this base cabinet on sale last week. I think it is a strong sturdy item so will see if it withstands an engine build.
This motor is from my blue 77 (matching numbers fwiw). The first repair is to replace the kick start return spring anchor before going any further.
There is a thread here about doing it so that is my first read.

That looks like a nice set up. I like that it has a relatively small foot print and casters, so you can move it around and park it out of the way. The storage underneath is also a plus!
 
Took the bike to work and around town yesterday. Very frustrated that after the clutch springs and retainers the
Trans seems to be slipping more than it was before. It consistently slips at 5 grand in 4th and 5th now.
 
Bobbed my front mudguard, cut sections out of the front & rear and welded ends back on.
Cover in filler & spend hours sanding and shaping, followed by some high build primer
 

Attachments

  • B1B2881A-DF88-4DF0-A77E-6345EFB6CE80.jpeg
    B1B2881A-DF88-4DF0-A77E-6345EFB6CE80.jpeg
    182 KB · Views: 161
  • 3C77F079-AF3D-4D67-8997-7BC596EEAEE0.jpeg
    3C77F079-AF3D-4D67-8997-7BC596EEAEE0.jpeg
    220.7 KB · Views: 190
  • 48A520A3-F266-49FF-9AC3-9D9AF274FBAE.jpeg
    48A520A3-F266-49FF-9AC3-9D9AF274FBAE.jpeg
    206.8 KB · Views: 182
More on my kick start return spring post repair, wow there is not a lot of meat to drill into. For a moment thought about going magic button only. Too bad some active p o has removed the shaft #10 that connects the e start gears on the left side to the gears on the right side. My research says the cases need to be split to replace that and I was not planning to do that to this motor. The bike is otherwise a complete almost runner except for the non matching numbers motor. I need to reseal the front brakes and reinstall that nice tank, side panels, seat and exhaust and replace the clutch push rod seal.
I think it will stay a non matching numbers bike!
 

Attachments

  • SAM_0657-001.JPG
    SAM_0657-001.JPG
    266 KB · Views: 179
Last edited:
A piddling little early winter project, with big shoutout to Willis, whose avatar inspired me to try ventilating a generator cover like he did. Still a work in process - openings were done with drill and Dremel, then hand-filed to final size and edges radiused. My wife's stainless steel colander is nicely perforated with holes of suitable small diameter and just about the right diameter curve near its top edge to fit with only a little flattening. This is starting to come together! I'll get this piece polished and re-paint the letters before JB'ing the perforated stock on the backside. She doesn't use that colander much, anyway LOL.
 

Attachments

  • IMG_2810 (Edited).JPG
    IMG_2810 (Edited).JPG
    140.4 KB · Views: 153
A piddling little early winter project, with big shoutout to Willis, whose avatar inspired me to try ventilating a generator cover like he did. Still a work in process - openings were done with drill and Dremel, then hand-filed to final size and edges radiused. My wife's stainless steel colander is nicely perforated with holes of suitable small diameter and just about the right diameter curve near its top edge to fit with only a little flattening. This is starting to come together! I'll get this piece polished and re-paint the letters before JB'ing the perforated stock on the backside. She doesn't use that colander much, anyway LOL.

Very nice! We want to see the finished product! :thumbsup:
 
Very nice! We want to see the finished product! :thumbsup:
Next installment: cover polished up by Gordon Duda of Rochester Hills, MI, while I waited maybe 10 minutes at most, notwithstanding several shelves full of jobs ahead of my little one. Gordon, a motorcycle guy in earlier years, is a very skilled restorer of all manner of aluminum and stainless trim in our area of SE Michigan, much of it vehicular in origin. Upon further reflection, I'm getting a piece of stainless mesh for the "grill" pieces - it'll look better than perforated stock and not endanger my marriage - should be here in a couple days.
 

Attachments

  • IMG_2811 (Edited).JPG
    IMG_2811 (Edited).JPG
    181.3 KB · Views: 183
I made it this far, new adventure for me. Cleaning and scrubbing. Everything looks fine, new seals and learn how to put it back together.
 

Attachments

  • IMG_3001.JPG
    IMG_3001.JPG
    134.2 KB · Views: 134
  • IMG_3002.JPG
    IMG_3002.JPG
    131.7 KB · Views: 127
  • IMG_3003.JPG
    IMG_3003.JPG
    135.4 KB · Views: 165
Atta boy rsor! You got it in the run now! You’re smart for splitting the cases. I don’t know why but that’s where I drew my line and I never did it. If I have problems now, I’ll never hear the end of it! :lmao:

By the way, you managing to stay warm in your shop?
 
Back
Top