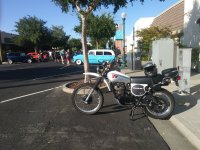
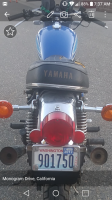
It's gettin there

Norton7d

XS650 Junkie
Messages
599
Reaction score
754
Points
93
Location
Sacramento
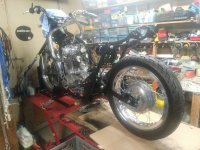
I figured considering the amount of questions I ask, I should show a picture from time to time...just to let everybody I actually am working on an XS.
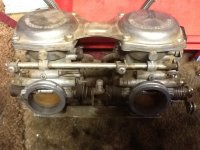
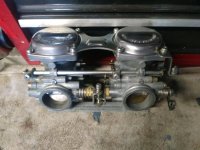
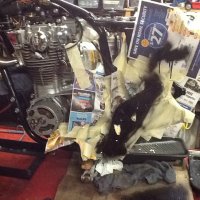
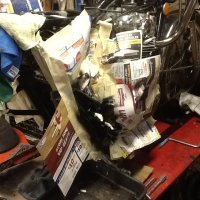
9k mile 76, starts and runs although I haven't ridden it yet. Once I get the carb sorted out on the stand then I will remove the battery box and replace it cuz it's rusted out. Didn't want to mess with the electrical until I got everything sorted out with the motor otherwise if I couldn't get it running I wouldn't know if it was the motor or electrical. Then after that I'll reverse it on the stand and work on the front end.
 

Attachments

  • 1569044446147128046122.jpg
    1569044446147128046122.jpg
    193.6 KB · Views: 292
  • 1569044709423379954196.jpg
    1569044709423379954196.jpg
    185.9 KB · Views: 282
Rear fender assembly ready to go back on after disassembly and spit shine each component.The other shiney part in the photo is the "show tank" for my 79 XT500, although now thats its perdy, I dont want to put it on the bike, so I ride around with my original patina tank.
 

Attachments

  • 1569077233151762090144.jpg
    1569077233151762090144.jpg
    157.7 KB · Views: 202
  • Message_1564536109928.jpg
    Message_1564536109928.jpg
    308.3 KB · Views: 161
Last edited:
Yes, that's looking very good. These are fine machines once all cleaned up and sorted. Just one small note on the carb top screws. Yamaha used two different lengths. Slightly longer screws were used on the 4 holes where the butterfly shaped plate mounts between the carbs. Slightly shorter screws were used in the 4 outside holes. But Yamaha cheaped out here. They should have used one more longer screw on the outside where the throttle cable holder mounts. The short screw they used barely grabs by a couple threads and is easily stripped. Best you change that one out to a longer screw.
 
Yes, that's looking very good. These are fine machines once all cleaned up and sorted. Just one small note on the carb top screws. Yamaha used two different lengths. Slightly longer screws were used on the 4 holes where the butterfly shaped plate mounts between the carbs. Slightly shorter screws were used in the 4 outside holes. But Yamaha cheaped out here. They should have used one more longer screw on the outside where the throttle cable holder mounts. The short screw they used barely grabs by a couple threads and is easily stripped. Best you change that one out to a longer screw.

OK, easy cure, add 1 more to the list of 5T rescue tips.
 
I did have to cheat a bit on the side "ugly plate" portions of the frame, very badly scratched, like some used an ice pick or screwdriver in trying to work on or pry off original exhaust, thats all I can assume. So I taped off and did some paint work, went up to the weld lines, somewhat undetectable for the amateur eye.
 

Attachments

  • IMG_2112.JPG
    IMG_2112.JPG
    264.4 KB · Views: 185
  • IMG_2111.JPG
    IMG_2111.JPG
    250.6 KB · Views: 212
This problem is on the horizon, hoping for a cure.
How does one solve for this, seat at rest pops up on the latch side. Latch is not adjustable, is this just due to the wearing down of material on the latch arm and catch? Thus allowing it to not fully retain grab at rest once latch was activated and released. The seat does not do this with weight on it, it goes in to the proper position once as little of weight of my hand is put on the high side of the seat.
 

Attachments

  • Screenshot_2019-09-21-07-38-00.png
    Screenshot_2019-09-21-07-38-00.png
    1 MB · Views: 175
This problem is on the horizon, hopimg for a cure.
How does one solve for this, seat at rest pops up on the latch side. Latch is not adjustable, is this just due to the wearing down of material on the latch arm and catch? Thus allowing it to not fully retain grab at rest once latch was activated and released.

What is the condition of the rubber bumpers under the seat? They get old and compressed and hard. They are replaceable. Are there missing ones? That would allow your seat to twist?

Edit: I would also look at the hinges on both the seat and frame to see if they have been bent.
 
What is the condition of the rubber bumpers under the seat? They get old and compressed and hard. They are replaceable. Are there missing ones? That would allow your seat to twist?

Edit: I would also look at the hinges on both the seat and frame to see if they have been bent.
Ok, but if it is the result of a flattened bumper, then that would be on the low side, yes?
Hinges, mounts, etc...all look good. Maybe the PO was heavy on one side.
Will work more on this as i get to this point in the make-over.
 
The seat latch on my '78 has a little coil spring attached to it so it does sit up on one side like yours until weight is put on it. Could be normal. But my latch is a replacement from some other bike (XS500 I think) so I can't say for sure if that attached coil spring is correct for my 650.
 
View attachment 150219 Seats do often sit at an angle like yours. If it does bother you like it did me as well simply cut the coil spring to a shorter length.
Interesting, i was thinking maybe this is the result of either the hinge brackets attached to the seat and or frame "giving away" after years of asses being plopped down on the seats. I was considering just "tweaking" them back up.
 
Back
Top