What have you done to your XS today?

FE924960-DDF3-456E-9F52-978AF9C6315D.jpeg

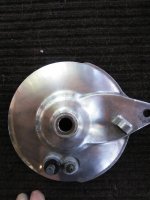
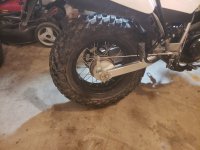
Swingarm pivot too was a little lubricated with a kinda rusty pasty substance which no way passes for grease in my world :umm:
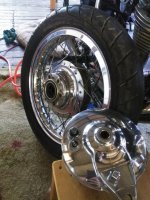
But it is off and will be fine. The swingarm pivot tube and bushings were apparently still in the swingarm for the powder coating process IDK but the bushings look cooked and the pivot tube is STUCK for now soaking.
These tasks take so long when a guy encounters conditions such as what I’ve described today.
We Do This For Fun and Because We Can lol I guess..
gotta go -RT
 
Just normal maintenance today, adjusted cam chain and valves.

It's a funny thing, when I was 14 years old I asked my mother when I could have a car and she smugly said, "When you can afford to buy your own car, that's when."

Little did she know that just one block up the hill from our house was a 1962 Fiat 600 with a sign on it that read, "For sale $25"

So up the hill I went with my paper route money in my hand.

According to the owner of the car, a 16 year old, the only thing that was wrong with the car was that he had over tightened the valves when he attempted to adjust them and the car only backfired when he tried to start it. Now I didn't even know where the valves could be found in a car but I was too dumb and too trusting not to go for it. I gave him $25.oo and his mother notarized the title for us.

Over the next few years his mother notarized numerous titles for me and the other boys in the neighborhood.

I coasted the car home and with the help of my brothers and a few boys from nearby pushed it into the back yard where I proceeded to hunt for valves.

Guess what? The engine was in the back? Until that day I had thought only VWs, Porsches, and Corvairs had engines in the back. But then it was just 1970 and we were living in the American Southland where anything that wasn't V8 powered and built in Detroit wasn't considered to be a real automobile.

While my Daddy was lucky to successfully change a tire or change oil without having the car fall on him again several of his friends were well known as mechanics so each time one of them came to visit I would get them to look at my car. Every time, as soon as the saw the engine was in the rear they automatically said, "There's no hope for that car. You might as well sell it and get you an American car."

I quickly figured out they were scared of working on the unknown and made up my mind never to let that stop me. Still, I didn't know where the valves were or how to adjust them.

Finally the father of one of my best friends happened by to visit. My friend and I had long been building chopper bicycles by using pieces of pipe slid over the front forks. We used to go to the nearby city dump. pick up old bicycles, build choppers, and sell them to the other kids in the neighborhood. Robbie's Daddy was a fork lift mechanic who worked on 4 cylinder engines every day. The Fiat didn't intimidate him at all. He pointed out the valve cover to me, explained what to look for, and knowing I probably didn't own a feeler gauge, explained the match book method of adjusting valves.

Turns out the boy who sold me the car hadn't lied about the valves. A couple of hours later I was making laps around the yard throwing up rooster tails of top soil from my Mother's yard and digging ruts that would take years to repair. (I own that house today)

But what he hadn't told me was the Fiat had no brakes which I sadly learned just moments before I crashed into that pine tree.

Funny though, even though adjusting valves was the first thing I ever learned how to do, I still have to do it 2 or 3 times to get it right.

Maybe I should go back to using a matchbook?

So what were the second and third things I learned how to do? Pry a bumper and fender off of a tire and replace a master cylinder.

Thank goodness one of my best friends Daddy owned the biggest junkyard in the Southeastern USA.
 
Not an XS, but it IS YAMAHA.

Had a friend bring over his 2017 TW200 today for a few changes. He wanted a bigger rear sprocket, and a new chain put on. I helped him out, and struggled more than a little bit with the master link clip. Broke two of them in half because the master link outer plate wasn't fully pressed on, so I drove 45 minutes one way to get more clips at the only place that was open on a Sunday to help me out!!!!:banghead:

However, despite the challenge of the clip, I got 'er done, and got the chain tension set to his rider weight.

I also rerouted a new clutch lockout switch, so he could start up in any gear he so chooses. Finally, I upgraded his handlebars, and made some adjustments for him, and set the battery on a tender. Not bad for a 1100 mile service. He definitely rides it... Hard.
 

Attachments

  • 20191110_220024.jpg
    20191110_220024.jpg
    146.9 KB · Views: 151
  • 20191110_220048.jpg
    20191110_220048.jpg
    129 KB · Views: 161
  • 20191110_220038.jpg
    20191110_220038.jpg
    149.1 KB · Views: 155
  • 20191110_220030.jpg
    20191110_220030.jpg
    168.3 KB · Views: 128
  • 157344174893888167906066089939.jpg
    157344174893888167906066089939.jpg
    141.2 KB · Views: 157
  • 15734417686478894468977770502434.jpg
    15734417686478894468977770502434.jpg
    143.1 KB · Views: 146
1BDA9E06-233F-4DD3-BC3A-A7D1127A7F6F.jpeg

All this polishing you guys do ! looks Amazing !
but I’m not only cheap, I’m lazy too :lmao:
Here at work today I loaded up the companys tumbler with my 79 XS’s small engine
covers. Oh I’d gladly toss in bigger items but the cleanliness of this dept. is extreme. I had to say please pretty nicely to get what I got in there.
They are looking okay so far. I’ll post after pics late in the day if it turns out as good as I hope :cool:
 

Attachments

  • 97F16D4D-35F8-48BB-9097-87C05B8480E5.jpeg
    97F16D4D-35F8-48BB-9097-87C05B8480E5.jpeg
    177.2 KB · Views: 133
Last edited:
60A8B2FC-AF7A-4747-B413-C513C21D96A6.jpeg

Tumbled ! Kind of a “matte aluminum” finish. Ready for use just like that. While I was at this I used an end mill and deepened that counter bore screw hole that never allows the Allen screw head to sit as low as the rest. You know which one I’m talking about ? Yes, on your side filter cover. That screw that sits up higher than the deeper counter sunk other ones.
;)
 

Attachments

  • CACE7153-B6E7-4D70-AFD2-1629A2B86D9A.jpeg
    CACE7153-B6E7-4D70-AFD2-1629A2B86D9A.jpeg
    127.7 KB · Views: 122
Last edited:
View attachment 153837
All this polishing you guys do ! looks Amazing !
but I’m not only cheap, I’m lazy too :lmao:
Here at work today I loaded up the companys tumbler with my 79 XS’s small engine
covers. Oh I’d gladly toss in bigger items but the cleanliness of this dept. is extreme. I had to say please pretty nicely to get what I got in there.
They are looking okay so far. I’ll post after pics late in the day if it turns out as good as I hope :cool:

Great work!

I have a homemade vibratory tumbler that works pretty good on steel. Haven't tried it on aluminum yet. My current tumbling medium is broken pieces of tempered glass, very hard with sharp edges. I'll probably need something more like the green ceramic beads you used before I toss my aluminum bits inside.
 
The temp was reasonable so I thought I would go for a short ride. I turned on the fuel and went to get my portable fuel gauge [a stick] because I have no reserve. A good sized puddle of gas was under the bike. So my ride turned into WTF. Pulled the carbs, checked float height, blew a little air around , things looked ok. Back on the bike right carb still leaked. Pulled them again , stuck the float in some hot water, Bingo. Replaced float with a spare and the bike started on the second kick. However my play time had expired due to Daylight Savings Time :eek:
tim
 
E7D808E9-EC11-47B6-ADC2-B13475F4110A.jpeg
The 79 XS Special II is giving me just a little more trouble in the swingarm pivot / rear wheel dryness condition.
I left off with a stuck pivot tube yesterday and decided to knock it out after work. Ya, it’s knocked out and jeez, It’s a little surprising what’s going on there. The pivot tube is So Dry and I really believe the frame and swingarm were powder coated together ? I am not familiar with the process but this pivot seems cooked.
Earlier I noted how difficult and dry the rear axle was as well and sure enough. The brake pivot was about stuck too. I’ll get it all fixed up in time..
As soon as the title shows up and this project is a sure thing worth pics, I’ll start a thread and quit rambling on this
:cool:
 

Attachments

  • E78BDAC8-C93D-4BF0-8366-78113EFDD837.jpeg
    E78BDAC8-C93D-4BF0-8366-78113EFDD837.jpeg
    122.8 KB · Views: 98
In the process of a Brembo front brake upgrade.

Had to repaint x3 times due inadvertently scratching when removing the paint on the logo/ letters.

Took three weeks to complete because of the cure time window (could only touch up after 7 days).

DF0BF6D1-F74E-4D62-B32D-F00C3C067FCD.jpeg


Used VHT Caliper gold and clear.

Now I just need to pick up a cheap toaster oven for the final bake.

Don’t think the wife would approve of using the stove.
 
Please tell me your secret. I have really corroded wheels just like yours. Just to get the grime off I have to use 220 grit wetsand. Then 409 then 600....still does t look a clean as yours. What's your trick

For the really nasty parts . I scrub with scotch brite pad and soap, Then fine steel wool and soap. I do the soap and steel wool over and over(scrub rinse scrub rinse)
Then use my drill with the polishing pad and some Mothers aluminium polishn and go over it a bunch and push down hard on the metal. then i clean that with soap and water then use the cotton wheel on the drill,

The only sand paper that touches this bike is 2000 Wet.

The Rear rim and drum brake took me 5-6 hours... It takes time
 

Attachments

  • IMG_20191110_141704.jpg
    IMG_20191110_141704.jpg
    214.4 KB · Views: 91
Last edited:
Don’t think the wife would approve of using the stove.

Then she probably won't approve of using the dishwasher as a parts washer either.

Some years ago I modified an old dishwasher to recirculate a 5 gallon bucket of orange cleaner. (non foaming) Worked as well as any commercial parts washer I had ever used. Just not as big. And that included some of the clamshell parts washers. Sadly it was lost when a huge tree fell on that shop forcing us to close.
 
Back
Top