Burger's Build

650Burger

XS650 Enthusiast
Messages
70
Reaction score
135
Points
33
Location
NYC
Hello world,
these last two days I have started on the journey of my xs650 build.
I have a xs650 Special II from 1980, and will be pulling the engine to do the following:
- General clean-up: the paint is flaky and icky, time to strip all of that and clean it.
- Install new timing chain, tensioner unit and guide (bought from Heiden Tuning)
- Install new 750 big bore kit from Mike's

The general goal here is to simply learn about mechanics. The bike could have gotten along fine with just a new chain guide, but I want to learn past the simple oil changes and general maintenance of my daily driver (a Honda cb500f from 2014).

I will be documenting the process here mainly so I can remember what I did. I will probably have questions and there will be mistakes for certain in what I do - my mechanical experience so far is more than limited. I am pretty nervous about this whole thing, since there are a lot of things that can go wrong and I have a bunch of money involved in this.

Initial Tear down:

First step was to remove the tank. Petcock off, and remove the fuel line by unscrewing the little clamp on the line.
20200103_170441.jpg 20200103_170604.jpg

I realised the seat was in the way so I removed it by pulling the hinge that was holding it in place.

20200103_170822.jpg

I then went on to remove the tank holding bolt and sliding the tank towards where the seat was to remove it. The bolt was holding down the small washer on top of the other bigger washer and then screwing thru the hole you see.

20200103_172832.jpg

And there we go, one properly naked xs

20200103_172951.jpg

I will then remove the tachometer drive cable by unscrewing the cap and pulling it out

20200103_192451.jpg

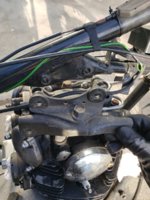
The next step was removing wire from the alternator to the battery

20200104_220640.jpg The cable in question is the black one, after taking this picture I unscrewed the nut and popped the cable off.


Next post will be carb removal
 
On to the carbs

20200104_220800.jpg

These are the mikuni BS34 model carbs. First step was to remove the filters:

20200104_230923.jpg I am all ears for tips on how to clean these.

Next step was loosening the clamps around the boots:

Screenshot_20200105-222848_Drive.jpg

Once loose, I removed the cam chain tensionner and loosened the carbs out by rocking them up and down while pulling. This made me realise I forgot to remove the fuel line between them

20200104_230632.jpg 20200104_230638.jpg That's gonna get replaced

Once that was off, and after some swearing the carbs popped out. I did not take a picture of this, but them I drained the carbs before storing them. There are two little screw to do so, and one of the screws was stripped. I just tilted the carbs upside down a few times to empty them, sprayed them with carb cleaner and bagged them up.
 
Now let's start working on those engine mounting bolts!

20200105_150703.jpg 20200105_150921.jpg
Removing the two bottom bolts then the two top bolts to remove the top mount

Then it's time to remove the front mount

20200105_151814.jpg

Using a rubber mallet to tap the long screws on the frame and liberate them.

Now it's time to remove the rear engine mounting bolts

Screenshot_20200105-224442_Drive.jpg These three slide out and the triangular metal piece falls off with them

Time to remove the second lower rear bolt, pictured in the previous picture. It is the one holding that rectangular metal tab.

Before removing the last bolt, let's see what's missing... Oh yes the ignition wires (I think that's what they are?)

20200105_171330.jpg 20200105_171544.jpg

I disconnected the little white box and the bigger black one. There were two grounds, colored brown (my bike has been rewired so no idea if this is the stock color) that I also removed. Finally, there was a red wire going to the battery that I removed.

20200105_172356.jpg

Don't forget to remove the neutral light by popping the cover off and sliding it out

20200105_153454.jpg

I then removed the last engine bolt. To do so, my friend lifted the engine and I slid the bolt out.

And now it's time to remove the engine. I couldn't take pictures, but with a friend who competes in weightlifting we lifted the engine out from the left side and set it on a lil dolly. No scientific method to pull it out, we just jiggled it out

20200105_180118.jpg

Next step will be cleaning, I hope I can get to it soon! For cleaning I have gunk foamy engine cleaner for the first pass, then I will hit it with purple power degreaser and brush it good. After that probably gonna hit it with paint stripper to get the terrible paint off of it. Will I need to clear coat it after that?
 

Attachments

  • 20200105_150921.jpg
    20200105_150921.jpg
    234 KB · Views: 164
Finally had some time to continue this.
Cleaned the engine with foamy gunk to get some of the crud off
20200106_173416.jpg

I then hit it with degreaser. After this is where I ran into problems. I purchased Airplane cleaner to strip the paint which would have worked great exept that it is around 35 here these days and stripper doesn't work in the cold. I tried using a heat gun but the process wasn't great. For now, I am going to leave the terrible paint on the engine and I might take care of it at the end of the build or this summer when I can actually cook the paint off.

Next will be disassembly of the valve covers and rocker box.
 
On to the rocker box and covers

20200121_180124.jpg 20200121_180540.jpg

I start by loosening the base nut for the oil delivery line (22mm) then heading up to the 2 top bolts (17mm)

Then move onto the valve covers (10mm and 12mm)

20200121_181007.jpg 20200121_181113.jpg

After this I move onto the advance housing covers that are empty since I have a '80s engine.

20200121_192726.jpg 20200121_192929.jpg 20200121_192241.jpg

Use a Jis screwdriver for the covers and then gasket remover + a plastic razor blade to remove the leftover gasket.

On to the 8 head acorn nuts (17mm)

20200121_204310.jpg

These take a bit of persuation since they are torqued down a bit.

I then undo the 4 rocker cover bolts (12mm)

20200121_205518.jpg

The rocker cover then comes off and I can start the cleaning of it. I am using permatex gasket remover for the gasket surfaces and brakleen red brake cleaner as well as purple degreaser.

20200121_213221.jpg

Next will be more cleaning and head removal. I already spotted some plastic specs floating around, which validates my idea of changing the cam chain guide.
 
Hi Burger and welcome,
most likely your newly acquired XS650 has had many dreaded POs, each with their own idea of what is a good upgrade and likely most of the upgrades - - - weren't. And you gets to inherit every one of them.
Paint removal? Yes, Yamapaint needs strong stripper and a heated shop or above 70 degrees F outside to shift it.
Clean those aftermarket air filters by washing them in kerosene and re-oiling them. Engine oil kinda works but proper air filter oil is best.
Haynes &/or Clymers XS650 manuals can be found on this site, as can wiring diagrams.
 
When you reinstall your engine.... it goes in (and out) much easier from the right side.
..... with the left side cover removed. The left side of the engine is shorter front to back so it is easier to maneuver in/out of the frame .....

Thanks, this will surely make reassembly easier!

Hi Burger and welcome,
most likely your newly acquired XS650 has had many dreaded POs, each with their own idea of what is a good upgrade and likely most of the upgrades - - - weren't. And you gets to inherit every one of them.
Paint removal? Yes, Yamapaint needs strong stripper and a heated shop or above 70 degrees F outside to shift it.
Clean those aftermarket air filters by washing them in kerosene and re-oiling them. Engine oil kinda works but proper air filter oil is best.
Haynes &/or Clymers XS650 manuals can be found on this site, as can wiring diagrams.

Thank you, saving this for later when I go clean my air filters.

Remember to remove the oil feed pipe fitting at the front of the crankcase Before you try to remove the jugs.

I would have forgotten so great tip!
 
Today was cleanup of the rocker cover. Used Permatex gasket remover and purple cleaner to remove the old junk adhesive. Finished with brakleen red. 20200123_153455.jpg 20200123_174901.jpg

Took a lot longer than I thought, this cover took basically 3 hours. Dreading doing all the other surfaces!
 
If you're encountering the original gray colored Yamabond gasket sealer, lacquer thinner will clean it off pretty easily.
 
If you're encountering the original gray colored Yamabond gasket sealer, lacquer thinner will clean it off pretty easily.

Seems like the gasket sealer was black-ish? So maybe the original. I got most of it off, but the surfaces stay stained a bit in certain spots. A friend seemed to say that was okay, so I hope it is.
 
I'm impressed with your fortitude, given that you stated you have somewhat limited mechanical experience.

I see that you are from our fair state of NY, and are likely cracking the windows open minimally while using solvents; please keep in mind that many of the paint strippers are extremely toxic, and other solvents quite dangerous, as well. I have poisoned myself during the winter months a number of times, and feel lucky to still be here to join in with builds like yours. :)
.
Dude

Thank you for the heads up, dude. I hope to not poison myself, but it is unfortunate it is so cold outside. I actually am pushing back the paint stripping of the engine to the warmer months for that reason, since outside is too cold.
 
Some small progress today, Put the engine at TDC:

20200124_170253.jpg

Split the cam chain:

20200124_171432.jpg

The pictures of me actually splitting it didn't save but it's just like a normal drive chain just smaller. I attached small wrenches to it with elastic bands to prevent it from falling into the cases.

Cleaning the mating surfaces on the valve cover:

20200124_174944.jpg

Will get some more pictures next time I'm in, for some reason I missed a lot of the fun.

Now on to clean the carbon... Any suggestions which aren't paint stripper?
 
No, paint stripper is what I always use. I've used it inside lots of times too, fumes aren't that bad. Not sure what brand you're using, I just use normal paint strippers like the old standby, Zip-Strip. "Paint" it on, let sit for 10 to 15 minutes, wipe and gently scrap it off. Takes a couple applications usually to soften up and remove all the carbon. I usually then finish up with a light polishing using plain old chrome cleaner. That seems to get any remaining little bits of carbon and removes the discoloration and staining.
 
- - - Now on to clean the carbon... Any suggestions which aren't paint stripper?

Hi 'Burger,
glass bead blasting works good. Sand or grit blasting leaves a rough finish.
Vapor blasting leaves a better finish than glass bead blasting but it takes money or well equipped friends
My son recently glass bead cleaned a whole bunch of motorcycle engine parts and they went from dirty & ugly to nice & clean in mebbe 10 minutes each.
Mind you, he had the use of a borrowed blast cabinet and a pushover dad with a 16CFM air compressor in his garage.
 
Listened to 5twins advice and used paint stripper to soften the carbon. Used a combination of green scotchbrite (the least aggressive one), a plastic scraper and a big scraper for the hard spots. Finished with some brake cleaner, that stuff is amazing. 5 hours later, scraped a bunch of junk off and here's a small before and after. Would love some input on whether to keep scrubbing or if this is enough.

Before:

20200126_165638.jpg

After:

20200126_215633.jpg 20200126_215644.jpg

Fred, thanks for your ideas! I don't have access to those but I note it for the future.
 
Listened to 5twins advice and used paint stripper to soften the carbon. Used a combination of green scotchbrite (the least aggressive one), a plastic scraper and a big scraper for the hard spots. Finished with some brake cleaner, that stuff is amazing. 5 hours later, scraped a bunch of junk off and here's a small before and after. Would love some input on whether to keep scrubbing or if this is enough.
Before:
View attachment 158914
After:
View attachment 158915 View attachment 158916
Fred, thanks for your ideas! I don't have access to those but I note it for the future.

Hi 'Burger,
that head is more than good enough to go as it is.
If it's pretty enough to go, that's for you to decide. i
 
Back
Top