79 Special II RestoCustom "Doomy"

Thanks Jim, PM on its way.
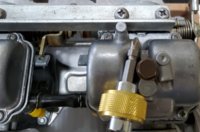
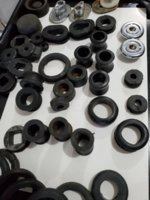
Also, were the cupped washer on the lowers from the factory? Or was that a mod Machine did on his own?
From the factory did they have the relief cut in them?
 
David Toll brought up a coil wiring question a couple pages back and I believe he is on to a possible error in hook ups by the PO. Since I'm up near the head stay after the re torque anyway I unraveled the spaghetti to take a closer look and to test these coils which seem just fine at approx 4.0 ohm primary and 9K (9.0 edited) secondary so here's to more wiring to play with lol.
:cheers:
Didn't make much progress on the 79 project this weekend. except behind the scenes..
-R
 

Attachments

  • 20200126_120037.jpg
    20200126_120037.jpg
    146.4 KB · Views: 143
  • 20200126_114220.jpg
    20200126_114220.jpg
    148 KB · Views: 111
  • 20200126_111758.jpg
    20200126_111758.jpg
    148.9 KB · Views: 118
  • 20200126_113853.jpg
    20200126_113853.jpg
    180.5 KB · Views: 124
Last edited:
No wonder I had to flip the scale switch and play around lol..
Hey we're not all XS electrical magicians Jim
:D
I took pics for back up on the putting back together. The coils needed nicer mounting hardware anyways.
Thanks for zooming in on the wires David Toll .
 
It was a self-serving observation Randy - checking my own hook up against your illustration, (your pics are great by the way). So, I assume the black is actually brown and connects to the red and white. Yellow gets orange (left side) and grey (right)?
Cheers
 
20200126_151439.jpg
Black as Brown, Yellow as Orange in the hook up.
must be correct .
20200126_103606.jpg
In this pic the yellow is hooked to the red/white (rt. side) black to grey. This pic I believe shows improper hook up which David seems to have spotted.
20200126_103606.jpg 20200126_153943.jpg
Now here is where I see the color mix up happening. On these after market coils the male and female bullet connectors are back wards from stock XS coils.
Now, is it a good idea to cut off the bullet connectors and move them or does this really even matter ?
:umm:
 
Last edited:
Are you sure the terminals going into the new coils match the old ones or might they be switched too? Not sure how you'd tell, maybe run the secondary test on both wires, see if results differ? If they don't then maybe it doesn't matter which wire hooks where.
 
Two schools of thought here. One side says it matters because the spark will be either pos or negative. The other side says it don't matter which way the spark jumps. Count me on the side that says it don't matter. If you look at a dual fire coil such as for a Pamco or TCI... one plugs negative and the other's positive. I do know from experience that it'll fire either way the coil's wired.
 
The after market coil terminals are bullet plugged opposite of stock XS apparently. I'm going by physical location of terminals on the coils. I did not get the instructions with the bike /coil set but see what is confusing. Can follow up test more later.
Thank You -R
 
Last edited:
Reading TwoManys mikesxs coil polarity articles found.
:doh:
Plenty to think over and read. Good news is there is a working pair of 78 original coils in my parts stash to run first now. Just to prove it all else out anyway. While further investigating after market coils..
-R
 
20200127_101911.jpg Way more fun than all the electrical plugging coming, Check out how I did at the Ace hardware store for Chrome U bolts and a variety of nuts.
Over the stock frame rear loop and thru the fender, Two loop mounts. Rubber Grommet inside the ID of these two chrome hooks coming soon !
 

Attachments

  • 20200127_144812.jpg
    20200127_144812.jpg
    111.6 KB · Views: 94
  • 20200127_144433.jpg
    20200127_144433.jpg
    94 KB · Views: 103
Last edited:
Motorcycle time Friday so out first thing to do was simply bolt on stock coils, done there, no after market coil polarity figuring this time
20200131_171256.jpg
Wiring is all ahead but I just gotta get more parts on this bike !
Great day to finish up with the small single out breather, I added the 78 breather drilled screen.
;)
20200131_171551.jpg
Getting to the 79BS38's assembly and installation with mostly just pics Cuz it was fun and worked thru it. The carbs are on there tuned at the best guess, lubes, mounted fresh and firm !
Fingers crossed. Well , I got some parts off the work bench and on there.
Perhaps the rear fender Modimounts tomorrow, ?
Enjoy the pics ! Thx, R
 

Attachments

  • 20200131_153918.jpg
    20200131_153918.jpg
    103.4 KB · Views: 142
  • 20200131_153858.jpg
    20200131_153858.jpg
    138.4 KB · Views: 103
  • 20200131_120628.jpg
    20200131_120628.jpg
    122.3 KB · Views: 134
  • 20200131_120605.jpg
    20200131_120605.jpg
    76.9 KB · Views: 107
  • 20200131_120537.jpg
    20200131_120537.jpg
    203 KB · Views: 132
  • 20200131_120517.jpg
    20200131_120517.jpg
    130.1 KB · Views: 105
  • 20200131_120454.jpg
    20200131_120454.jpg
    79.2 KB · Views: 99
  • 20200131_120341.jpg
    20200131_120341.jpg
    195.8 KB · Views: 138
  • 20200131_120304.jpg
    20200131_120304.jpg
    173.8 KB · Views: 142
  • 20200131_120325.jpg
    20200131_120325.jpg
    130 KB · Views: 151
  • 20200131_131419.jpg
    20200131_131419.jpg
    274.9 KB · Views: 118
  • 20200131_135713.jpg
    20200131_135713.jpg
    142.1 KB · Views: 106
  • 20200131_171417.jpg
    20200131_171417.jpg
    244.8 KB · Views: 112
  • 20200131_171506.jpg
    20200131_171506.jpg
    256.7 KB · Views: 111
Saturday, still very rainy outside but here goes some rear end parts which will create a look that is just happening with what comes along. I'll post again..
:cool:
 

Attachments

  • 20200201_104618.jpg
    20200201_104618.jpg
    174.5 KB · Views: 109
  • 20200201_104316.jpg
    20200201_104316.jpg
    143.6 KB · Views: 91
  • 20200201_104558.jpg
    20200201_104558.jpg
    168.2 KB · Views: 102
Back
Top