I’m open to all suggestions. I’m running out of the things that I know to try.
-
Enjoy XS650.com? Consider making a donation to help support the site.
XS650.com receives a small share of sales from some links on this page, but direct donations have a much greater impact on keeping this site going.
You are using an out of date browser. It may not display this or other websites correctly.
You should upgrade or use an alternative browser.
You should upgrade or use an alternative browser.
Finding my standard...
- Thread starter willis
- Start date
Well yes, don't rule out something simple like a bad plug wire or plug cap. So, do switch those plug wires side to side. If the problem follows then it should just be the wire or plug cap. Your single coil with dual outputs usually works both of neither plug wires. If one side is misbehaving, it's got to be it's wire or plug cap.
I’ve already swapped those out for brand new units, so it’s unlikely. Could a bad ground or electrical connection cause weak spark in just one cylinder?
I’ve already swapped those out for brand new units, so it’s unlikely. Could a bad ground or electrical connection cause weak spark in just one cylinder?
I’d say that could only happen if the bad ground was associated with the coil on that cylinder.
yeah, i am just grasping at straws right now. I did just order a compression tester off the 'ol interweb. should be here sometime this weekend.
On a positive note, the bike shop just called and my tires are in and installed on my powdercoated wheels. I will hopefully pick them up tomorrow and get them installed next week!! I'm really excited to see these wheels all done!
Even though it's rare, sometimes you do get a bad part right out of the box. So, I would still go ahead and swap the plug wires side to side. Just crisscross them, pull them off the plugs and move them side to side. Your dual output coil fires both plugs at the same time. The cylinder at TDC on it's compression stroke uses the spark to fire, in the other cylinder it's just what's called a "waste spark". That means either plug wire can connect to either cylinder. So, if the problem follows the plug wire/cap and changes cylinders, it's got to be one of those two items. You could narrow it down even a bit further by then swapping the plug caps wire to wire.
You can also test the plug caps while they're off. I assume you've got the 5K ohm ones. Measure the resistance through them and see if it's right.
You can also test the plug caps while they're off. I assume you've got the 5K ohm ones. Measure the resistance through them and see if it's right.
Not common, but new doesn't guarantee good. Might be worth swapping 'em again.
The compression tester arrived tonight. A quick cold/dry test produced about 140 in Left and 145 in Right cylinder. The kids are in bed now so I didn’t get a chance to try swapping the plug wires and firing. Hopefully I’ll get to that tomorrow night after work. I did have a decent look down the offending cylinder plug hole and didn’t look like there was any significant carbon buildup. Just cranking it over by hand was producing fuel vapors and valves were operating as they should. I don’t think this is a fuel issue, but I’m not ruling that out yet. My frustration continues.
I am excited though that I’ll be picking up my new wheels and tires tomorrow from the local shop! They are ready to be bolted on once I transfer my front rotor and sprocket. I think these black wheels will really transform the look. The shop I use is a great little spot. The specialize in vintage Honda’s. The owners race hopped up 350’s (I believe) and usually have a couple of their race bikes on the showroom floor. I’ll try to snag some pictures tomorrow as they usually have some other fun bikes out there too.
I am excited though that I’ll be picking up my new wheels and tires tomorrow from the local shop! They are ready to be bolted on once I transfer my front rotor and sprocket. I think these black wheels will really transform the look. The shop I use is a great little spot. The specialize in vintage Honda’s. The owners race hopped up 350’s (I believe) and usually have a couple of their race bikes on the showroom floor. I’ll try to snag some pictures tomorrow as they usually have some other fun bikes out there too.
Looking forward to seeing your new wheels!
Compression sounds good. I’m curious to see what you eventually find as your problem. Sure seems like it’s ignition related.
Compression sounds good. I’m curious to see what you eventually find as your problem. Sure seems like it’s ignition related.
Got the new wheels today. What a struggle. What I thought would be a straightforward swap fought me all the way. With persistence it paid off but I still need a few more details to get it on the road. But first, some pictures. I’ll try to do a side by side comparison from old to new. Hopefully the layout will turn out right as I’m doing this from my phone.
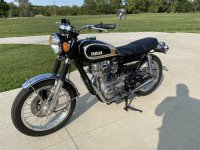
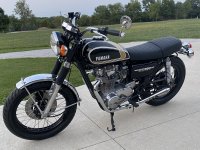
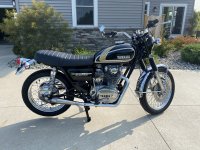
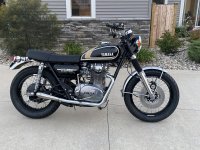
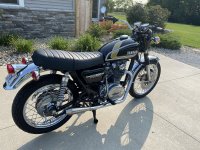
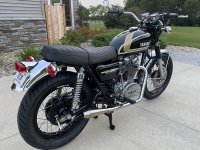
So the tires were a little hard to procure. With Covid, many tire manufacturers had shut down so supplies in warehouses were limited. I went with a modern Avon RoadRider set. Front 100/90-19 Rear 120/90-18. I was a little concerned about my choice for the 120 rear fitting. But the 110 was not in stock, so I went for it. One tire shipped from PA and the other from CA. Glad I ordered when I did. My shop guy told me they are now on backorder. The 120 fits, barely. I may need to order a longer chain or add a link to get a touch more room. I’m afraid heat expansion may cause it to rub my brake stay. Also, my chain guard had to be removed. I’ve got a spare I may try to clean up and clearance it to fit, but that may be this winter. I also need to get some new sprocket bolts. The ones that came out of my other wheel show some strange wear and had troubles threading into the hub. I’ll hit the hardware store later this week. Also had some issues getting the front axle through. I either had a spacer or bearing not fully seated. The axle was just getting stuck. I was able to persuade it to seat after some choice words though. The only thing I’m not happy about is the stick on weights the shop used. They look terrible. I’ll be updating to the spoke clamped weights in the future. All in all I’m very pleased though.


So the tires were a little hard to procure. With Covid, many tire manufacturers had shut down so supplies in warehouses were limited. I went with a modern Avon RoadRider set. Front 100/90-19 Rear 120/90-18. I was a little concerned about my choice for the 120 rear fitting. But the 110 was not in stock, so I went for it. One tire shipped from PA and the other from CA. Glad I ordered when I did. My shop guy told me they are now on backorder. The 120 fits, barely. I may need to order a longer chain or add a link to get a touch more room. I’m afraid heat expansion may cause it to rub my brake stay. Also, my chain guard had to be removed. I’ve got a spare I may try to clean up and clearance it to fit, but that may be this winter. I also need to get some new sprocket bolts. The ones that came out of my other wheel show some strange wear and had troubles threading into the hub. I’ll hit the hardware store later this week. Also had some issues getting the front axle through. I either had a spacer or bearing not fully seated. The axle was just getting stuck. I was able to persuade it to seat after some choice words though. The only thing I’m not happy about is the stick on weights the shop used. They look terrible. I’ll be updating to the spoke clamped weights in the future. All in all I’m very pleased though.
Ooooh. I actually have one of those on my other bike that I’m running a 19 rear on. I’ll pull it off and check that out. Thanks for the tip!!!
Bike looks great! Love the black rims. 
That, I don’t understand. They make black wheel weights, I had em on my late model Suzuki that had black rims.
Surely that shop had them. You should give them a call.
The only thing I’m not happy about is the stick on weights the shop used.
That, I don’t understand. They make black wheel weights, I had em on my late model Suzuki that had black rims.
Surely that shop had them. You should give them a call.
I’ll just either re-use the ones off the old wheels, or... I still have a new package of Dyna beads from my other project. I’ve never used them before so I’m kinda on the fence about them. The weights the shop used are bright and shiny. They stick out horribly on the black wheels. Would probably blend well with chrome or polished wheels though.
Willis, just read through this whole thread - man, your bike looks fantastic! Sounds great too! Hope you get it sorted soon.
Well no luck on my special brake stay. It was a straight piece with no dimples. On the positive side, I figured out that the infamous PO had installed the stay backwards. My stay has the offset like the one 5T posted, but the PO had the offset on the drum attachment instead of the swing arm side. A simple swap-a-roo and I now have about an additional 1/2-3/4” clearance on the tire. Winner Winer chicken dinner!!!!
Very little progress today. I had to work from home so the Goethermal system could get serviced. I thought I’d be able to sneak out to the garage and get some work done, but I was too damn busy to sneak away. Anyhow, I did manage to switch the plug wires around and the issue did not follow the wires. Still not firing properly on the right side. So I am ruling out any faulty coil or electronic ignition for now.
I did however receive a PM out of the blue from a longtime member here offering some assistance with my issue. After a long phone conversation, I realized I really don’t know squat compared to a lot of you guys here. Dennis, thanks for taking your time to educate me on the electrical info. I have to admit, I was a bit overwhelmed with the depth of your knowledge! But there were several key points in our conversation that stuck with me and gave me new directions to focus.
Something that I did work on in my spare time though. I just haven’t been 100% on my Halcyon bar end mirrors. They are very nice units but something about them just doesn’t feel like they fit. I looked at some other units, and thought some gold accents might pop with the factory paint. But everything I found was just too GOLD. The decals have more of a brass color. So I started looking at some simple bar ends. Again, everything was too gold. So I looked for some brass units. Not much out there. Then I had an AHA! moment. The common garden hose has brass fittings. A trip to the hardware and I came up with this. I’m not sold yet, but as the brass ages and gains patina I think this could be a nice subtle accent. And then maybe a gold chain down the road too. What do you all think? Is it too much, or cheesy looking. I haven’t bought parts for the other side just yet.
Oh, ho.... An opportunity for some excitement.
When you park the bike, screw a garden hose in there.
See what kinda crowd forms...
When you park the bike, screw a garden hose in there.
See what kinda crowd forms...
Similar threads
- Replies
- 22
- Views
- 505
