I do recommend buying a piston ring installer / spreader , they’re inexpensive on eBay. The solid rings are very brittle and easy to break.


-
Enjoy XS650.com? Consider making a donation to help support the site.
XS650.com receives a small share of sales from some links on this page, but direct donations have a much greater impact on keeping this site going.
You are using an out of date browser. It may not display this or other websites correctly.
You should upgrade or use an alternative browser.
You should upgrade or use an alternative browser.
Yam_Tech314's official build thread
- Thread starter G_YamTech_314
- Start date
Properly treated they'll go many many yrs without needing service. The key to that is to always return it to it's minimum value when you're done with it. That leaves the spring unloaded so it doesn't lose tension over time. Do that and it'll likely last a lifetime without needing adjustment. One of my wrenches has been with me well past 30yrs. I had it tested a few yrs back and it was still within tolerances. Also... don't rule out the bending beam type wrenches. Although most people look down their noses at 'em, they're just as accurate as any other type.that being said, They need re-calibrated after awhile anyways right? (Right..?)
Yes, stored properly, these "clicker" type torque wrenches should stay calibrated a long, long time. But, having several and some being bought used, I decided to take matters into my own hands and purchased one of these so I could test and adjust them if need be myself .....
https://www.amazon.com/ACDelco-ARM6...AG5HTVZYJCJ&psc=1&refRID=QWZA0D47JAG5HTVZYJCJ
A couple of the used ones from eBay did need a slight adjustment, but most were still good, as were all my new store bought ones, and some of those are 20+ years old now. I store all mine a click or two above the minimum setting and that's always seemed to work well.
Gonna see if I can get my hands on a valve grinding kit today and reseat my valves (if they're in spec)
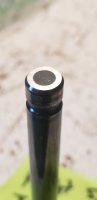
Any advice on this? Manual is telling me to check for indentation of valve tips. Does this count as indentation? Is the tip supposed to be FLAT? if so, how do I "grind it flat" as the manual suggests?
Any advice on this? Manual is telling me to check for indentation of valve tips. Does this count as indentation? Is the tip supposed to be FLAT? if so, how do I "grind it flat" as the manual suggests?
Attachments
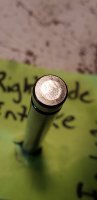
Those look fine, I wouldn't touch them. When searching for valve lapping compound, try to find a "dual" container that has both coarse and fine compound in it. You start with the coarse and finish with the fine. The coarse does most of the work and the fine just puts a nicer final finish on things .....

Those look fine, I wouldn't touch them. When searching for valve lapping compound, try to find a "dual" container that has both coarse and fine compound in it. You start with the coarse and finish with the fine. The coarse does most of the work and the fine just puts a nicer final finish on things .....

I found this from permatex. It says I can think it out with a few drops of water... It says it starts at 120 and goes to 220. Seems like a rough final grit to me... I want them to come out shiny right? This is where I'm at so far.
Attachments
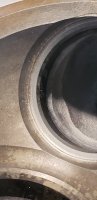
Those look good. What you want is a grey ring all the way around the valve face and the seat. A finer grit would give you a smoother finish, but what you have looks good enough judging from the pics.
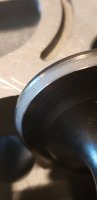
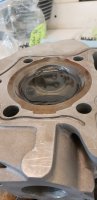
This is what I believe to be the final product for this left side intake valve.

This is the seat (obvious enough)

I'm kinda using the "it ran before" on this process... I don't really know of a good way to measure the width of the bore in the valve guides, and when they're inserted, it's a tight suction cup feel with my finger plugging the other end... The valve stems don't have any grooves that my fingernail can catch on so I'm calling that good 'nuff. Correct me if I'm wrong...
This is the seat (obvious enough)
I'm kinda using the "it ran before" on this process... I don't really know of a good way to measure the width of the bore in the valve guides, and when they're inserted, it's a tight suction cup feel with my finger plugging the other end... The valve stems don't have any grooves that my fingernail can catch on so I'm calling that good 'nuff. Correct me if I'm wrong...
Finish will be a gray matt, not shiny. Like Jim said, yours looks OK but some finer compound might give a smoother finish.
I'm pretty sure the "dual" container I have is 120 and 280 grit. Honestly, I never gave it much thought. I lap with the coarse first until all the pits are gone (black specks on seat), then give it a quick going over with the fine for the final finish. I test for leaks both before and after lapping with solvent and compressed air. Blowing air into the port is a much better test than just watching for the solvent to leak through. Leaks will show up as streams of bubbles emanating from around the edge of the valve .....


You have to play around with the blow gun positioning. Get too close to the valve and you'll actually blow it open, creating what look like massive leaks when you actually may have none.
I'm pretty sure the "dual" container I have is 120 and 280 grit. Honestly, I never gave it much thought. I lap with the coarse first until all the pits are gone (black specks on seat), then give it a quick going over with the fine for the final finish. I test for leaks both before and after lapping with solvent and compressed air. Blowing air into the port is a much better test than just watching for the solvent to leak through. Leaks will show up as streams of bubbles emanating from around the edge of the valve .....
You have to play around with the blow gun positioning. Get too close to the valve and you'll actually blow it open, creating what look like massive leaks when you actually may have none.
So when I'm done all four, put plugs in it, hose out excess compound, and drop the valves in, fill with water and spray air in? I don't have a compressor  maybe I can just do a 10 hour test with gasoline?
maybe I can just do a 10 hour test with gasoline?Using Dykem or perhaps another marker dye was in the past considered a way to see how the valve seat fits the valve flat. The Dykem is applied to both mating faces and then the valve is rotated in the seat to wear off exactly where the two components fit to each other.
Can anybody better explain this process with pics perhaps?
Can anybody better explain this process with pics perhaps?
If you have good, continuous grey rings, they're gonna seal just fine. If you want a little peace of mind, put the head together and pour kerosene into the chambers. If they're still full 5 min. later, your golden.
Consider this; at 3000rpm, those valves are opening and closing about 25-30 times every second. Add to that, on the compression and power strokes, there's tons of cylinder pressure forcing them closed. Good solid grey rings are good enough.
Consider this; at 3000rpm, those valves are opening and closing about 25-30 times every second. Add to that, on the compression and power strokes, there's tons of cylinder pressure forcing them closed. Good solid grey rings are good enough.
More rambling on valves.... I like 5twins way of finding leaks. It looks to be quick and foolproof. I just have a different approach when it comes to heads. I don't check for leaking valves. When I pull an engine apart, I just assume the valves are leaking and work accordingly. After rework, I'll look for good solid rings on the seats and faces... and call it good. Been doin' it that way for the better part of 50yrs and haven't had a leaker yet.
Only rebuilt 3 motorcycle heads myself. A Suzuki single, Yamaha XJ 4cyl. And the FJ 4cyl.
Cutting manually on two, checking with Dykem, And lapping with compound. Might have used gasoline for leak check ? Don't remember but those engines ran very well ..
Cutting manually on two, checking with Dykem, And lapping with compound. Might have used gasoline for leak check ? Don't remember but those engines ran very well ..
A bike mechanic buddy of mine showed me this testing method many years ago and I've been using it ever since. Yes, it is a quick and easy way to check for leaks. It shows any and all of them. Just letting the head sit with solvent in it may not show the small leaks. But if you do a good enough lapping job, you shouldn't have any. Normally when I test a head before disassembly, I'm more likely to find exhaust valve leaks. The intakes are often still good. This makes sense because the exhaust valves run much hotter and take more of a beating. But, upon disassembly, the intake seats usually show lots of scaling and pitting too. It just hasn't gotten quite bad enough yet to start them leaking, but it will eventually. So, I lap them all, even the ones that aren't leaking yet. Those may only get a quick lapping with fine compound, but they do get lapped too. Here's a seat that's been cleaned but not lapped yet. It's easy to see all the scaling and pitting .....

..... and here's an exhaust seat partially lapped. All the black specs you see are pits still remaining so this seat requires some more lapping. The intake below it is done, a nice solid gray surface with no black specs (pits) remaining .....

..... and here's an exhaust seat partially lapped. All the black specs you see are pits still remaining so this seat requires some more lapping. The intake below it is done, a nice solid gray surface with no black specs (pits) remaining .....
Makes sense now. Lol. I used gasoline. Now my garage reeks!Yes, you have to install the springs. I wouldn't use water for the testing. The parts you're dealing with are just raw steel and will rust. Personally, I use kerosene.
Been trying to get this cyl. Head rebuilt all weekend.
Went out to harbor freight in a last ditch effort to getting the job done and the damn tool didn't work even after modifying it to make it small enough to fit in the space.
The problem is that I tried to use a spring compressor that was designed to be used when the head was still on the vehicle. (A car) I need a C Clamp type for this to work and unfortunately the clamp I have is too small. It worked well with a block of wood removing the springs, but it's another story trying to reinstall them.
Frustrated as ever. But I also spent some time washing the head to ensure all grinding compound was removed, and got all the browned material off so now things look quite clean and uniform. Just ready to have this bad bitch together.
I’ve been there with the same results as you. I ended up going to an auto parts store and getting a loaner tool from advanced auto to get the job done.
Similar threads
- Replies
- 214
- Views
- 25K
- Replies
- 98
- Views
- 8K