Master Cylinder Rebuilding

littlebill31

Smells of Raw Fuel
Messages
3,474
Reaction score
393
Points
83
Location
Western Maryland
This will cover the procedure for rebuilding the front brake master cylinder (m/c).
All 3 types will be covered.
There are 3 stock types of front brake master cylinders on the XS650.
The original Round Cover:
insert round assembled here
The "Standard", which has no angle, straight body:
MC rebuild 002.jpg
And the "Special", which has an angled body to "clear" the Buckhorn handlebars:
MC rebuild 001.jpg

The inside of the reservoir on all 3 types are also different:
Round Type:
43b8371c15d340bf39b3718c9e24ac94_12799.jpg

The "Standard":
MC rebuild 003.jpg
The "Special":
MC rebuild 006.jpg
NOTE: Brake fluid is a dangerous substance. DO NOT let it come into contact with painted surfaces. Immediately clean up any spill and wash hands thoroughly. Keeping a "more than normal" clean area when working with brake parts is very important!
Makes sure you read this in it's entirety and thoroughly before beginning.

To begin, First drain the system using the bleeder nipple on the front brake caliper. Refer to the Bleeding Brakes How-To if you are unaware of the proper procedures to do this. Drain as much fluid out as possible to reduce spillage from the reservoir.
Using the center stand or leveling the bike is a good idea when doing any maintenance.

Open the top cover of the master cylinder after draining the fluid. Put the cover, diaphragm, and diaphragm bushing in a safe place for later inspection/cleaning.
Bleeding 014.jpg
Bleeding 015.jpg
You can use a rag to "sop" up the remaining fluid. Do not get this fluid on any painted surfaces.

Disconnect the brake line from the m/c. Remove the banjo bolt and 2 washers.
[insert picture]

Remove the 2 10mm bolts from the m/c clamp and remove the m/c from the machine.
Bleeding 011.jpg

NOTE:An above average cleaning area is needed for any types of brake repair.

Turn the reservoir 90 degrees to prepare for removal.
MC rebuild 007.jpg

Using a thin instrument, CAREFULLY raise one corner of the reservoir from the m/c body. There is a large O-ring that the reservoir must be separated from.
MC rebuild 008.jpg

Work your way around the reservoir to loosen and raise it.
MC rebuild 009.jpg

Then you can "pop" the reservoir off of the m/c body.
MC rebuild 010.jpg

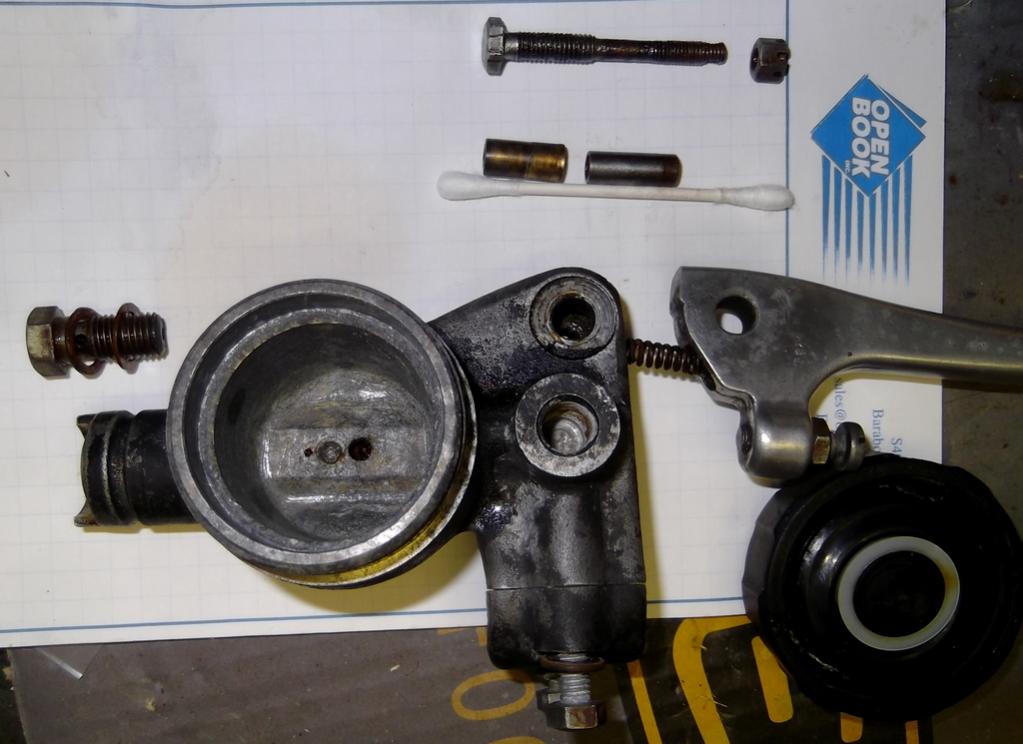
You can now inspect the inside of the m/c body and large O-ring. Notice the hardened brake fluid and grime that has collected between the reservoir and m/c body.
MC rebuild 011.jpg
 
Great start! Thanks for all your hard work Bill.
release the brake switch from the MC
kimg0386-2-jpg.205460
 
Last edited:
Remove the large O-ring from the body. it is a good idea to replace this, but if there is a very good seal, the ring is smooth and pliable, you can reuse it. If the reservoir was leaking between the m/c body and reservoir previous to removal, then the O-ring is suspect and should not be reused.
MC rebuild 012.jpg
MC rebuild 014.jpg

Inspect the reservoir for cracks, nicks, and poor condition.
MC rebuild 013.jpg

You can now remove the brake handle.
MC rebuild 015.jpg
MC rebuild 017.jpg
MC rebuild 018.jpg

BEFORE! you separate the handle from the body note that there is a spring in the m/c body. Once you take the bolt out catch the spring by slowly remove the lever.
MC rebuild 019.jpg
MC rebuild 021.jpg
MC rebuild 020.jpg
Notice the poor condition of the piston. This is caused by the brake lever adjustment screw. Over time a "pocket" or "dimple" will begin, which can cause the improper brake lever pull.
MC rebuild 016.jpg

There is a small rubber cap that fits over the piston. This is a sealing point. If brake fluid has been leaking out from around the lever and piston this "boot" could be the cause. It looks similar to a top-hat.
Remove this from around the piston. I would not reuse this!, so a pair of needle nose pliers will help it off. You will also notice that there is an internal wire in the bottom lip of the boot. This will corrode over time and will fail!
MC rebuild 024.jpg
MC rebuild 025.jpg
 
Last edited:
When the boot has been removed you can now look into the beginning of the piston bore.
MC rebuild 027.jpg
MC rebuild 028.jpg
MC rebuild 026.jpg
Note the brown fluid. This is old brake fluid, so imagine what the inside of your lines and caliper look like. You must treat the entire braking system as one. Do Not fix one part and neglect the others. Brake fluid moves up and down and all throughout. So if you just rebuilt the m/c and not the lines or caliper, you just wasted a bunch of time and money.

Now for the fun part. Piston removal.

In order to remove the piston you must first remove the internal snap-ring. This "ring" is a pain in the butt, seriously. I never reuse this ring nor should you. It will be corroded and, after trying to work it out, will be damaged.
MC rebuild 030.jpg
MC rebuild 031.jpg

This ring has 2 small holes on the end so snap-ring pliers can be used to remove it. Not all snap-ring pliers will fit. You will need a pair with long, thin extensions. The inside of the bore is narrow and deep.
MC rebuild 033.jpg

I also loosen the ring by using a punch to insert into one of the holes and turn the ring in place to free it. These rings will be corroded and will probably need to have brake cleaner sprayed into the bore, let sit, then follow with a penetrating oil.
MC rebuild 032.jpg

If you can use the pliers, then reach down into the bore and remove the snap-ring. I will say that this is tough to do, but can be done. Just make sure you have the correct size pliers, the correct tips (not too big), and internal pliers, not external.
MC rebuild 035.jpg
MC rebuild 036.jpg
MC rebuild 037.jpg
MC rebuild 038.jpg

If the snap-ring will not come out or you do not have the correct pliers, you can use a punch. Simply put the punch in one of the ring holes and CAREFULLY press it towards the piston center while using a slight upward twist. This will usually free it enough to "pop" it out of the groove. You can then use needle nose or a hooked end punch to remove it the rest of the way.
WARNING!! DO NOT damage the interior of the bore. If you damage this the piston will not work properly. Getting mad and scratching the bore will cause you to have to buy another m/c body!!
 
Once the snap-ring has been removed, throw it away, do not reuse it!!

The piston should pull straight out. If it does not then I suggest using a wooden dowel rod. Place the wooden dowel rod in through the banjo bolt hole, center it on the bottom of the piston, and tap it until it becomes free. I do not suggest using anything metal for fear of damaging the bore. A couple turns of the piston can help free it as well. the are usually pretty gummed up and corroded from neglect.
MC rebuild 040.jpg
MC rebuild 041.jpg
MC rebuild 042.jpg
This is a really bad piston!!

Here is the bad one and a used one that has been maintained over the years.
MC rebuild 045.jpg

Next, use a dowel or screw driver, being sure to not scratch the bore, and from the banjo bolt hole, push out the spring and end cap.
MC rebuild 046.jpg
MC rebuild 048.jpg
MC rebuild 049.jpg
Here are all the internal parts laid out.

NOTE: It is highly advisable to lay each part out as you remove them. Mixing parts up or putting them back in, in the wrong order, can cause the master cylinder to fail.
NOTE: The wide end of the spring goes towards the banjo/brake line end.

You can now begin to clean the master cylinder as all the parts have been removed.
 
When you are cleaning the m/c body be sure to clean the small ports in the bottom.

Here, on the "Standard",
MC rebuild 066.jpg

..And on the "Special",
MC rebuild 057.jpg

Also note that the reservoirs are different on both types as well.

The "Standard" cover screws are attached to the reservoir itself, not the body
MC rebuild 059.jpg
MC rebuild 061.jpg

While the "Special" cap screws go through the reservoir and into the body
MC rebuild 053.jpg
MC rebuild 052.jpg

Cleaning can be done with brake cleaner, a soft wire brush, and very fine grit wet sand paper. Most of the "gunk" will come off easily, but taking your time, and doing it correctly, will only produce a better outcome.

Before,
MC rebuild 011.jpg

After,
MC rebuild 051.jpg

Make sure you clean all the parts, front and back. The old brake fluid can seep between areas, causing pitting and some rust.
MC rebuild 060.jpg
MC rebuild 070.jpg

That second port is ( and must remain) TINY, smaller than your smallest torch cleaner pin or the smallest number drill. The hole is made at the factory using a special V shaped cutting tool that just pierces the piston bore. Several aftermarket MC's have been found with the hole not complete! Endless fun ensues.

One way to clean a stubbornly clogged hole, sharpen a piece of stainless steel safety wire on the grinding wheel. or a small sharp sewing needle........

even better is a 90 scribe or scriber.

attachment.php


A very handy tool!
Working up into the hole from the bore side. As you can imagine whatever is blocking the port settled there from the reservoir side, and needs to get pushed back that way CAUTION! do not scratch the piston bore or enlarge the hole!
 
Last edited by a moderator:
Nice! And a lot of work!

I wonder if some standard and special reservoirs are the same and you happened to get some that aren't. It would make sense to make them the same and share parts.
 
Really awesome work. I'm actually rebuilding my front brake as we speak.
Instead of using brake cleaner to clean out the mc, is it ok to use purple power or something similar?
 
^I don't see why not as long as it gets clean. Although lots of chemicals react with aluminum.

People recommend not doing any honing on them, since they're aluminum. I can see a brake hone cutting ruts in them and removing a lot of material fast.
 
I think they do. Gotta check. The clutch, I think, is left-hand.

If you need to uuse anything, use a very fine sandpaper. Like a "mirror" grit. 2,000 and use it very lightly. Just enough to get the oxidation off and that's it. Make sure you use it wet or with brake fluid as a lubricant.
 
attachment.php


Bill or others
How do you put the gasket(?) on to the piston? I can't seem to put it on with just my finger, and I don't want to damage it with a pair of needle nose...any suggestions?
Thanks
 
blow up of an early master cylinder with lever parts.

full


This is a 72-73 M/C with the brake light switch held on by the lever bolt.
A cotter pin at end of lever bolt is not shown.
To remove the lever from the housing; the brass bushing is threaded onto the bolt, the steel sleeve is a slip fit, remove the cotter and nut, pry the brake switch off the retaining pins. Using aluminum or brass to protect the threads, tap the bolt and brass bushing together up out of the housing to free the lever.


72-73 Internals in assembly order
early MC 001.JPG

AFAIK there are no overhaul kits available for this MC
Ebay and mikesXS have new replacements for the 74-76 but they do not have provisions for the 72-3 brake light switch.
 
On the reservoir o-ring (first and second pictures on your second post), it doesn't look like the fiche has a part number or size listed, and the rebuild kits don't include one. Any idea what size that o-ring is or a good place to get it would be? The only one I've found is:http://www.ebay.com/itm/like/331127448517?lpid=82and it doesn't say if its year specific or not.

Great job with the write up, I've got my M/C in pieces at the moment so this is perfect for me.
 
Back
Top