How difficult is it to replace the rear drum brakes?

You pull the wheel. Once the wheel is off the bike. Pull the brake backing plate out of the hub. Now you just swap the new pads for the old.
Your repair manual covers this.
Leo
 
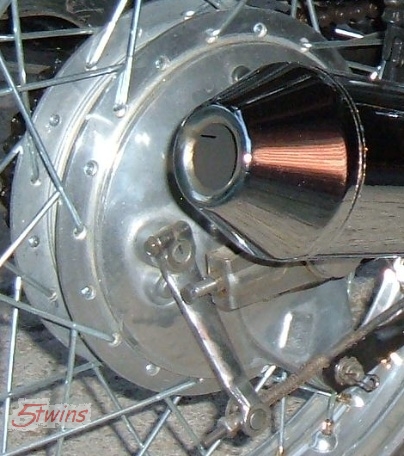
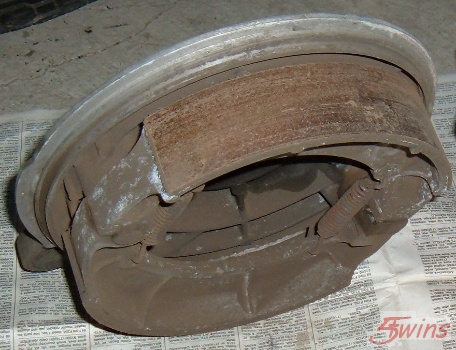
Replacing (or servicing) your drum brake (front or rear) is quite simple once you know the one important little trick involved. This is something you should do yourself as opposed to having a shop do it because you will do a better job. There are a couple other items you should address while in there. The pivot shaft that runs through the backing plate should be pulled, cleaned, and greased. Also, the brake drum surface should be cleaned. If you take it to a shop, they'll pop the old shoes off, stick the new one in, and probably won't do any of this other much needed stuff. OK, when you first pull the brake plate out, you'll probably be presented with something that looks like this .....

full


Go to the auto parts store and get yourself a spray can of brake cleaner. You can do a rough cleaning first before you start the disassembly. If you're going to re-use the shoes, mark them "Top" and "Bottom" before removal so they go back in where they came from. Now for the little "trick" - the easiest way to remove/install brake shoes is to "fold" them off and on. Hold one shoe down in it's installed position and simply fold the other one up 90° to it. The shoes will easily come off now as a set still connected by the springs. Install is the reverse - set one shoe down in position (and hold it there), set the other at 90° (and connected with the springs) on the far side of the pivots, and simply fold it down into place. Once the shoes are removed, you can do a thorough cleaning of the backing plate, getting into all the nooks and crannies (Q-tips work well here).

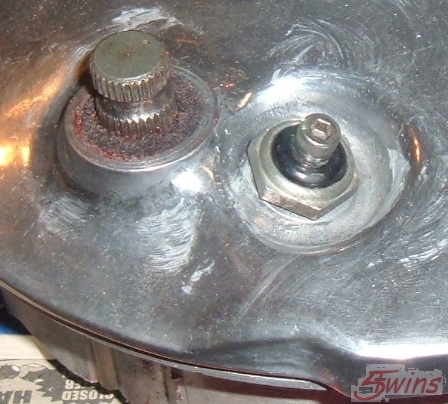
Now on to the other things that need doing. The shoe pivot shaft should be cleaned and lubed. Before removing it, mark the split in the brake arm on the shaft head with a Sharpie. This will allow you to assemble it later with the arm properly positioned .....

full


Once the arm is removed, you should find a felt ring seal nestled down into a depression around the top of the shaft .....

full


Pull the shaft out of the hub noting the position and orientation of the thick washer just under the flats on the brake shoe end. Now you can carefully lift the felt washer out. Clean it by dipping in solvent and pressing between clean paper towels. Repeat until the solvent presses out clean. Knead the clean felt ring full of fresh grease before install. This is the seal for the pivot shaft and is what keeps the dirt and water out.

On the shaft, you'll notice it's center section, the part that resides in the brake plate, is depressed. This is a grease reservoir. After cleaning the shaft and hole in the plate, coat the shaft with fresh grease and work it in and out of the hole to displace the excess lube. Use a twisting motion so the depression remains full. Wipe off all the extra grease that wells up around the top of the hole.

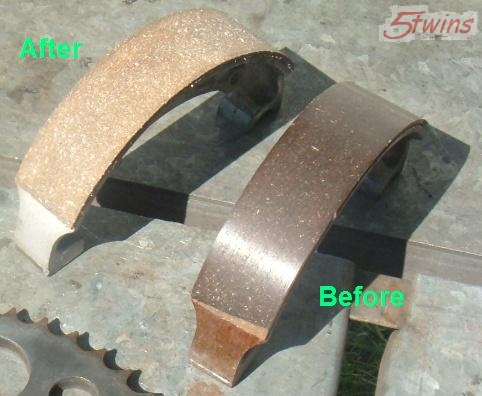
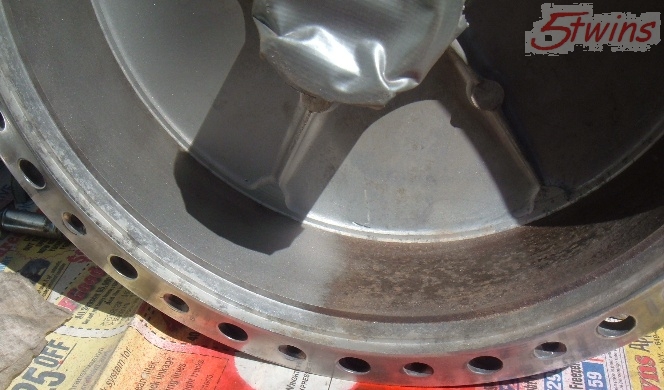
Are you replacing the shoes because you've actually inspected them and found them worn too thin or simply because the brake no longer stops as well as it should? They may be fine and have plenty of life left in them, just needing a thorough cleaning and deglazing, along with the drum. That can be accomplished by lightly sanding the surfaces but by far, the best method is glass beading them. Here's some before and after shots of glass beaded shoes and drums .....

full


full


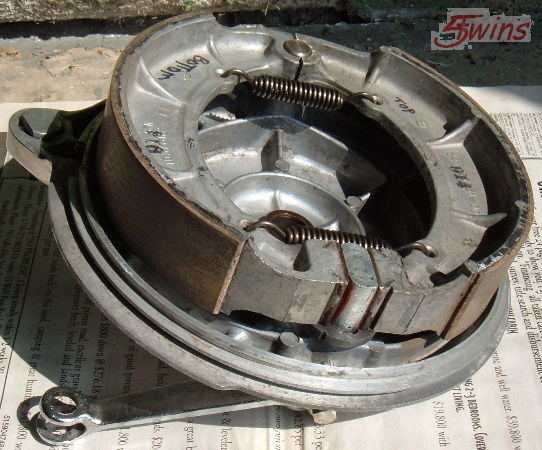
The springs should be cleaned and if rusty, wire wheeled. Apply a light coat of oil afterwards, just enough so they shine. Before installing the shoes, apply a small amount of grease to the pivot post and the flats on the pivot shaft. After install, wipe away any excess grease that has squeezed out. The finished job should look something like this. Note the small amount of red grease showing at the edges of the flats on the pivot shaft (excess having been wiped away). And yes, this is the same brake plate assembly from the first pic after cleaning .....

full


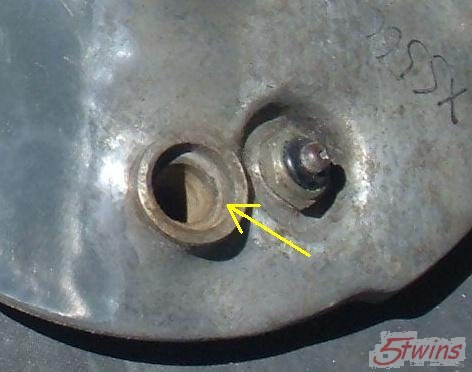
Edit 3/21/19 - Through careful research and measuring, member 2M has discovered that the brake cam is not exactly symmetrical. One end of the cam moves or applies it's brake shoe slightly less than the other end. The splined end of the cam has a dimple stamped in it. This denotes the end of the cam that applies it's shoe slightly less. The cam should be installed with the dimple on the inboard side, towards the axle .....

arKDkY2.jpg


All the details on this can be found here, starting with post #29 .....

http://www.xs650.com/threads/650-rear-drum-brake-plates.51046/page-2
 
Last edited:
I've commented on this before in other threads but never spelled the whole procedure out in one place. Being 30+ years old, pretty much every one of these bikes should have this service performed now, they're due, way past due in fact. The factory put little (if any) grease on the pivot shaft and I can pretty much guarantee you'll find that long gone today. Do a thorough service like this and your drum hub should give you years of trouble-free service. It's not hard to do, just a little time consuming but what better way to spend a cold winter afternoon? Commune with your bike a little, become one with it - and get a properly serviced and better working brake out of the deal, lol.

Thanks for the write up 5twins. Just what I was looking for. BTW can this job be done with the center stand on the bike or should I invest in a jack first? Also, I assume servicing the front disk brakes is just as simple. Trying to save $$$ by not going to the shop but it always makes me kinda nervous messing with important things such as brakes. I have all the necessary tools (I think) just no hands on experience. Thanks in advance.:thumbsup:
 
The centerstand is fine for one wheel at a time, don't think you can do both at once with it though. You're better off concentrating your efforts on one at a time anyway. Fixing up an old bike is a big job but not so bad if you break that down into a series of little jobs.

Oh, and one more pic, a cleaned and freshly greased felt ring installed .....

full
 
Last edited:
BTW...anyone know of any good links on this forum regarding replacing the front pads and rotor? Can't seem to find anything thorough. I do have the Clymer manual but it's always good to have a second source for tips/tricks.
 
In the Clymer book under the front disc brake they talk about the early two piston caliper brakes. Your 81 uses the later single piston caliper. Much easier to work with.
On page v209 look at the pic 81. This shows you a good break down of your caliper.
See item #2. This screw holds the inside pad inplace, Well noit really it more just keeps you from easily lifting the caliper up off the pads. Anyway remove this screw.
Now look at pic 82. Remove the bolt in the circle. This bolt holds the caliper to the bracket. Once you get this bolt out, the caliper, with a bit of wiggling lifts up off.
Now you should be able to see the pads. They just slide out of the bracket, one in, one out. If they have not worn much then they can be put back in. Page 210 pic 85 shows the line they talk about. If not worn to the line they are ok.
If you have new pads just install then the way the old one were. clean up the places the pads set. a thin coat of grease where the slide on the bracket won't hurt. Just don't over do it.
With the cliper off is a good time to inspect the caliper. Look at the dust seal. If torn or missing, there's a good change of water getting inthere. This water makes things rusty.
A mid sized c-clamp comes in handy. Use it to push the piston back into the caliper. Carefully pump the brake lever to push it back out. Not too far, don't want it poping out. Do this a few times and you will make sure the xcaliper is working freely. If it's very rusty inside under the dust seal you might need to do a tear down, clean and inspect. New parts are availible to rebuild the caliper.
Leo
 
I can't pull my rear brake backing plate out of the hub, is there any trick to this? It's definitely not seized or anything, in fact it works fine, I just thought I might give it clean and an inspection.

Thanks for the awesome write up 5twins. Very much appreciated.
 
I can't pull my rear brake backing plate out of the hub, is there any trick to this? It's definitely not seized or anything, in fact it works fine, I just thought I might give it clean and an inspection.

Thanks for the awesome write up 5twins. Very much appreciated.

Hi muks,
WTF, man? That brake plate should simply fall out of there.
Try carefully prying it out.
& 5twins, my 1937 Velocette handbook advises smearing the brake drum surface with "no more grease than will fit on your little finger nail" when installing new brake linings.
Mind you, that book was written back when you rivetted the new linings on yourself and woven asbestos was the latest and best friction material.
 
I've commented on this before in other threads but never spelled the whole procedure out in one place. Being 30+ years old, pretty much every one of these bikes should have this service performed now, they're due, way past due in fact. The factory put little (if any) grease on the pivot shaft and I can pretty much guarantee you'll find that long gone today. Do a thorough service like this and your drum hub should give you years of trouble-free service. It's not hard to do, just a little time consuming but what better way to spend a cold winter afternoon? Commune with your bike a little, become one with it - and get a properly serviced and better working brake out of the deal, lol.

Great Tutorial 5 twins. I have an XS2 that is being restored. Got it about 80%done. Brakes front and back are next and this will help. Talk about original,, the bike still hast he stock Dunlop Gold Seal tires front and back. 4500 original miles. Will be replacing as well but they look good none the less.
 
Back
Top