some wiring diagrams

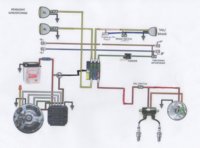
Okay, suppose the battery fuse blew, but the one in your diagram remained. Then, the alternator could go into runaway mode and damage the Pamco.

An interesting logic challenge, isn't it? Of all the single-fuse diagrams out there, yours is probably the best. If the fuse blows, the harness and Pamco are protected. And even if the charging system and/or the main red wire cook, you still have a potentially/temporarily field fixable system, allowing you to limp home (by wiring in a temporary battery and running total-loss).

If any condition exists that jeopardizes the ignition system, it gets more troublesome, expensive, and requires being hauled home.

Blowing fuses is not a frequent thing, and most of the bikes here would run fine with unfused electronics. But, it can and does happen, and you want to minimize damage when it does. So, you have to think in terms of cutting the source of damaging electrical power, the battery.

The PMA and Pamco add the twist, as you want NO scenario that allows runaway/unregulated charging voltages to reach the Pamco. Your existing single-fuse diagram handles that.

What's left is that unfused red wire between the battery and charging system, which is actually how most charging systems are wired, so you could leave it as is.

Having worked on a lot of machines that had failed charging systems, ranging from simple/slow battery discharges thru regulators and rectifiers, to full-blown charred remains, I have a natural 'combat fatigue' perspective to that part of the system.

Myself, I would add a fuse in the charging system line, and, something I've not seen elsewhere, the use of a DPST ignition switch, connecting the battery to the main ignition line, and separately, to the charging system, each line fused.

But, that's my 2 cents. Your diagram will work fine. The important part is that you can see the logic of your wiring design, and account for all scenarios...
 
Good, you're thinking, I like that. There are a couple of highly unlikely scenarios that would blow one and not the other. One is fuse delay (as soon as one blows, the other doesn't see enough load), the use of delayed fuses (Slo-Blow, which forces the issue), wire chafe/shorting in the line between the two fuses or their connectors, and our favorite, intermittant shorts (charging system hiccup, battery fuse blows, charging system comes back on line, runaway, cooks Pamco).

Whatcha think?
 
Last edited:
So also put another fuse right before the reg/rec? And if I did that along with one right before the battery would I actually need the 20amp that is in my diagram? Heck why don't I just make an entire harness out of fuses one right after another! haha
 
Yeah, an entire harness made of fuses, that would satisfy my paranoia!

Paranoia, good name for a bike. Or "Fusable Link".


So also put another fuse right before the reg/rec?

Yep, somewhere in that line, between the reg/rec and the 3-way tie, or as a separate line going from the reg/rec, to a fuse, then independantly to the battery. That'll protect the charging system, and prevent runaway regulator.

So, then you'll have a 2-fuse system.
One protecting the harness, running accessories, and Pamco.
The other protecting the charging system, and isolating an unregulated runaway.
 
Hey all! XS650 newb here, wiring in a PAMCO+e-advance and a Hughes PMA into a stock unmolested 79' Special, does a wiring diagram for this exist? And what's this I hear about changing a fuse to 7.5amp? Thanks in advance
 
First off, I just want to say thank you to everyone who has posted in here. I've through this article and although my brain hurts, I'm starting to get a good idea of where to begin. I used one of the wiring diagrams her to get me going, but I was hoping someone could look at this and let me know if it's right.

A couple of things to consider:
- I'm currently running two headlights (both hi/low beam). I'm assuming I can just duplicate the wiring for both?
- The diagram I've used shows only two wires coming from the front and rear turn signals, but mine have three (they are LED). I assume that means that they will also serve as running light and signal lights. Anyone know where the 3rd wiring runs into?
- Was planning on running my rear turn signals as brake lights as well, and there is a good post in here on how to do that, but currently I'm just too confused. My wiring experience to date is limited to plugging in a tool into a extension cord, so I want to keep it as simple as I can.

Any advice would be greatly appreciated!!

You can see my set up here:

Stu's 650
 

Attachments

  • xsWiring Harness 1.jpg
    xsWiring Harness 1.jpg
    145.6 KB · Views: 293
Hi new to the forum and a few months ago got a 1980 xs650 been changing a few things on it learning as I go have absolutely no knowlege. Just put new indicators on I beleive I have wired them correctly seems no fuses blew this time but instead of the indicators coming on there is just a clicking sound coming from under the tank I assume this is the flasher? Just wondering if anyone has a idea of what I have done wrong or need to do?
 
I love the diagrams that you all have posted. I used them as a basis for my 650. great work. Oh, hey for LED signals I got some off of sleezebay dirt cheap and ordered a LED flasher from www.superbrightleds.com cheap and works great.
 
The light housing has to be directly touching the frame in order for the ground to be useful. If you have a meter test where you are wanting to mount and where your are connecting the ground. That way you know for sure that your good!!!

Put multimeter on OHMS and touch one end to where you think you might place your ground and the other directly to the frame. If you get a reading of 000.000 you are good. If not try a different spot.
 
Ok, I'm going to use the diagram below for my 1980 build. I've read this thread 3 times over and I think I understand how everything should work. My question has to do with the key switch and a starter button, I see some diagrams show a ignition key with a on/off position, and the starter button basically grounds the starter solenoid, and then I see a three way ignition switch, like the attached image, and I'm not really sure how a starter button fits in this scenario.

Any help would be appreciated thanks!
 

Attachments

  • Presentation1_zpsd5eb48bb.jpg
    Presentation1_zpsd5eb48bb.jpg
    76.3 KB · Views: 202
I'm hoping someone can have a look at this diagram. I've cut and pasted from others in the thread. 80 SG stock ignition, with starter. I'll be using a fuse block as I like how tidy it is. Can anyone see any problems with the diagram? any suggestions?
 

Attachments

  • 1980SG-XS650WiringDiagram.jpg
    1980SG-XS650WiringDiagram.jpg
    136 KB · Views: 181
I guess those factors will be the things that make you need to run it one way or the other. I recently decided to go back to the stock type right hand bar housing with starter button and kill/run switch incorporated into it. Still need to figure out where I'm mounting key. But anyway, in case you were also going to use the stock right side handlebar housing switches, I thought I'd let you know how that gets hooked up. I had HELP, from XS Leo and Retired Gentleman and possibly others. I'm sure someone will chime in to answer your situation soon. I wondered about the exact same thing. There's another diagram that shows the starter "button" as a separate thing in addition to key switch, maybe you can kind of figure that into that diagram you're using. Good luck!
 
Back
Top