Just another first build.

Another little update. I'm down to the last few wires! :bike: Just the brake switches.

Figured out the throttle assembly. I'm not really happy with the cable wiggiling around in there. I'll see if there's something I can do about it. It can't pop out or anything, it just is loose in the housing.

Forgot to show you guys the right side turn signals and electric start. They are both working.

 
So what did you come up with on the throttle? What were the issues you ran into?

The video I posted earlier shows it; but with the 650's you have to remove that holder and locknut that peanut was talking about earlier. It gives the cable a little extra length so the throttle tube can sit in the correct spot in the housing. It's kind of funky. The cable can't come out of the housing, but it is a little loose in the housing. Not too happy with it, but, it works. I'm going to see if there's something I can do about it.
 
Some more pictures from Saturday.

With only the brake siwtches left, here is what the electronics pan looks like. Trying to keep it as neat and organized as possible, but it looks like spaghetti :laugh:

20ixdz6.jpg


2nsmfjk.jpg


Heat shrink over the neutral light so the connections don't get dirty, etc.

amp954.jpg


I re-did the wire to the coil with a different route so I could put the loom up a little higher on the frame. Also put heat shrink on the connector.

wtc9e9.jpg


Turn signal wires with heat shrink. Running them through the frame took A LOT of patience!

2r70duo.jpg


What the mess of wires looks like exiting underneath the tank :shrug:

2198cxh.jpg


I spent some time away from the 650 today, to remind myself how I fell in love with motorcycles in the first place.

Helmet camera from some motocross fun today.

34yv7gl.jpg


I'll be spending this week figuring out what is up with my rear wheel. I really don't want to have to go back to spoked wheels if I can't figure out what's going on
 
Currently stuck in a class for electronically controlled diesel engine training monday through thursday :doh: torture!

After class today spent just a little bit of time on the bike.

Bolted the caliper to the forks. Pricing out a brake line and a master cylinder at the moment.

eu50nc.jpg


Rinsed the petcocks with solvent and blew some air threw them. Installed. They are the non-vaccum type.

2a845kw.jpg


I need to order a gas cap for the tank. My bike is a 78 standard, but I've already had a few instances of parts from different models being mixed in with this bike. Can anyone tell me if the cap I need will be for a standard or a special? Mikes says they don't interchange.

2pyqfet.jpg
 
Subscribed. I venture it is the Monstercraftsman throttle you have. I just got the same one for my build and was having the same trouble. I can't tell for sure on your video, but I think you removed the bottom part of the locknut? Maybe you can post one or two images?

Your build is very neat and tidy. Love it! I also like your wiring video's going to be very helpful when I get to that part! hah!
 
Love the bike so far man! And I had that same issue on a build I did with the exact same setup for the throttle. I actually let the guy ride it forgetting that at the right spot the cable could come out, he took a right turn the cable popped out and it WOT'd him into the grass in the neighbor's yard! haha. We were able to laugh about it...but not without recognizing the danger of what could have happened if he hadn't been pulling out of the drive way and had actually been out on the road when it happened.
 
If the tank fill is in the center of the tank, its a standard. If the fill is off to the right of center, its a special.
 
Love the bike so far man! And I had that same issue on a build I did with the exact same setup for the throttle. I actually let the guy ride it forgetting that at the right spot the cable could come out, he took a right turn the cable popped out and it WOT'd him into the grass in the neighbor's yard! haha. We were able to laugh about it...but not without recognizing the danger of what could have happened if he hadn't been pulling out of the drive way and had actually been out on the road when it happened.

Thanks JP! Yikes :eek: that's gnarly! I'll be sure to double check mine won't do the same :thumbsup:
 
Subscribed. I venture it is the Monstercraftsman throttle you have. I just got the same one for my build and was having the same trouble. I can't tell for sure on your video, but I think you removed the bottom part of the locknut? Maybe you can post one or two images?

Your build is very neat and tidy. Love it! I also like your wiring video's going to be very helpful when I get to that part! hah!

Thank you! Here is the piece I was told to remove. Holder and locknut. Once these are removed it allows the cable to have the little extra length it needs for the tube to sit in the correct spot for the housing.

2jancpy.jpg


You can see what I mean about it being a little "funky." The throttle functions great, but the cable isn't snug into the housing. I'm going to call TC bros again and see if they know of a way to secure the cable in there better. If not I'm going to try and brainstorm of something.

20pa3bl.jpg


Hope that helps!
 
I was going to suggest the same type of thing as Two Many. If the housing is made of aluminum you may be able to drill and tap in the bottom for a small screw for a retainer. The other possibility is you might be able to shorten the outer cable housing at the carb end using a dremel to cut and split the outer cable housing and reinstall the adjuster and lock nut. If you go this route it would be best to practice on an old cable so that you get the feel of just cutting the outer housing.
 
It does help and I'll look forward to see what solution you come up with. I'm not at that point yet, but I'll have a think as well.

I guess ideally you'd like to add thread to the top of the elbow and screw it into the housing. Although that would be a PIA to remove for adjusting!
 
Last edited:
...I guess ideally you'd like to add thread to the top of the elbow and screw it into the housing. Although that would be a PIA to remove for adjusting!

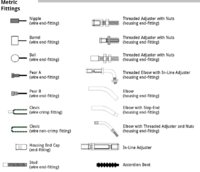
Many smaller bikes of that era had threaded throttle elbows. Still available. You thread it in, set the exit angle desired, and lock it down. The adjuster is on the end.

Pic taken from Motion Pro website:
 

Attachments

  • CableFittings.jpg
    CableFittings.jpg
    165 KB · Views: 178
Little more progress. Waiting on some more cash to order some more parts. Getting close to being able to start her up!

Dissasembled the rear wheel to figure out why the shoes were binding and why the spacer in the middle of the wheel wasn't sitting correctly.

First removed the shoes. Installed with some grease on the pivot points. Made sure the pivot points were clean; greased

zy8zrk.jpg


Re-installed the bearings. This time I did the process a littler differently. Installed the smaller bearing with red loc-tite first. Then the spacer, then the larger bearing with loc-tite. I put the axle through the whole assembly to made sure it stayed center. Lughtly tapped the outer edge of the bearing with a punch until the larger bearing with the top hat spacer met firmly with the inner spacer. Much better!

288xvsp.jpg


I also installed the axle from the right side of the bike. Before I was installing it on the left. With the whole assembly off of the bike I noticed that the axle enters the drum brake hub easier from the right rather then the left. Could've also conrributed to the hub binding in the wheel.

Hooked up the rear brake linkage pedal, and adjusted. Still waiting on the modified anchor rod.

2zqhj4k.jpg


2u4skkz.jpg


Found some nice stainless hose clamps for the intake manifolds.

ve2lh0.jpg


I was going to run the bike without the horn. But now, it bothers me that I have a horn button on the bike that is not functional :laugh: I'm thinking about mounting it here somehow, since it is the only free tab that I have on the frame now.

nn74lu.jpg


And lastly, tested for a spark on both plugs today. Both checked out :bike:

2lihnph.jpg


Decided on an exhaust set-up from Gordon Scott. I'm suprised he hasn't emailed me saying he's doesn't want to do the pipes for me anymore :laugh: I've had to have changed my mind about 3 times now. 2-2 with 12" shorty mufflers, with a slight kick up just after the footpegs.

Also decided that I'm going to run a modified (bobbed) front fender, painted the same grey color as the tank.
 
Just read through all ten pages, o my god. You're definantly breathing a new life and style into that bike its sure to get some looks.

On the throttle cable issue, my brother has a 82...ish? Kawi kz440 with an adjuster inline. It may be clutch side now that I think about it. It should work for throttle too since its just the cable tubing/housing. Tap the housing, thread the end and install. The adjuster is set up like the two nuts removed only longer which would make adjusting just as easy as having the two nuts by the housing. Just another idea, it is a custom bike after all.

You can see what I'm rambling about here.
http://www.d2moto.com/p-30558-1980-...&cagpspn=pla&gclid=CJSP2NaGj7wCFYVDMgodl2kAig

Thanks for the kind words and information mn650 :thumbsup: I will look into that!
 
Installed some inline fuel filters and 1/4" marine fuel line. This fuel line is pretty thick, it may actaully be too thick to seal on these little barbs the XS uses. Time will tell when I put some gas in the tank. If they don't I'll resort to some thinner 1/4" line.

This is the way I ended up running the lines and filters.

2uzxbn8.jpg


20gldoj.jpg


33oo2e8.jpg
 
Back
Top