Flattrack racer build

Great thread love the pics. Can you share any details on the R&D right side shift conversion?
wondering what all is involved inside the cover.
 
Robert sorry I could explain better here are some pics. that should help. They come as seen in the picture with out the shim.. to get the proper spring height bore the hole in the cup to fit over the collar of the guide.. add the shim.. it am not look like much but it give you enough to make the 1.3" spring height. Gary
 

Attachments

  • 0408151326.jpg
    0408151326.jpg
    158 KB · Views: 313
  • 0408151327.jpg
    0408151327.jpg
    200.8 KB · Views: 326
Ok, Gary, here is how I determined my installed valve spring height using the pics. In pic #2 I measured the total thickness of the RD spring cup which is .260". In pic #3 I measured the "shim" thickness of the cup which is .061". Now if you subtrack #3 from #2 you get .199" (let's call it .200"). This is the distance from the upper edge of the cup to where the spring rests. Make sense? Now pic #1 shows the distance from the upper edge of the cup to the retainer which is 1.144". Now add .200 to this and you get the installed spring height which is 1.344" Get it?

This height is too much. It should be between 1.3 and 1.325.

Pics 4 thru 5 show how I installed the shim and cup as you described. But I'm thinking that if the cup rested on the guide as I showed in my previous post the spring height would be the proper number as it would raise the cup up just a little bit. Problem is I already modified the cups to fit down around the guide so now I need to call Megacycle and see if I can get a new set of cups. The other alternative would be to use thicker shims. Is this possible?

Please let me know if this makes sense Gary as I don't want to miss something or see if I made a mistake.
 

Attachments

  • IMG_1147.jpg
    IMG_1147.jpg
    184.3 KB · Views: 226
  • IMG_1146.jpg
    IMG_1146.jpg
    165.7 KB · Views: 246
  • IMG_1145.jpg
    IMG_1145.jpg
    170.9 KB · Views: 219
  • IMG_1138.jpg
    IMG_1138.jpg
    151.3 KB · Views: 229
  • IMG_1141.jpg
    IMG_1141.jpg
    119.5 KB · Views: 250
  • IMG_1142.jpg
    IMG_1142.jpg
    135.6 KB · Views: 221
gggGary, here are some pics of the clutch side cover with the right side shift conversion. Roger at R&D asks if you want to keep the left side shift before he begins work. You also need to supply a shift shaft with your side cover. Hope this helps.
 

Attachments

  • IMG_1148.jpg
    IMG_1148.jpg
    144.6 KB · Views: 253
  • IMG_1149.jpg
    IMG_1149.jpg
    130.3 KB · Views: 265
  • IMG_1150.jpg
    IMG_1150.jpg
    145 KB · Views: 249
  • IMG_1151.jpg
    IMG_1151.jpg
    146.2 KB · Views: 262
You know Gary, like an idiot I didn't measure that first. I should have because it would have showed me that the cups didn't need modifying in the first place.

I called Megacycle and they don't have any 103-Y cups in stock. I'll have to call RD directly tomorrow. Good thing is they are in California so if I need to order some it won't take long to get them.
 
Ok so now while I wait for the spring cups I thought I'd try to get the oil pump installed. Does anyone know what the marks are for on the inner and outer rotors? The inner rotor will only go in one way so what are the marks for? Do they need to be lined up when installed in the side cover?
Also the Clymer manual says to make sure the inner rotor notch is lined up with the shaft pin. ???? What does this mean? What am I missing here?
I'm not sure if any of this stuff is important. Just throwing it out there.
 

Attachments

  • IMG_1152.jpg
    IMG_1152.jpg
    201.5 KB · Views: 235
  • IMG_1153.jpg
    IMG_1153.jpg
    193.5 KB · Views: 250
Just finishing up a 700 with #1 cam anyone interested? ..should have 57+ hp..but I wanted to add this .. I like to find TDC with the head off, It make life easy looking at the pistons.. when I do I mark the gear on the right side like the picture. I also use a degree wheel for cam timing etc. but sometimes I bump the wire and not sure where I am at. This makes life easier.
 

Attachments

  • 0409151438.jpg
    0409151438.jpg
    173.4 KB · Views: 246
Great idea Gary, I must remember to do that.

More clutch issues...
I had to search this forum for a while to find one little tid bit of info that my manual doesn't have. The proper clutch nut torque. The "all about the XS650 clutch" article in the tech section is where I found it.

Now I have some confusion about the washer behind that nut. I have a few different clutch hubs and all have the little recesses for the locking tab washer but one does not. The one that doesn't must use the conical spring washer. My question is can I use the spring washer in place of the locking tab washer even if the clutch hub has the little recesses for the locking tab washer? I'm not a big fan of the locking tab washers but I'll use it if necessary.

Also, do my pics show the proper sequence of washers and bearings both behind the clutch housing and between the housing and the inner hub/boss?
 

Attachments

  • IMG_1157.jpg
    IMG_1157.jpg
    182.1 KB · Views: 227
  • IMG_1155.jpg
    IMG_1155.jpg
    138 KB · Views: 209
  • IMG_1154.jpg
    IMG_1154.jpg
    184.1 KB · Views: 229
Locking tabs work ok, if you are worried add a little blue locktite.. As far as torque I hit it with my 1/2" 100psi air ratchet, a couple three blips.
 
Gary I re-measured the valve spring height with the cups you sent me sitting on the valve guide. The installed height ended up being 1.280". Not enough.
My previous number with the modified cups sitting on the stock shims was 1.344" which is .064" more than 1.280".
Are you sure it's not ok to run the valve spring height at 1.344"? The difference between this and the max recommended height (1.325") is only .020". Is this a make or break situation? If so then I need to find some shims that are .020" thicker than the stock ones.
 
Awesome. With all your experience I figure you aught to know. This is good news. I can keep moving forward on this project.

The Amateur Sacramento Mile is back on this year (May 30) and I'm in a mad dash to try and get this bike done in time for that.
 
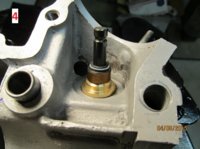
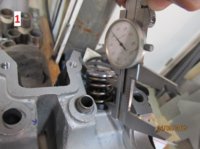
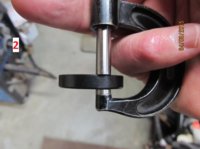
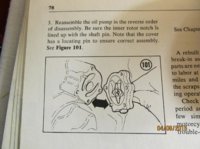
Champ, I'm sure you're aware of this, but once you have the final setup on the valve springs put a dial gauge on each rocker and turn the engine so you have maximum compression of the valve spring. Measure for coil bind with a 0.010" feeler gauge by sliding it 360 degrees around each spring coil. The feeler gauge should glide easily between the coils with no sense of binding. If it doesn't, then you need to slightly increase the installed height and remeasure. Typically, the installed heights will vary slightly, so you need to check for bind on all four rockers.
 
Well I finally buttoned up the engine for the last time. Got the Megacycle 250-30 cam degreed in to the "straight up" position with all clearances checked.

The Shell cam covers I have are machined funky (maybe they're defective). The shoulder on the inside of the cover isn't machined concentric to the rest of the body. This is hard to see in the pic with the o-ring on the shoulder. It took me a while to figure out why I couldn't get them to install correctly. But once I saw what was wrong I figured I would machine the shoulder down so it was concentric which would make it's overall diameter smaller (the other pic). I thought this would make the shoulder too small for the o-ring at first but I got lucky and the o-ring still fit, albeit just a little looser than before.
I also found two stripped cam cover holes that I had to repair.
Once that problem was solved I got the 8 disc clutch put together (with Ferrodo springs) and the PVL ignition installed and timed to 38 degrees (thanks Gary).
Then I rigged up a safety wire set up for the output sprocket so I wouldn't have to use a locking tab washer. I really don't like locking tab washers, especially on a flattracker where gearing is changed often.

Side covers on, oil sump screen installed and clutch cable worm drive installed. It's finally ready to put in the frame!

I can't believe I've come this far.
 

Attachments

  • IMG_1162.jpg
    IMG_1162.jpg
    166.9 KB · Views: 294
  • IMG_1161.jpg
    IMG_1161.jpg
    185.1 KB · Views: 310
  • IMG_1160.jpg
    IMG_1160.jpg
    139.3 KB · Views: 291
  • IMG_1159.jpg
    IMG_1159.jpg
    146.7 KB · Views: 315
  • IMG_1163.jpg
    IMG_1163.jpg
    218.4 KB · Views: 332
  • IMG_1164.jpg
    IMG_1164.jpg
    133.6 KB · Views: 316
  • IMG_1166.jpg
    IMG_1166.jpg
    120 KB · Views: 304
  • IMG_1167.jpg
    IMG_1167.jpg
    183.8 KB · Views: 325
Back
Top