Refurbing a '78 Standard

pckopp

XS650 Addict
Messages
307
Reaction score
97
Points
28
Location
Spokane, WA
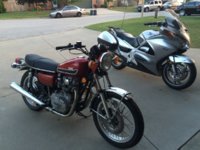
I have been working on my '78 Standard for a couple of months now. I have it apart as far as I'm going to go and I thought you could follow along as I get it put back together.

This refurbishment is a classic case of Project Creep. When I started, I only wanted to do one thing. By the time I put my tools down I had the engine out of a bare frame. It got completely out of control. One thing led to another and before you know it... Well, it is a slippery slope.

I got my hubs vapor blasted, as well as some other pieces. They turned out really well. So did I come home and lace up my wheels? Nope. I discovered my battery overflow tube has disintegrated and there was battery acid cancer all over my battery box and all around the area. So I removed that. You can see how the project creep sneaks up on you.

Fortunately, I have a friend who owns a car restoration shop and he has a sand blaster cabinet I can use as well as some other tools. And he and his techs have a lot of expertise I take advantage of. I take them donuts and coffee regularly.

The current status is that the frame and swing arm have been sand blasted and are waiting for sealer and paint. I have degreased, de-rusted, and cleaned what seems like hundreds of fasteners and other small parts.

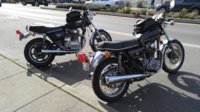
The project bike is the one on the right. Updates and photos as I go along.
 

Attachments

  • 0318161438.jpg
    0318161438.jpg
    204 KB · Views: 288
The bike is on my stand and the wheels are off. Pull the side covers and this is what I see. Ugh. The overflow tube ends just behind the wire harness and looks like it has been chewed off. The frame and center stand have battery acid cancer. Out it comes. Project creep is full steam ahead. It took several passes through the sand blaster and with the rattle can to get it like this. "Good enough for who it's for!"

batterybox1.jpg batterybox2.jpg batterybox3.jpg
 
I have a painted frame and swing arm. Suddenly I have a lot to do!

Might as well start with steering head bearings. Got the races in.

BottomRace.jpg TopRace.jpg

Now back to work.
 
While apart, a grease fitting in the side of the neck is a good idea. Then you can keep your new bearings greased in the future without disassembling things .....

GreaseNipple.jpg


You will need to take another step with your Standard model. The steering neck is a hollow tube, open on the bottom, and with a hole in the side for the fork lock to engage. You need to block off that open bottom or grease will just fall out of there. I used an old wine bottle cork. Drive it up into the bottom to just below the steering lock notch.

It's also a good idea to add what's called a "grease saver". This will fill some of the void in the neck so less grease is required to fill it up. 1" vinyl tubing from the hardware store works well. Tight fit but will pound on a lubed stem and after being warmed with a hair dryer or heat gun. It's a very nice tight fit. This pic is from YL76 .....


After it's in place, cut a hole out of the side for the steering lock.

If you're using the All Balls bearing kit, you see it comes with two grease seals. They are identical. Do use one on the bottom along with the original seal. It fits up into the neck nice and tight and seals the grease in very well. You needn't bother installing the top seal. It doesn't do anything.
 
The bike is on my stand and the wheels are off. Pull the side covers and this is what I see. Ugh. The overflow tube ends just behind the wire harness and looks like it has been chewed off. The frame and center stand have battery acid cancer. Out it comes. Project creep is full steam ahead. It took several passes through the sand blaster and with the rattle can to get it like this. "Good enough for who it's for!"

View attachment 89179 View attachment 89180 View attachment 89181
I remember sand blasting my battery tray. It was a pain in the butt!
 
While apart, a grease fitting in the side of the neck is a good idea. Then you can keep your new bearings greased in the future without disassembling things .....

And do I need to pack the bearings when I install them? They are greased but it looks almost like Vasoline. Very light. Certainly not packed.

Thanks.
 
Nice looking bike - and you're doing a great job on it!

Let's keep those mid-70's standards a-rollin'

Pete
 

Attachments

  • My_Bikes.JPG
    My_Bikes.JPG
    192.5 KB · Views: 251
You will be amazed at the amount of grease you can pack into a new bearing.
 
Harbor Freight has a bearing packer also. It has a clear cup you put the greases in, A white funnel shaped piece goes in on top of the grease. A bearing sets on this white piece. A red plunger goes on top of the bearing. Push the plunger and grease flows through the bearing.
It takes a bit of pushing. I use a 2 foot long piece of 2x4 and the Harley. Put one end of 2x under bike, put bearing packer under 2x. push on 2x. Much quicker and cleaner than by hand or the screw together bearing packer.
Once the bearing is packed put the red plunger inside and put on the cap. Stores the grease right inside.
Leo
 
Somehow I managed to jam my thumb and for a couple of days it really was uncomfortable. No idea how I did that but so it goes. I took the weekend off. Seems back to normal this morning.

I have some issues with the frame. I will follow up when I get back to it. In the meantime...

Today I am putting the forks back together. Everything is clean and ready to go. New fork seals, too. 7 ounces of 10wt fork oil to start.

While looking at some of the fork threads in the Tech section, I noticed HHB used grease when he assembled the lower damping rod "cup". Is that just to help hold it in place or is there some further benefit?

Before, after, and ready for assembly. Yes, there are springs.

ForksAfter.jpg ForksApart.jpg ForksBefore.jpg
 
Yes, the grease is just to hold the "cup" on the bottom of the damper rod, but if you assemble things with the parts laying on their sides like in your pics, you shouldn't need it.
 
Do I see a set of emulators in your fork assembly? It has been a while since I had a set apart.
 
If you're using the All Balls bearing kit, you see it comes with two grease seals. They are identical. Do use one on the bottom along with the original seal. It fits up into the neck nice and tight and seals the grease in very well. You needn't bother installing the top seal. It doesn't do anything.

Yes, got two seals. This is the correct order of assembly, left to right? Original rubber seal, All Balls seal, bearing - not yet packed.

shborder.jpg

Thanks!
 
Back
Top