Because I have Hugh's PMA and it doesn't use one.
Every rotor should have a woodruff key. Its just a bad idea to have a rotor that is not keyed to the crankshaft. With one engine blow up, why leave yourself open to a second engine failure. I suggest it is important to set the timing correctly, and to know that the timing mark will not move in the future.
 
Last edited:
put on a big dab of white out then a fine black line. But without a key to the crank count on it moving.
 
Who says they do?
Well guys, top end success!
Started first kick.
Timed up nicely.
Now I have a fuel leak at the T into the carbs.
Find a O ring that fits?
Very frustrating, but I knew this day would come.
Any suggestions would be greatly appreciated.
Thanks again for the input
I'm still concerned about no key to the crank or how to create a stable timing mark. I'll have to ask Hugh.
Peace all!
 
I can't be the only one with an HHB PMA with this issue. What are others doing to get and keep an accurate timing mark?

Dude, there's a woodruff key for your Hugh's PMA. He in-depth tells you in the instructions to set it with a little locktite first and come back in an hour so it doesn't slide to and fro while mounting. Are you sure your's was mounted without one? That's a nasty potential recipe waiting to happen. He also goes over marking your timing using a paint marker and the sticker.
 
Because I have Hugh's PMA and it doesn't use one.

I have a key on my PMA, granted I pieced my PMA together. I originally didn't, but I later pulled the rotor and put one in so I could make timing marks. I just filed down the stock one to fit the banshee rotor. Made the marks on the rotor after that.
 
How can the rotor stay put without a key?

As for the "T", look in the tech section.
https://www.facebook.com/KompotiIsL...547990632055/1840154732971379/?type=3&theater

I use a piece of fuel line and a nylon "T"

.......
See this woodruff key? It’s no longer needed, pull that sucker out! Sometimes it will come right out, other times you will need some pliers/vicegrips to grab it. I had to use Vice Grips today.

101_7967.jpg

Get that sucker out of there! (Previous install threads mentioned making a whole new woodruff key, but you won’t need to do so. All the woodruff key does is locate the OEM rotor on the crank for timing mark reference. We’ll be making new timing marks, and the taper on the crank matches the new flywheel perfectly for a precision fit.)

101_7969.jpg


101_7970.jpg

Hugh's directions say pull that sucker out and that the taper of the PMA magnet matches the rotor and with 29ftlbs of torque it will stay put.
Those are his directions. However, checking that the timing mark is still correct when timing is still simple finding TDC and checking the mark. So at this point I am not concerned as long as the timing mark is accurate when I do the actual timing...which I did and it all worked fine.
Now on to the leak at the T. Will use the neoprene gas line and the press on technique recommended by a prestigious member. Thanks again.
 
Quote:
" the taper on the crank matches the new flywheel perfectly for a precision fit."

Well HHB may say that, but its been found that with those Chinese rotors, the taper, and the keyway are not always machined correctly
and do not match the stock engine crankshaft. Rotors are not balanced either.
 
Years ago I had a Puch R125 scooter. When it backfired the rotor would slip and shear the Woodruff key off and bugger up the timing. To prevent this I had to grind the rotor to match the crankshaft perfectly. This was done by hand using fine valve grinding paste. This gave a perfect fit and the problem was solved.

Perhaps this is a solution here ..... ????? But a key would be better!
 
Dudes, The top end job looks to be complete.
Fired up after the crazy T leak. Thanks Pete. The local Yamaha dealer had the neoprene fuel line. Cost me a buck.
I replaced all of the external screws in the carb while I as at it. Thank God for impact wrenches and vice grips.
I did reinstall the ball and spring and bearing and the choke works great. Thanks for the info from Jayel and 650.com
Fired up after five kicks.
Timing was perfect
Fifty, change oil, re torque. Hunnert, change oil, re torque. Two hunnert, change oil, re torque and check all nuts and bolts and run like hell.
Again, thanks to all of you for your input and archival help. I was using info from five or six years ago...but the bike is nearly forty.
I have learned a ton.
Just wait till I split the cases...
Grace and Peace, All!
 
So, part of my rebuild involved new intake manifolds. When I installed the carbs after the new screws and repairing the T and installing the spring and ball on the choke I must not have tightened the band mounting the carb well enough because one of the carbs blew off the intake manifold resulting in only one side firing. Which was cool for a minute. I never actually experience only one side firing before and I know there are some tests to do which require one side at a time and I may reinvestigate those tests now that I know the bike can run on one side only.
Well, I did find and fix it and then it started and fired both sides, but all of a sudden the bike stopped and I couldn't get it started again.
I really ruminated why this might have happened. I checked the advance rod and the advancer and the Pamco looking for some indication of what might have happened. Then I thought what might be the easiest solution...a fuse. And low and behold, that's exactly what it was. I replaced the 7.5 fuse for the ignition and it fired up first kick.
What went wrong? Well I did remount my horn, which for some reason has caused me some issues in the past, so I removed it. There must be a short somewhere to cause the fuse to blow...but where? Any ideas of paths to follow? I know I might just be posting to my self at this point but I am still open to any input you might offer.
In the mean time, I am going to re check my timing and look for any loose wires, especially grounds. There is the one on the top motor mount that I noticed when I took it off for re torquing.
Oh yeah, I will re torque today as well.
Other than that, I am going to keep my break in rituals and continue to enjoy my new pistons, rings, valves and cam chain while changing my oil frequently.
Peace All
 
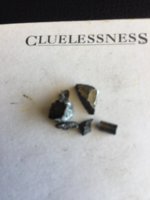
So I did my 100 mile oil change and cleaned the filters. This is the last of what fell out of the bottom of the oil pan.
Notice the little round register pin. That baby fell through the whole engine and came out in the end. It was probably the culprit all along. IMG_3521.JPG
Have a great weekend. Be safe out there.
 
Back
Top