1976 XS650 restoration and rebuild, advice and help welcomed!

I didn't want any of that safty stuff to work on my machine so I took a hot wire to the plug in on the sylinoid and pluged it in where the red/white wire from the safty switch goes....(left it unplugged) now when ever the start putton is pressed it turns the starter ! ....
....
Nice looking machine and I do Love those pipes !!!!!!

Bob.......
 
After a lot of distraction from non motorcycle building... I am nearing the tail end of the wiring. Here is a quick write up on my Pamco install, with the e-advancer. "Ultimate Pamco Electronic Ignition with E-Advancer/Ignition Coil Kit" SKU: 14-0907 from MikesXS. The instructions for installing the Pamco unit are very good from @pamcopete , so I will spare that step by step. Where I did find myself in need of help was getting everything straight with the e-advance unit. For that, I'd like to thank everyone that has contributed to the Pamco threads in the Tech section, as well as those who've weighed in on my questions within this thread, and pm's. You know who you are!

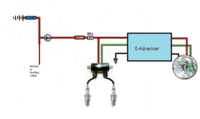
Mailman and RG both pointed me towards the attached mini diagram, for the e-advance wiring.

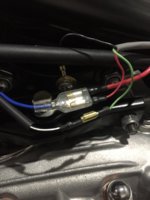
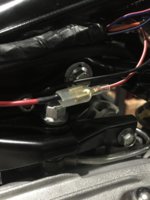
- The Red/White from the harness is connected to the 7.5a mini fuse lead, which wraps around the battery area, and then heads back towards the coil in a big "U".

- 3 wires from the e-advance connect as follows:
Red > shared connection to the coil (Blue), with the other end of the fuse lead.
Green > connects to coil (Black/white)
Black > Ground to frame

- From the coil, I had 2 leads. A Blue, and a Black/white. From what I could gather through the threads here, there is no polarity of the coil leads, so it was luck of the draw that the Blue met the e-advance and fuse red wires, and the B/W met the green from the e-advance.

So that's it! Again, thanks to everyone for their insights. Let's hope the 'plumbing' is sound. Getting close to the point where I'll be able to find out...
 

Attachments

  • Screen Shot 2017-05-26 at 11.31.01 PM.png
    Screen Shot 2017-05-26 at 11.31.01 PM.png
    204.1 KB · Views: 157
  • IMG_1146.JPG
    IMG_1146.JPG
    142.1 KB · Views: 152
  • IMG_1145.JPG
    IMG_1145.JPG
    131 KB · Views: 160
  • IMG_1141.JPG
    IMG_1141.JPG
    139.9 KB · Views: 169
Last edited:
Your usual nice work George! You're getting so close to having a runner!
Thanks Mailman, for the thoughts on using the bullet connections vs splicing. I ended up soldering the bullet connections for good measure, and everything will end to with heat shrink once I know the system is functional.
 
Question of the day... I noticed that my rear wheel was not spinning freely when the axle was torqued down. The drum plate was getting hung up on the hub shell. I have looked closely at the EV diagrams for the rear axle assembly, and made sure I have everything in place. I think I can gain the clearance needed with a thin washer on the axle, that would sit between the drum plate, and the hub bearing contact area (which should normally butt up against the steel insert of the drum).

Is this a terrible idea?

I am starting to feel that special kind of twinge... Not unlike the first time a gal said she'd go out with me. HA! Possibly for good reason. Threw the battery in last night, and 'tested' a few things. Some lights turned on, and some things flashed, an no fuses blew. But I stopped short of hitting the engine firing pin. More on that soon.

Thanks all for your thoughts!
 

Attachments

  • FullSizeRender.jpg
    FullSizeRender.jpg
    97.3 KB · Views: 162
  • axle.jpg
    axle.jpg
    104.6 KB · Views: 153
George did you install new brake shoes? That have zero miles on them?
When I replaced my brakes , the new shoes drug so much that the wheel was hard to turn and it made this dry scraping sound. It was so hard to turn that I took everything back apart, sure that I had assembled something wrong.
The short story is that the new shoes just were dragging on the drum and needed a few miles to bed in. I just kept bringing it up to speed and then doing easy slow downs and repeated that a few times and the dragging disappeared.
I'm not sure if that's the problem you are experiencing but I hope that helps.
 
Question of the day... I noticed that my rear wheel was not spinning freely when the axle was torqued down. The drum plate was getting hung up on the hub shell. I have looked closely at the EV diagrams for the rear axle assembly, and made sure I have everything in place. I think I can gain the clearance needed with a thin washer on the axle, that would sit between the drum plate, and the hub bearing contact area (which should normally butt up against the steel insert of the drum).
Is this a terrible idea?
I am starting to feel that special kind of twinge... Not unlike the first time a gal said she'd go out with me. HA! Possibly for good reason. Threw the battery in last night, and 'tested' a few things. Some lights turned on, and some things flashed, an no fuses blew. But I stopped short of hitting the engine firing pin. More on that soon.
Thanks all for your thoughts!

Hi George,
looks to me like the red-circled area of part 13 in the drawing is a fair bit longer than the same thing in your photo.
Was this wheel & hub ever installed and working? Do you know if the hub's bearings, spacer tube and bearing insert are all in place?
Check that first.
Then trial assemble the brakeplate into the hub adding 7/8" plain washers between them until it tightens down hard and the brakeplate don't rub.
Thanks Mailman. These are not new shoes. I'm pretty confident the contact is coming the drum plate being a teeny tiny bit too close to the hub. I think I'm over thinking this. A small wafer this spacer shouldn't be too much an issue. I was worried they something might get deformed or blow up inside the wheel. I think I just need to make sure I use a good quality steel washer...
 
Hello again everyone, today might be best described as the best of days, and the worst of days. The 'worst' being an exaggeration, but somewhere in between. After 2+ years, millions of emails, and due to the extremely gracious community here, the old 76' hit a major turning point today. She fired up!!!!


The only problem is, that I can't seem to get her to fire up again... I will be trying to chase that down. The battery seems dead, the probes only gave me a reading around 5volts, not the 13.75 ish when fully ready. I do know that the headlight stays on, the HL switch is not turning it off. Perhaps that it the drain... Beyond that, if anyone has a good direction to start in, I am all ears!

Thanks as always everyone!
 
Well done achieving that first start up!:cheers:
I see you using the throttle a couple of times. With a cold engine, these bikes don't like to start with any throttle at all. It leans the mixture too much. Did you use the choke? Normal cold start is choke on, don't touch the throttle and just push the button. Once it fires, give it some throttle and then quickly choke comes off.
 
agreed - to start the bike you MUST use the choke (it's really not a choke but rather an enrichener circuit int he carb) and you must not use the throttle (at least not very much) - or it will stall just about everytime in my experience.

As for the light staying on....well, that will definitely drain the battery in short order.
 
Hey George! Congratulations, the bike sounds great. I'm confident you'll get it sorted out. In my personal experience , more often than not, it's never just one thing, but rather a number of small things that require sorting.
It seems that every success brings new challenges. You'll get there, just keep swinging!
 
Well done achieving that first start up!:cheers:
I see you using the throttle a couple of times. With a cold engine, these bikes don't like to start with any throttle at all. It leans the mixture too much. Did you use the choke? Normal cold start is choke on, don't touch the throttle and just push the button. Once it fires, give it some throttle and then quickly choke comes off.
Retired, thank you. Lets chalk my throttle use up to rookie knowledge. This is literally the first time I have ever started a motorcycle. I appreciate the heads up!
 
Hey George! Congratulations, the bike sounds great. I'm confident you'll get it sorted out. In my personal experience , more often than not, it's never just one thing, but rather a number of small things that require sorting.
It seems that every success brings new challenges. You'll get there, just keep swinging!
Thank you Mailman, much appreciated. Yes, time to address the new challenges. Starting with that headlight...
 
Hi George,
looks to me like the red-circled area of part 13 in the drawing is a fair bit longer than the same thing in your photo.
Was this wheel & hub ever installed and working? Do you know if the hub's bearings, spacer tube and bearing insert are all in place?
Check that first.
Then trial assemble the brakeplate into the hub adding 7/8" plain washers between them until it tightens down hard and the brakeplate don't rub.
Fredintoon, thank you. The wheels come from a reputable source here, one of the zen masters here. The rear hub came to me without a brake plate, so the hub and plate are not a matched pair so to speak... all the necessary parts required are present. I will report back on the next test fitting... Thanks again!
 
Back
Top