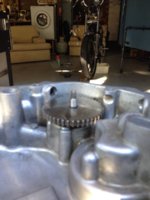
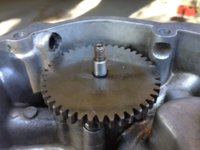
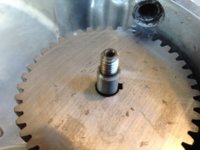
Can anyone tell me how to remove the oil pump drive gear from the shaft? The manual is fairly casual on the issue. I have read both "I Am Carbon" & "Airwolfe's" excellent thread's on this procedure plus a number of other posts dealing with the process but, according to all, the worm drive and this gear drive should just lift off. I have removed the woodruff key and the drive spins and wobbles freely on the shaft but it won't slide over the chrome shaft end shown in the pics. I have pried, levered, heated and tapped to no avail. Could the shaft be deformed? Is it a wheel puller job? I would have left the bloody thing alone but I found debris in the filters and wanted to check the condition of the pump rotors.
-
Enjoy XS650.com? Consider making a donation to help support the site.
XS650.com receives a small share of sales from some links on this page, but direct donations have a much greater impact on keeping this site going.
You are using an out of date browser. It may not display this or other websites correctly.
You should upgrade or use an alternative browser.
You should upgrade or use an alternative browser.
Oil Pump Drive
- Thread starter David Toll
- Start date
Bob Kelly III
Ranch Kid from way back,.... that got Old !
Hi David ! a small gear puller should do the trick for ya I doubt it's stuck on their very hard.....
.....
a trick/ Hack that can destroy everything is putting the nut back on far enough to be level with the top of the shaft and hold the weight of the thing by the gear only and smack the end of the shaft and nut , with a brass hammer or heavy plastic mallet.... to drive the shaft in through the gear....
..... I wish I had a dollar for every stuck shaft I've removed like this.... but it's certainly not foolproof as you can mushroom the end of the shaft and mess up the threads too ( that's why the nut back on there) ....just don't get carried away beating on it ! or you'll destroy the shaft... the best is a small gear puller....!
you need one anyway David just grin and bear it and go buy one.... they are handy in many ways I have one store bought and 3 home made gear pullers...... getting v belt pulleys off shafts is always hard if they have been on there for decades
.......
the trick with getting stuff off shafts like that is an even pull ...very hard to gauge if the pull is even, so the gear puller is by far the best option
.......
Now watch... there will be someone bitching at me for telling you a way to do it without a gear puller because it's not Perfect ! few things in life are perfect and Working on your own bike without all the tools is one of those !
......
Bob..........
Yeah, they can be a bit stuck, especially if the shaft is bent. You should be able to get it to budge by fitting a pair of thin wedges under the gear, just enuff to lift it up and hold it there.

Then, a gentle tap on the shaft, with a brass hammer, should drive the shaft downward about 0.010" (0.25mm).
Or, use a small punch in the hollow of the shaft.
Or, thread a 6mm nut on to protect the threads, tap on the nut.
Then, refit the wedges, and tap again.
Repeat 'till it's off.
The exposed pump body looks like this:
Try Bob's first trick, holding the weight of the thing by the gear, and tapping on the shaft with a brass hammer...
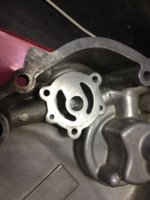
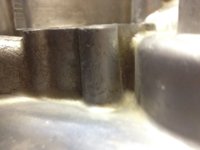
OK. Bought a wheel puller, (thanks Bob,) and got the gear off the oil pump shaft. Tried the wedge technique first Two Many but couldn't budge the thing. As everyone has suggested, getting the screws out of the casing proved to be more difficult than I had hoped. Bought am impact driver (manual) and eventually moved them, though with considerable damage to their Phillips heads, (had to cut a slot in the top of one). Removed the cover and found that the large rotor was cracked, (see photo 1) and that there was a reasonably large scour in the surface of the case under the smaller rotor (photo 2).
I also believe that the shaft may be slightly bent and this is what caused the difficulty removing the gear. I noticed scouring on the inside of the case cover which also makes me think that something has been running out of alignment (photo 3).
I have located a new set of rotors, pump cover, shaft, etc in the States for $50 ($64 in AUD) + $22 ($30) postage and I assume that this is the way to go. I really don't want to try to sand that scratch out of the pump base - can't guarantee that it will stay level. Should I try?? I wonder if anyone knows why the large rotor would be cracked right through and if this could mean that the engine has been running without proper lubrication? Is it likely that a bent shaft could cause the gear to run out of true and dig into the casing wall? That shaft looks pretty solid. Is there anything I should check with the seller before I fork out a hundred bills for the replacement pump. Mine is a '78 the new pump is off a '79.
Cheers
Bob Kelly III
Ranch Kid from way back,.... that got Old !
My experience with this oil pump is Zilch-zip-Zero ! but I don't like the deep scratch in it, or the crack in the rotor ....
I think it got a chunk of gear tooth in it and caused the damage ! not good at all !
you could run the cases ok but i WOULDN'T USE THE ROTOR UNLESS THEY ARE SUPPOSED TO BE LIKE THAT !!!!!
HAHAHAHA ! which I doubt very seriously ! ...
I would take some emery cloth and a block of wood and try to get most of the scratches out of the side case....
you won't be able to get that deep scratch out that way but you can get all the rest ok...
what you need is a Milling machine and take off 2 thousandths or so and make sure it's perfectly flat... but not having that it will still work fine for many years with only a tiny drop in oil pressure because of the scratch.... not enough to notice i'm sure !
......
one time I had to re use a nasty really chewed up oil pump in a 6 cyl chevy PU..... 54' i think it was.....
I didn't have the money to replace it so I cleaned it up the best I could and put new rod bearings in it.....
to my surprise the oil pressure was right up there where it should be ! and the scratches were deep ! too ! but I was careful to match the parts the way they came apart ! when I put it back together... I think that is what did the trick ! LOL
those rod bearings were paper thin and rattling and I needed the truck so I had to do something.... as it worked out the truck ran great for years to come ! I put an oil pressure gauge on the dash the first week I had it and the oil pressure was something like 20 psi
so I knew I had to do something soon ! after new rods and cleaning up the oil pump it was at 50~55psi ...
compression was still low but it ran like a champ ! LOL
that's how I know scratches won't effect the oil pressure much.... same thing with Volkswagen ! LOL
they have a meshing gear oil pump and are always scratched to hell ! HA !
.... get that thing together David !!!!!!
Bob.........
Bob I love your enthusiasm and your wealth of anecdote. Makes me feel like getting out there right now and fixing the bastard. Unhappily, my wife wants to take me to dinner. Oh well, happy wife..... you know the rest.
Thanks 857, that's one less worry on a long list.
Thanks 857, that's one less worry on a long list.
Bob Kelly III
Ranch Kid from way back,.... that got Old !
indeed thanks Azman!
....
Bob.......
....
Bob.......
Bob Kelly III
Ranch Kid from way back,.... that got Old !
David ! Why is it your wife wants to take YOU to dinner and I have to take My wife to dinner..... I think I need to train my wife better !!!!!
LOL
.....its funny it's like ... Your taking me to dinner tonight....just so you know early ! LOL ! and I say OK sure ! LOL
...well that's the way it used to be for 40+ years ...now it's we can't go out because we got no money better start soaking the beans AGAIN !
HA ! price ya pay for progress I suppose !
....Maybe I could train my wife to buy more tools eh ? you know.... mention that with more tools more house things could be made
I just can't figure out how to explain a Metal lathe is going to help fixing the house ! gott'a work on that ! HAHAHHAA!
.....
Bob...........
You've lasted 40 years Bob, you must be doing something right. Besides, "Money Can't Buy You Love" a poet once said.
David, there's several threads in here on the oil pump, including cracked outer rotors. Just follow the book specs for inspections. Here's xsjohn's (rip) oil pump tune-up:
http://www.xs650.com/threads/a-collection-of-xsjohns-mods.2426/#post-26637
If that gouge in the sidecover part of the oil pump bothers you, you could fill it in with a smear of jb-weld. Thoroughly clean that area, smear some jb-weld in there, then press a piece of scotch tape over it, levelling it out. After cure, remove the tape, and you can use a perfectly flat stone to smooth the area. There's no real loads or contacts on that area, so should work fine.
Edit: If you decide to use a new MikesXS rotor set, be advised that you'll need to do some critical measuring and fitting first. If so, I have some pics on what to do there...
Last edited:
Thanks Too Many. I'll do the J B Weld bit to smooth that casing gouge but I have ordered the whole set up from motosmartparts in Utah, (wherever the hell that is. Saw it in John Ford's "Stagecoach" some time in the '70's or was it the '60's?? Alzheimer's man!!).
Edit: If you decide to use a new MikesXS rotor set, be advised that you'll need to do some critical measuring and fitting first. If so, I have some pics on what to do there...
Do you recommend that I refer to your photos if I am putting in replacement original parts, (albeit second hand)? Definitely need all the help I can get to do the job correctly and am grateful for your interest and support but I don't want to waste your time if it's a case of feeler gauging the gaps and levels as I have read in several threads.
Last edited:
I don't see a problem if you're going to use OEM parts, in good condition.
Okay, I'll post what I've found.
The MikesXS rotors I received have slightly different dimensions, both rotors, especially the outer, so thick that it will bind in the housing.

Now, this could be a good thing if you're trying to close-up the face gaps.
However, the outer rotor wasn't flat, the outer rim is thicker, kind of a dish shape. Had to lap the thing on a flat plate, using #280 wet-or-dry.

You should be able to see the lapping pattern on the outer rim of this partially lapped outer rotor.

After all that, the tip clearance (0.007") fails service specs.

Should still work, tho'. But, I have this as a backup spare.
And, decided to install the +50% 12mm oilpump instead.
http://www.xs650.com/threads/hp-oil-pump-from-mikes.40991/
Okay, I'll post what I've found.
The MikesXS rotors I received have slightly different dimensions, both rotors, especially the outer, so thick that it will bind in the housing.
Now, this could be a good thing if you're trying to close-up the face gaps.
However, the outer rotor wasn't flat, the outer rim is thicker, kind of a dish shape. Had to lap the thing on a flat plate, using #280 wet-or-dry.
You should be able to see the lapping pattern on the outer rim of this partially lapped outer rotor.
After all that, the tip clearance (0.007") fails service specs.
Should still work, tho'. But, I have this as a backup spare.
And, decided to install the +50% 12mm oilpump instead.
http://www.xs650.com/threads/hp-oil-pump-from-mikes.40991/
Excellent Too Many! I can run these dimensions over the parts I receive to check their specification. Thanks for the time and effort to post this.
Regards
Regards
You bet, David.
One more thing. Thoroughly flush the oil passageways, in case anything is hiding in there...
One more thing. Thoroughly flush the oil passageways, in case anything is hiding in there...
Will do.
Cheers
Cheers
So, got my oil pump bits from the States. All in good shape and worth the wait. As mentioned earlier, I had some minor scouring and a relatively major gouge on the case face of the oil pump. (pic 1). Decided to take this out with some 1200 paper wrapped 'round a flat steel bar. Scratches eventually came out but I'm not sure if the whole face is perfectly flat (pic 2 & 3). How critical is this feature to the operation of the pump? If there is a little unevenness in the face of the case will this seriously affect pump pressure? I have run a steel straight edge across the face and can detect a little light showing in places. Should I sand further to attempt to make this surface perfectly flat and level? I am concerned about creating play between the rotors and the case facing.
Attachments

Last edited:
CDNTX650
XS650 Guru
Id say pretty critical for flatness. You dont want to cockeye the pump and gear.
That last pic looks pretty cock eyed. You might be looking for a new side cover. The gouge was probably fine to clean up, fill with epoxy nice and flat and be done with it.
That last pic looks pretty cock eyed. You might be looking for a new side cover. The gouge was probably fine to clean up, fill with epoxy nice and flat and be done with it.
Bob Kelly III
Ranch Kid from way back,.... that got Old !
I'ed say ( and I'm no expert) I would assemble the oil pump in the case first and and lube it in the process, and turn it with your fingers
if it don't turn you got problems ! if it turns easily, squirt oil in the inlet and turn it by hand and see if it pumps OIL..... almost any rotor type oil pump will pump oil even when wore out, so your not proving anything by doing this.... the question here will it pump oil at the pressure
needed or not.... and for that you need to fully assemble it and put a oil pressure gauge on it....
.....
the main thing is when it's assembled in the case that there is no binding or hard spots when turning the oil pump....it should be halfway tight
but turn freely all the way through 360 deg...... if there is a spot in it's rotation where it gets hard to turn then you'll need to lap it more.
.....
just my opinion and I doubt its of much help .
hang in there David !
.....
Bob.........
Similar threads
- Replies
- 3
- Views
- 241