Boyer and Pamco Ignition

This pic of an e-advance circuit board shows labelling at the ends of the board for 'sensor' (top in pic), and 'coil' (bottom in pic)...

4-jpg.61778


Pic taken from this thread:

http://www.xs650.com/threads/pamco-e-advance-mounting-enclosure.45105/
 
Thanks 650Skull this is a great resource. I did have a couple extra questions to clarify:
1) when testing the transistor (thread - How I fixed my basic pamco and yet another pamco) one of the pins of the transistor is referred to as 'base' yet on the data sheet I dont see a 'base' pin but there is a 'gate'. Are these one in the same?
2) If when I rotate the rotor the green wire from the pamco never drops from 12v she is toast correct?

Im pretty confident I need new boards since my electrical system had some sort of surge while riding. Blew out a fuse and my headlight at the same time the bike quit. Actually third question there: Anyone know the ideal fuse size to put inline on the red wires (running a 277 rephase) powering the pamco?
 
Yes gate and base are much the same. Gate is the control terminal for a FET, while the base is the control terminal for a BJT.
Pamcopete recommends a 7.5 amp fuse to power up the Pamco. Green wire not changing voltage, would indicate failure I believe.

I'm going to guess that you have a PMA charging system, and maybe a capacitor in place of a battery.. Those systems can have very high voltage swings, that burn out headlights and ignitions. A fuse does not protect from high voltage. Your problem is likely due to the alternator generating too much current, which the loads on your bike are not consuming (unbalanced). Your regulator is failing to consume the excess current, so the voltage goes very high...................18, 19 maybe 20 volts.

Stock alternators don't have problems such as this. I recommend you use a stock type charging system.
 
Thanks for confirming that for me. I expected so much just wanted to be sure. Are there any other components to check that may also need replacing or is that transistor pretty much it for what with have failed? There is not burned or popped components on either board.

I actually used to have that PMA/cap setup but had so much trouble with that exact problem (I even used a ricks stator and regulator, would keep things at 14.5v but the stator overheated 3 times). Since then I switched back to a small battery and the factory alternator. Had been running fine for a while like that so not sure what just happened, still looking for the cause of the power surge.I will be mounting a volt meter on the bike from now on though!
 
The stock alternator does not produce high voltages, unless the regulator loses its voltage sensing input. If the input signal is lost, the rotor current goes to maximum, and high voltage is the result.
If you have a 1970 to 1979, with the 3 wire regulator, make sure that the black ground wire is connected to bare metal on the frame. That black wire cannot be connected to the battery box, because of its rubber mounting.
Of course if the regulator itself has failed, then that will cause high voltage.
If the regulator is the old original mechanical regulator, best to replace with a VR-115 (only for 1970 to 1979 years)

If your bike is 1980 to 1984, its the same story. Make sure the combo rec/reg is getting good connections for the regulator voltage sensing.

Yes, a voltmeter is a must on these bikes.
 
Thanks again. I'll be sure to check all that. Bike is a 79 and i had replaced the regulator with the vr-115 as i had found that suggestion on here before. Ground wire may still have come loose though or broken.
 
Hi there,
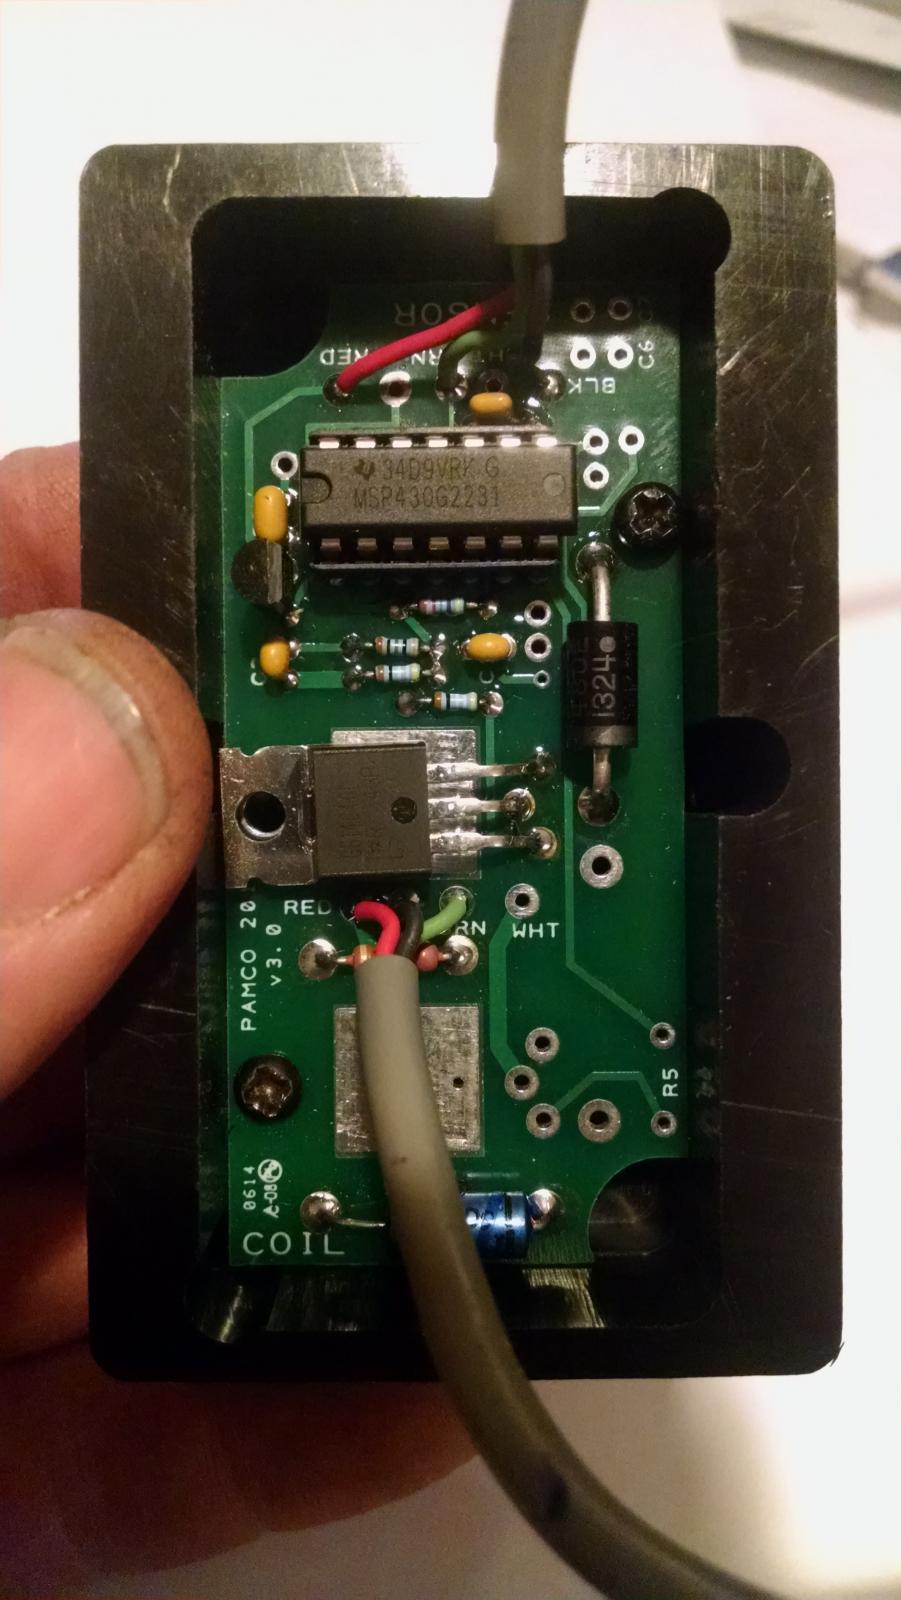
I have sent Pete a few emails with no reply so figured I would post here. I have completely gone through and tested everything again and I finally found a reading that I think is off. I got the ultimate high output Pamco system with e-advancer from MikesXS last October (2016) along with the PMA system. I installed it then and got GREAT results. In November, I tore the bike down and have been working on it every day since. This is the first bike I have worked on and have learned so much (a large % from Pete and these forums). I have done everything myself, paint, upholstery, etc. I completely rebuilt and polished the top end with all new parts and finally finished a few weeks ago. I got it to fire up, but it still needed quite a bit of adjusting to get it to idle. I got it to idle pretty well the next day for about 1 min then shut it off. The next day, I noticed there was a very small bit of oil in the left hand camshaft compartment (oil was only below the pamco unit). I noticed that the baseplate on the left side was not fully seated to the engine, so I removed the pamco, tightened the baseplate screws, and reinstalled the pamco. Everything fit perfectly (better than the first install) but since then I have not been able to get ANY spark. I tested the coil and got all proper readings. When testing the actual pamco plate(sensor) I get battery voltage at the red wire. When spinning the rotor by hand as per Pete's instructions, my reading on the green wire alternates between .3volts and 0 volts. If I am correct, I believe this reading should be alternating between near 0 and battery voltage?
I am first wondering if I only need to replace the sensor plate or both plate and e-advancer? Or if there are any cheaper options than the full replacement?
 
NLa...,
If that reading is on the green wire to the coil, then it's possible that the battery to the coil is not there.
 
I'm confused on what you mean. That reading was on the green wire at the sensor plate. The numbers on the coil all matched the proper readings. I have the battery connected to a key switch (with a 30A in-line fuse). Then the ignition terminal on the key switch connected to the coil(with an in-line 20A fuse near switch and split to E-advancer near coil connection).
 
^What he means is if you have 12V on the red, that should go through the coil and appear on the green at all times except when the ignition is trying to fire the coil. At the coil -- check for 12V from the red to ground. If good, check for 12V from green to ground. If 12V not on the green, remove green connector at coil and check coil there again. If still not 12V there then bad coil -- check ohms from red to where green was connected to confirm. If you did get 12V on the green terminal only with the green wire removed from it, it means bad ignition or bad installation. When you say it fits better than before, is it possible any metal trace on the board is shorting against something metal on the engine now?
 
Last edited:
I'm confused on what you mean. That reading was on the green wire at the sensor plate. The numbers on the coil all matched the proper readings. I have the battery connected to a key switch (with a 30A in-line fuse). Then the ignition terminal on the key switch connected to the coil(with an in-line 20A fuse near switch and split to E-advancer near coil connection).

The green wire on the sensor plate is connected to the MCU input port which has an internal pull up resistor to 3 Volts. You cannot reliably see this with some meters. You have to use an oscilloscope with a very high input impedance.If you were getting a reading between near zero and near battery Voltage on the green wire to the coil when rotating the rotor, then the system is working properly.
 
Ah ok! I tested again and got these numbers

At the coil...
Red to ground : slightly over 13 volts
Green to ground : slightly over 13 volts

Green at coil when turning the engine over...
Electric start : hovered between 7-8-9 volts
Kickstart : no change (13 volts)
Manually rotating rotor: no change (13 volts)

When testing I am using battery - terminal as my ground

I checked and I don't believe there is anything shorting the board.

Is it possible that the magnet in my rotor could be the problem?
Or an issue with the PMA?
 
Green at coil
Manually rotating rotor: no change (13 volts)
...
Is it possible that the magnet in my rotor could be the problem?
Check that the sensor signal is making it from the Pamco to the eadvance -- it should go noticeably low at some point when turning by hand. If the signal is happening and making it to the eadvance, then the the problem might be the eadvance, If it isn't happening, the problem is the Pamco or its installation.
 
When testing the green wire at the "sensor" side of the e-advance when manually rotating (multimeter red lead on green wire/ black lead on - battery): alternating between 0.3 and 0 volts.

When testing green wire at the sensor plate : alternating between 0.3 and 0 volts

Corresponding red wires test 12-13 volts

On the coil side of the e-dvance..

Red wire and green wire both test a constant 13 volts.
 
When testing green wire at the sensor plate : alternating between 0.3 and 0 volts

Corresponding red wires test 12-13 volts
.


I don't know how much more you want to get into it yourself, but my understanding is the green wire at the Pamco should be 12v except when the magnet is passing under the sensor. The Pamco would seem to have 12v on it so the problem sounds like it's either the sensor, or the transistor after it, or something between the two. It would take some circuit-level debugging that isn't called for. I was a little concerned about what you said about it suddenly fitting better but it suddenly stopped working. Probably coincidence though. If you want to continue on it yourself, figure out what voltages you should be seeing where, and under what conditions, and figure out why you aren't seeing them. At the coil, with an eadvance, probably the green wire would go to ground so briefly that you wouldn't see it on a meter. But it sounds like the Pamco itself isn't acting right (green wire low all the time).
 
Thank you xjwmx, I appreciate you taking your time to help. I haven't gotten any word from Pete yet but hopefully I will hear from him soon and will finally be able to get this bike in motion.
 
Back
Top