....when you really want to reach out and touch someone....
-
Enjoy XS650.com? Consider making a donation to help support the site.
XS650.com receives a small share of sales from some links on this page, but direct donations have a much greater impact on keeping this site going.
You are using an out of date browser. It may not display this or other websites correctly.
You should upgrade or use an alternative browser.
You should upgrade or use an alternative browser.
Jim's 1980 SG Miss September
- Thread starter Jim
- Start date
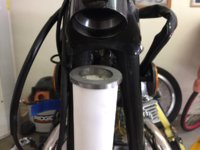
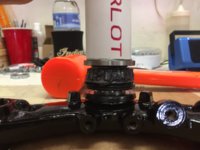
I bought and used one of those fancy a$$ed bearing drivers but sold it and went back to using this.
View attachment 111752 View attachment 111753
gggGary ? did you put this in
http://www.xs650.com/threads/homemade-and-unique-tools.37/
I'll see your BFH and raise it to a BMFH haha.And nothing says "I love you" like a BMFH!
Guess I'm stupid but had several bearing installs that needed tightening after a few miles, til I got really serious about hearing the change in ringing when the race is FULLY seated, shrug.
WER I haven't. I thought of it as about the same technical level as a rock, LOL Unlike 5T my shop tools tend to stay pretty crude.
FWIW I thought this
was pretty worthless, tried about 3 or 4 installs on a variety of bikes and ended up using the home made tool and BMFH to finish anyways. Guess I'm not fast enough for the hot, cold drop and done technique.
Last edited:
Yes, I may have some fancy tools, but I still appreciate and use a good hammer all the time. I have a similar pipe driver like Gary's for steering head bearings, except I haven't welded the old race to the bottom of it ..... yet. As Gary mentioned, the secret to hammer driving stuff is listening for that change in sound once the item is fully seated. I routinely hammer in steering head bearings, swingarm bushings, and wheel bearings. I've done so for years without any problems. But, after using a hammer on pretty much a daily basis for nearly 40 years at work, I may have a bit better skill set than most for this. I also use good hammers.

Yup, that's how I seated these bearing. Listening for that sweet sounding "ting" is still the best way to know that your bearing...bushing... whatever is fully seated. If you know what to listen for, it's pretty foolproof.As Gary mentioned, the secret to hammer driving stuff is listening for that change in sound once the item is fully seated.
Not quite a rock, but about 99 cents worth of schedule 40 PVC pipe, with an old race as the driver.


By the way I also have a nice new bearing/seal driver tool kit that has sat unused since I bought it. I anticipated using it on this restoration, but haven't found a single thing on this bike that it would be practical to use it on. Oh well, it looks cool.


By the way I also have a nice new bearing/seal driver tool kit that has sat unused since I bought it. I anticipated using it on this restoration, but haven't found a single thing on this bike that it would be practical to use it on. Oh well, it looks cool.
Sorry mailman but I'm not buying pvc as a bearing driver, you try'n to make fun of us?Not quite a rock, but about 99 cents worth of schedule 40 PVC pipe, with an old race as the driver.
maybe it goes different in a 130 degree phoenix garage compared to my 40 degree (heated, HAH) Wisconsin shop.
Last edited:
Maybe....living in a heating oven garage has its benefits!
Yup, that's how I seated these bearing. Listening for that sweet sounding "ting" is still the best way to know that your bearing...bushing... whatever is fully seated. If you know what to listen for, it's pretty foolproof.
Sort of like that satisfying "click" you get when you really nail a golf ball fair and square (I think....because I have never actually done it myself).
Minton Mod.... Sort of....
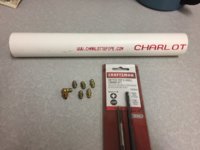
I remember reading about Joe Minton's Xs650 mods eons ago when I subscribed to Cycle World. At the time, my garage had Triumph's and Norton's and such in it, so I never really gave it much thought. Then I joined this fabulous site and started hearing about the "Minton mod", so I started reading everything here about the Minton fork mod. And, after talkin' to 5twins and confirming that he was still a supporter of doing it, decided to go ahead and mod the SG.
'Cept I'm a bit of a contrarian by nature... so I went about it a little differently. Now, I don't claim to be a fluid dynamics engineer by any stretch (I did stay at a Holiday Inn Express last night though ), but it seems to me that a better transfer of fluid through the valve body could be had with more holes rather than just enlarging the existing ones. Sooo..... time to dust off the ol' grey matter.
The existing holes are .196 in diameter, Pi times radius squared gives us a square area of .03 inches (rounded down from .0301"). Times the 4 holes gives us a total valving area of .12". The new holes (.228") give us an area of .163" for a difference (or increase) of .043". That's the amount of additional valving area in the valve bodies after the Minton mod. Dividing that into 2 holes means that a #19 (.166) drill bit will give us exactly the same valving area... spread out over 6 holes instead of 4.
I went ahead and added the extra top hole and enlarged the existing one with a #45 bit, but to be honest I don't really think the top holes do much as far as valving. Looks to me the main reason the existing hole is there is to allow any trapped air between the valve body and the fork tube to escape. They're really too small to have much of an affect on the valving action.

I went ahead and chamfered all the holes and polished them a bit....

A different seal with less friction was also part of the Minton mod, but I already bought new seals. Guess I'll just stick with them for now.
I remember reading about Joe Minton's Xs650 mods eons ago when I subscribed to Cycle World. At the time, my garage had Triumph's and Norton's and such in it, so I never really gave it much thought. Then I joined this fabulous site and started hearing about the "Minton mod", so I started reading everything here about the Minton fork mod. And, after talkin' to 5twins and confirming that he was still a supporter of doing it, decided to go ahead and mod the SG.
'Cept I'm a bit of a contrarian by nature... so I went about it a little differently. Now, I don't claim to be a fluid dynamics engineer by any stretch (I did stay at a Holiday Inn Express last night though
The existing holes are .196 in diameter, Pi times radius squared gives us a square area of .03 inches (rounded down from .0301"). Times the 4 holes gives us a total valving area of .12". The new holes (.228") give us an area of .163" for a difference (or increase) of .043". That's the amount of additional valving area in the valve bodies after the Minton mod. Dividing that into 2 holes means that a #19 (.166) drill bit will give us exactly the same valving area... spread out over 6 holes instead of 4.
I went ahead and added the extra top hole and enlarged the existing one with a #45 bit, but to be honest I don't really think the top holes do much as far as valving. Looks to me the main reason the existing hole is there is to allow any trapped air between the valve body and the fork tube to escape. They're really too small to have much of an affect on the valving action.
I went ahead and chamfered all the holes and polished them a bit....
A different seal with less friction was also part of the Minton mod, but I already bought new seals. Guess I'll just stick with them for now.
Last edited:
Interesting take on the Minton Mods, and I'm sure it will work just fine. These forks aren't high tech by any means, so I'm sure new oil hole sizes just reasonably close to the recommended ones will work just fine. The original article called for 1/4" holes at the bottom of the rods. I used the slightly smaller #1 size because I just happened to have good bits that size. We used them at work all the time and well, some just managed to follow me home over the years, lol. I figured if that #1 size proved too small, I could always go bigger to the 1/4". But, I never have, the #1 seems to work just fine. But I'm sure any size between that and 1/4" would work OK.
I did the Minton mods on a stock bike a couple years ago and also used a slightly smaller bit. I wish I`d have left them alone in the first place. They seemed very "squishy". I added a higher viscosity fork oil and that didn`t seem to help a whole lot either. I took them out and replaced them with a untouched set and the firmness came right back. At least I got the seals, dust covers, and fork oil replaced. I`ll see if I can find them and take another look at the mods. Not saying I didn`t make a mistake (would have been my very first) but I was not impressed with this mod at all.
Hi Mailman,Well Jim, I look forward to your ride report when you get this old girl on the road. It's clear you gave this some thought. I mean PI times radius squared?
I'm a blue collar guy. Pi is something you have after dinner. Haha!
Ljke the punchline sez:- " even dumb Polack like me knows that Pie are round and cake is square."
Which was another reason I added the 2 holes instead of enlarging the existing ones.... if I think it's too "squishy", all I gotta do is TIG the new holes closed and I'm back to stock. We'll know when I ride it.I did the Minton mods on a stock bike a couple years ago and also used a slightly smaller bit. I wish I`d have left them alone in the first place. They seemed very "squishy".
Smart idea! That's why you're the Captain! 

The forks probably will feel "squishy" if you don't add the additional ounce of oil. That's one of the key ingredients to making the mods work. Even without the Minton Mods, that extra ounce of oil makes a big difference. These forks just plain work better with a little more oil in them. So, my "cheap fork mods" recipe is 7 ounces of oil (stock recommendation for weight - 10 wt.), the Minton Mods, and 1" preload spacers added to the stock springs. The stock springs are a very nice dual rate progressive type with a nice transition from soft to hard, but they're just too soft overall. Even setting the preload caps to their max setting often isn't enough to overcome this. There are 2 stiffer steps available in the caps, each adding 10mm of preload, so you can add a total of 20mm. 1" is about 25mm so a spacer that long starts you out about a half step stiffer than the max stock setting. Then you have 2 additional 10mm steps if need be.
That ain't no hammer
THIS is a hammer
interesting thread as I suspect this is the next job on my to-do list along with rebushing the swing arm hinges
motorbikerx
XS650 Addict
After checking out the rotor puller I reckon I can make one up with my MIG out of a couple of nuts , some pipe and a bolt .
Similar threads
- Replies
- 30
- Views
- 2K


