There's a couple postings in here about the trigger magnets on the *new* rotors being weak. Anybody cook up a definitive test (weak/strong, pass/fail) for those trigger magnets?
-
Enjoy XS650.com? Consider making a donation to help support the site.
XS650.com receives a small share of sales from some links on this page, but direct donations have a much greater impact on keeping this site going.
You are using an out of date browser. It may not display this or other websites correctly.
You should upgrade or use an alternative browser.
You should upgrade or use an alternative browser.
10 cent charging diagnosis please...
- Thread starter MacMcMacmac
- Start date
Crackers61
Crackers61
Hi Guys,
how did the rotor come apart? I'm thinking of pulling the 2 dud rotors i have. Looking at the bakalite plate looks as if there was screw holes covered over, is that correct?
Thanks
Crackers
how did the rotor come apart? I'm thinking of pulling the 2 dud rotors i have. Looking at the bakalite plate looks as if there was screw holes covered over, is that correct?
Thanks
Crackers
Crackers, this thread shows pics of 2 rotors, one with the screws exposed, another with the screws epoxied over.
http://www.xs650.com/threads/help-diagnosing-overcharging.50133/
http://www.xs650.com/threads/help-diagnosing-overcharging.50133/
Rick's rotor arrived today. Bloody work of art compared to the hunk o' shite I got last year. You get what you pay for! Naturally it's raining for the next three days.
Pictures, Pictures, Pictures!!!!!!!!!!!!! Let these guys pick it apart. ")

Rick's rotors for Hondas are a work of art. We gotta know how much you paid and what kind of warranty, if any. I buy my Rick's rotors for less, from Pat in Toledo. I pay less because Pat gets them without the warranty. That's how much faith Pat and I have in Rick's products. Pat is a strange guy, He won't sell you a part unless you can prove to him that the part you are replacing is bad. I've won the argument every time,
Scott
I like Pat already!
These things are sent to try us.....and they do.
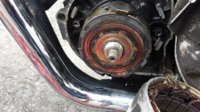
Finally got some warm weather to do a bit of wrenching. I went to put on the Rick's rotor and found the keyway wasn't machined properly. The rotor would slip on a little ways then grab the woodruff key and tilt it up. I file fit the slot as best I could where I thought it was slipping on correctly, then I buttoned it up and checked for charging. I was getting 13.75 VDC at fast idle so I thought I had finally gotten things under control. Setting off with the heedlessness of drunks and children, I revelled in the newfound revvy nature of the bike with the Uni filters and bigger jets, then stumble...stumble...bwahhhhhh......CRACKKK, it backfires and dies. After some swearing and sweaty pushing, I got my bike to a grassy knoll, and I pondered using it like the one at Deely Plaza for a few moments. Luckily, a good samaritan gave me a ride home and my neighbour hitched up his ramp trailer retrieved my bike.
After pulling the alternator cover, I was greeted with flakes of melted plastic. I could see flashes of it around the case of my ignition pickup. Turns out, the rotor was too far out on the shaft, and it had been dragging against the ignition pickup, as well as the ends of the brush holders. What a mess. One of the brushes was seized in its holder, and the pickup and magnets were covered with smeared plastic. Well, so much for Rick's workmanship I suppose. $250 down the crapper. I unseized the brush, cleaned up the rings with steel wool,and began to work on the taper bore of the rotor with emery, scotch brite and a file. I found lots of little metal adhesions on the bore, like hard little nodules of steel, which appeared to be machining chips that had stuck to the taper and had been pressed in. They weren't that big, so I went after them with a file and knocked them off one by one. I made damn sure the keyway was good and clear and rotated the rotor on the shaft by hand to see if I could burnish any remaining high spots. As hard as I could force the rotor on by hand, I could not get all the slop out of the fit. When I got it as clean as I could get it, I put it on and hit it with my Bosch 18V impact. Lets just say the rotor remover will have its work cut out for it next time. I double checked clearance between the pickup and the rotor face and could easily slip a .010" brass feeler in there, so I figured it was safe. I went for a quick ride and everything seems ok now, but I have less than 100% confidence in this rotor now, and I probably need to fit new brushes and brush holders to feel safe. Hopefully this is the last of it.
Attachments
Last edited:
Good grief. Such mixed reviews and experiences. Terrifying...


Thats the one. I can't say the workmanship is terrible, but triple check the fit of any rotor, and ensure there is clearance between the rotor face and pickup.
Woodruff key........no more complicated than a hose clamp or cotter pin.
Scott
Yes, you'd think they could machine a decent keyway for one.
I like how he gives the torque specs for the nut then proceeds to nail it with 20 times as much with his 1/2" impact.
I like how he gives the torque specs for the nut then proceeds to nail it with 20 times as much with his 1/2" impact.
Last edited:
Now no spark. Thinking a shagged pickup. Rough start to the season, especially after waiting so long for it to warm up.
I don't see any real big problem or hassle altering the Woodruff key to make these rotors fit. I'm talking about altering the key, not the key way. These shafts and rotors are a tapered fit just like the Hondas, right? With that tapered fit it should be obvious if the rotor is seated. This IS all very similar to fitting a sprocket or pulley to an electric motor, never took for granted that those three parts were "plug n play".
Scott
Scott
The problem was a duff keyway, not key, ergo, I filed the keyway. If I modded the key, then whenever I might put on another rotor, I have a modded key that I have to hope fits properly.
I have put on hundreds of tapered pulley bushings over the years, and they always fit right, because they were always machined right. It would also be obvious if they weren't. The flaws in this taper and keyway were subtle, and easily overlooked.
This keyway was badly machined or deformed when the halves were pressed together. The taper was also full of high spots.
You are correct, I should not have taken for granted everything was alright, and should have taken the lead of another member here and lapped it in with some compound. I have some, but as usual it was impossible to find in my tool diaspora.
I'm with mickle mac file the keyway on the rotor. kind of a standard practice here to fix the offending part not the originals. I ones i bought needed the keyway file and varnish removed from the taper just light touch up after that. Typical built to price machining. If you are of a certain age you remember when that type of "fit" and quality was common in low cost US built parts as well.
My first new Ford has been a bit of a disappointment after owning several Toyotas
My first new Ford has been a bit of a disappointment after owning several Toyotas
Thanks for the further description of the fit Mac, might come in handy some day. There's no key way on the Hondas I've done.
Ditto on the Toyotas Gary. I'm enjoying the long trouble free life of a Pontiac Vibe, designed by Toyota, based on the Camry, only assembled by GM. 300,000 miles plus with only oil, tires and brakes. If I changed the timing belt and adjusted the valves I'd probably get a couple more 100,000 from it. Next used car will definitely be a Toyota.
Scott
Well, the pickup checks out. 725 ohms on each sensor. When I turned the ignition on and passed a magnet over them, the plug I had out and grounded fired. The other cylinder wheezed a bit as if there was a weak mixture in it, which was a relief, because if I get many more of these epic troubleshooting backfires I think I'll fill my pants.
What I did find was a very weak timing magnet. I tried to stick the small screws that holds the pickup in place to it but no dice. I couldn't get any magnetic response at all. Now either the magnet was weak from the get go, or, it reached its curie temperature and lost magnetism when it was abrading against the pickup and brush holders. I am thinking the latter, since it did run for a couple of hours the other day, although it began cutting out at low rpms coming to a stop. I upped the idle to 2000 rpm and it stopped dying on me. So now, I am thinking there are two remedies. Either drill out the duff magnet and replace it with a neodymium magnet, or take the OEM Yamaha rotor plate off of the old rotor and put it on the Rick's rotor because after 35 years, that oem Yamaha magnet is still DAMN strong! The gap between the pickup and magnet is 1.5mm on my bike. I don't see any way the current magnet could trigger anything. I could try the warranty route I suppose, considering the keyway was not cut properly, but I am man enough to admit the install was not my best work

What I did find was a very weak timing magnet. I tried to stick the small screws that holds the pickup in place to it but no dice. I couldn't get any magnetic response at all. Now either the magnet was weak from the get go, or, it reached its curie temperature and lost magnetism when it was abrading against the pickup and brush holders. I am thinking the latter, since it did run for a couple of hours the other day, although it began cutting out at low rpms coming to a stop. I upped the idle to 2000 rpm and it stopped dying on me. So now, I am thinking there are two remedies. Either drill out the duff magnet and replace it with a neodymium magnet, or take the OEM Yamaha rotor plate off of the old rotor and put it on the Rick's rotor because after 35 years, that oem Yamaha magnet is still DAMN strong! The gap between the pickup and magnet is 1.5mm on my bike. I don't see any way the current magnet could trigger anything. I could try the warranty route I suppose, considering the keyway was not cut properly, but I am man enough to admit the install was not my best work
Keep at it Mac, sure learning some things from your thread.
Scott
Scott
Devils advocate here. How about trashing the whole rotten system and purchase a modern PMA? I installed a Sparx brand in 2009 and haven't touched it since. So reliable the battery I purchased at the same time was good for 8 years. Only maintenance I have done is absolutely nothing. Don't even have a kickstarter installed. Push the button one time every time and goooooooo. Constantly working on old worn out components that weren't that good when new is far more expensive than joining the 21st century. But good luck in your quest to find mediocre performance.
Similar threads
- Replies
- 4
- Views
- 878