Shell #1 timing specs

All us bozos are still on this bus.

anecdotal :
I've only met one (750) that would run with 210 plus jets in it. Seems the owner felt that the float level was too high so he kept bending the tap until fuel stopped leaking from the carbs. As a consequence the fuel level was about a half inch low :) . Re did the float valve seats (yes it can be done) and established correct fuel level. Installed correct jets and ....

Then there was the infamous adjust the valves on overlap deal.

Stop tabs on the advance were allowing nearly 45 degrees advance so when set to full advance marks timing was about 5 degrees after TDC at idle.

Even though both points were opening at the same degrees before TDC their dwell was different by nearly 15 degrees.

There are only two types of stock coils. Those that have failed and those that will.

XV 750 valves that hat a bunch taken off the top?! why?!

Early crankshaft with the pressed in weights that were shifting around.

Last but not least the pistons were in backwards.

Yup all the same engine.

end anecdote

Dick brought up a good point that many miss. I keep a few old head gaskets around to check deck height vs cam degree. Tighten down on the old gasket at about 1/2 torque on the inside studs, adjust tensioner, read the wheel and dial indicator. A few thousandths of deck height does equal a few degrees either way.


~kop
 
Thanks all for the feedback on this. timing work was delayed by a starter motor gasket that failed. That thing is a b*tch to address with the engine in the frame. Then I found a new Yamapuzzle where if the starter motor bolt is short enough to clear the swing arm and pass into its hole, then it can only be long enough to catch the top 2-3 threads and strip them.

I re-checked my TDC mark scribed on the PMA and I have no issue with it. I did not wrestle the valve cover off to inspect the cam degree in relation yet.

After some research I have a new question- could my shell#1 cam from Hoos be of a different sprocket pitch than the drive teeth on my crank? With zero oil in the system and hand rotating the engine to tamper with TDC I can really hear that chain in there. Tensioner was readjusted within 20 recent miles. The engine is an '81 but the bike is a '79 and I just read that there were 2 different cam chain pitches out there. some metallic sludge on the drain magnet suggests something wearing uncomfortably.
 
XS1 through TX650 motors (1970-1973) used a 17T crank sprocket and 34T cam sprocket. Motors from 1974 through end of production used a 18-36 combination. Chain pitch differed as well. Assuming you could get the chain on the sprockets, mixing a 17T cam sprocket with a 36T crank sprocket would lock up the motor after a few revolutions, since orientation of crank and cam would change until a piston locked up hard against a valve.
 
Last edited:
Ah very wise! Clockmaker’s logic. I’ll dig through my purchase orders to verify that the cam chain is post 1974 but it seems my issue is elsewhere.

I put the starter motor back on and the new seal was wrecked from the process before it ever saw oil. I even have a bike lift. Flipping it in it’s handlebars would barely help.
 
Thanks all for the feedback on this. timing work was delayed by a starter motor gasket that failed. That thing is a b*tch to address with the engine in the frame. Then I found a new Yamapuzzle where if the starter motor bolt is short enough to clear the swing arm and pass into its hole, then it can only be long enough to catch the top 2-3 threads and strip them.
.
The factory bolts all go out and back in. At least I did a starter motor change on a 79 standard in about an hour with no problems, I did buy a cheap 12mm wrench heated it with a torch and bent it to fit the job........ Maybe that fussy bolt needs to be in the starter motor when installing the motor?
 
Last edited:
I had to run out and buy Goldilocks bolts that were 30mm. It’s an awkward install even with ring ratchets, but my real issue was how chewed up the seal hole was from taking out the old one.

Back on thread topic I can test some of the above theories now that it is off the lift. I’m starting with throwing the pamco plate towards anti-advance timing (PC term).
 
And hotdamn itelluwhat- rotating the timing plate so the FIRE and ADVANCE events happen before their marks on my reprinted Hugh's timing sticker seems to have cleared up that top end WOT combustion! I also swapped MikesXS paper filters for UNI foam units so my bad for changing 2 things at once, I know, I know.

Now the bike behaves properly rich, as you would expect with 210 mains. I swapped in the 185s back in after 4 Seafoam runs, will test those 185s tomorrow. Interestingly the multiple Seafoam 10min burn off runs were without any filter at all and it seemed to like that.

(Total side question but very relevant- does more air require more fuel, or does more fuel require more air when evaluating symptoms? One must lead the way)

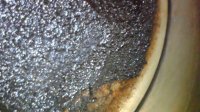
Idle is janky and popping back through the carbs occasionally though, but I want to tune from the top down so we will see about that later. #30 pilot jets currently installed. Reminder- VM34 carbs here. Here is a pic from my bore scope of why I am Seafoaming-
Cylinder face.jpg
 
OK, phaedrus, we don't have any psychics onboard that I know of, so let's play questions and answers. What NJs and needles are in place, where are the clips, and where are the air screws set? #30 PJ is pretty fat. The answer to your question is YES. What you're working for is a usable air/fuel ratio.
 
I don’t want to hijack this nice thread of good cam timing info with my scope dope. Been working with Hoos on it for a while as most of my A/F gear came from him except for the pamco. I’ll push that convo into a new thread soon. Moving the timing around to where I wouldn’t normally think to was helpful though, thanks y’all!
 
Back
Top