Miss November XS2 tribute

Excellent news indeed!

Once you correct the timing chain length issue, you could just lap the valves and slip the head back on and..... Well, yeah, likely better to check the ring gap.....

As for the oil at the cylinder base: people seem to find that the head needs to be re-torqued several times after a re-build and then occasionally after that to prevent/cure base gasket and head gasket leaks. With the other assembly errors that you have found, I suspect that this was never done and so you will likely find that the leak clears up after you button everything down properly.

Forward progress - good going!

Pete
 
Last edited:
We see all sorts of inept things done to these bikes around here but I have to admit, this installing a cam chain that's too long is a new one, for me anyway. Carefully inspect the chain to determine it's brand. Two different brands are commonly used (D.I.D. and Tsubaki) and the master link will need to match the brand.

For testing the valves for leaks, I use a combination of solvent and compressed air. I set the head upside down on the bench with old spark plugs installed and fill the combustion chambers with solvent. Then I blow compressed air into the ports and look for leaks around the valves. They will show up as streams of bubbles .....

dAyCZVL.jpg


scTVevw.jpg


mLxDTcb.jpg


ShfA3qL.jpg


You'll need to play around with the positioning of the blow gun. Get it too close to the valve and it will literally blow it open, indicating massive leakage that really isn't there.
 
Today, a few faltering steps forward and one step back. For example, it was a definite step forward to discover the over-long cam chain. It's a DID chain so have ordered a DID rivet link. Trying to avoid buying an expensive splitter/rivet tool so looking at methods used on this forum

Pete, I don't think I'll check the ring gap. In line with my 'policy' just to rebuild from where I am, decided not to lift the barrels. This time.

Checked the head with a metal ruler and it's not fully flat. Able to push a 0.002" feeler under the ruler near the cam chain tunnel. Thinking about using a flat sheet of glass and wet or dry paper or valve paste to grind it flat.

5twins, I had the idea of checking the valve sealing and the method I came up with was to stand the cylinder head on end and pour petrol into first the inlet and then the exhaust ports. Good news on both inlets and the l/h exhaust - no petrol leaking past the valves. However, on the r/h exhaust, by the time I looked, petrol flowing down inside the combustion chamber. Either the valve is seating badly or bent.

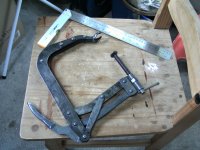
Next idea was to remove the valves - all of them, no point just taking one out. Got my ancient spring compressor:


PICT1856.JPG


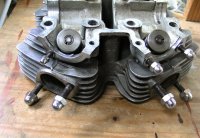
As you might see, it's fairly huge and awkward to use. But has proved able to do the job in the past. Started of course with the r/h exhaust. Ran out of adjustment on the threaded part so, to get it to close far enough, had to put a large 'penny washer' on the valve face, held in place with a blob of grease. Perhaps that end was taking too much of my attention. Sounds like an excuse? No, the blame is all mine. Tool not suitable as I should have realised before it started taking chunks out of the head:


PICT1857.JPG


Ouch! I really hate inflicting damage. Almost enough to make a grown man swear.

Can't be helped now, just have to try and tidy up when I eventually have the valves out.

Have ordered a smaller spring compressor, with a long attachment to go over the spring washer so it should be well clear of the head. Also some of the parts I'll need for the rebuild. Including 4 x Suzuki copper washers for the outer head bolts.

There will be a haitus now until the new spring compressor arrives. Might be able to do some refurbishment on nuts and bolts, etc. And grind the cylinder head face.

Is anybody actually interested in any of this? I owe a big thank you to all of you who have read about my travails and posted helpful replies. Cheers, Raymond
 
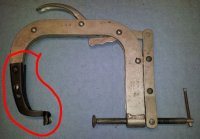
A C-clamp style valve spring tool works best and easiest on these heads, and they're pretty cheap on eBay .....

https://www.ebay.com/itm/Valve-Spri...091158&hash=item3ae08e1619:g:FRYAAOSwySlZ7WQ~

With this type, you can tighten it and compress the spring just as much as you need to, unlike that clamp-on style you tried to use. I have one of those too and quickly discovered it was no good for this head.

For the cam chain, the riveting tool is quite cheap as well. As I mentioned, you don't need to use the "splitter" part, just grind the riveted heads off the pins and tap the link out .....

https://www.ebay.com/itm/13-PC-Cam-...800552?hash=item3b1050ca28:g:FzEAAOSwNNVbKbSj

The pin for "breaking" these small chains is really tiny and easily bent or broken. That's why I don't even bother to attempt using it. Like I said, I just grind the pin ends off with a Dremel.
 
Today, a few faltering steps forward and one step back. For example, it was a definite step forward to discover the over-long cam chain. It's a DID chain so have ordered a DID rivet link. Trying to avoid buying an expensive splitter/rivet tool so looking at methods used on this forum

Pete, I don't think I'll check the ring gap. In line with my 'policy' just to rebuild from where I am, decided not to lift the barrels. This time.

Checked the head with a metal ruler and it's not fully flat. Able to push a 0.002" feeler under the ruler near the cam chain tunnel. Thinking about using a flat sheet of glass and wet or dry paper or valve paste to grind it flat.
:wtf:
5twins, I had the idea of checking the valve sealing and the method I came up with was to stand the cylinder head on end and pour petrol into first the inlet and then the exhaust ports. Good news on both inlets and the l/h exhaust - no petrol leaking past the valves. However, on the r/h exhaust, by the time I looked, petrol flowing down inside the combustion chamber. Either the valve is seating badly or bent.

Next idea was to remove the valves - all of them, no point just taking one out. Got my ancient spring compressor:


View attachment 145217


As you might see, it's fairly huge and awkward to use. But has proved able to do the job in the past. Started of course with the r/h exhaust. Ran out of adjustment on the threaded part so, to get it to close far enough, had to put a large 'penny washer' on the valve face, held in place with a blob of grease. Perhaps that end was taking too much of my attention. Sounds like an excuse? No, the blame is all mine. Tool not suitable as I should have realised before it started taking chunks out of the head:


View attachment 145218


Ouch! I really hate inflicting damage. Almost enough to make a grown man swear.

Can't be helped now, just have to try and tidy up when I eventually have the valves out.

Have ordered a smaller spring compressor, with a long attachment to go over the spring washer so it should be well clear of the head. Also some of the parts I'll need for the rebuild. Including 4 x Suzuki copper washers for the outer head bolts.

There will be a haitus now until the new spring compressor arrives. Might be able to do some refurbishment on nuts and bolts, etc. And grind the cylinder head face.

Is anybody actually interested in any of this? I owe a big thank you to all of you who have read about my travails and posted helpful replies. Cheers, Raymond

OH YES - we are definitely interested Raymond and as noted above by 5Twins, you have certainly brought something unique to the party :wtf: with that over-long timing chain.

As for not checking the ring gap - good call (IMO) - I suspect they will be fine and this engine will come back to life in quite good order once you sort out the timing chain and valves.

Cheers,

Pete
 
Well, thank you gentlemen. Was feeling a bit shell shocked earlier after misadventures with spring compressor. But now I've had my dinner, al fresco with Mrs and a nice white wine, so feeling a bit more mellow now.

5twins, the tool I've ordered is this one https://www.ebay.co.uk/itm/252257337661 which is the C clamp shape. Just a cheap one but if it does the job a few times, that's all I need.Very interesting the cheap chain rivetting tool - ebay in UK only shows via import from USA, with high postage and import duty charges. However, there is a motorcycle engineer with his shop in this village and my plan now is to visit him on Monday, see whether he has a cam chain tool and I can borrow it. He's a proper character, but we've known each other for a while now so as long as I give as good as I get . . .

Jim, I fully take your point. But I have to do not just time & materials but also risk assessment. It's not very scientific. But on this occasion, I will leave the pistons and rings undisturbed. There is a risk, especially if the circlips come loose but I'm putting a low chance on that. As I have suggested before, I might have to strip the engine again if problems come to light. The major risks are things like the cam chain breaking or the circlips jumping out but . . . if that happens, I'll just have to bite the bullet and say I got it wrong.

BTW, opinions on grinding the head on a flat piece of glass? I am fortunate and have several sheets of very old plate glass - very thick and seemingly very flat.
 
Last edited:
Yes, that valve spring compressor is exactly the one you want. It doesn't include a fitting large enough to swallow the 650's valve spring but all the kits are like that. Just use the biggest one they give you and center it on the spring washer.
 
I used the same one on my engine. I had all my valves out 30 minutes after this was delivered! ;)
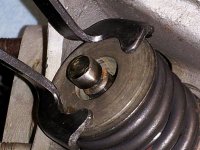
View attachment 145227 View attachment 145228
Made one out of a $1 12" garage sale C clamp. Welded a nut on the anvil and put in a 3/8 carriage bolt to center on the valve head. made an end similar to what mailman's looks like out of some iron pipe and a washer. Works great.
 
Similar to your K-D compressor, I used Snap-on, and chose the deeper-reach claws, suitable for motorcycle and smaller engines.
ValveCompr-2b.jpg

These claws reach deeper, around aluminum castings.
ValveCompr-6.jpg

Unfortunately, agree with Jim about suspicious work, and I'd have the dial on my "ineptness meter" turned fully ON.

But, I understand the risk management path, and the avoidance of:

mission creep ( definition)
Mission Creep happens when extra and often unnessesary details that are added to a project usually causing the project to spiral out of control. Mission Creep slows down the process and causes things to creep along...
 
Last edited:
Unfortunately, agree with Jim about suspicious work, and I'd have the dial on my "ineptness meter" turned fully ON.

But, I understand the risk management path, and the avoidance of:

Inevitable to speculate about PO's state of mind, approach to rebuild, what has/has not been done. Or been done wrong.

There is much that is good. What I find isn't telling me that money has been saved and short cuts taken. Will never know how somebody fell into getting it so wrong with the cam chain & valve timing. But speculation is pointless, so I am at that place between going for full engine strip, spend loads of money, pointlessly replace things that might well be new and run the very real risk of adding my own foul-ups. Or take some things on trust, rebuild the bike, get out on the road and take it from there.
 
Raymondo, if you can add a photo of the ends of the tappet/lash screws to show the damage then I could give an opinion on whether they can be salvaged. If the damage is minor then you could post them to me and I will regrind them for free - its not a difficult or time consuming job. If you just want to replace them with new then the Yamaha Virago X750, XV1000 or XV1100 lash screws are a good replacement. They take an Allen key instead of the slotted screw drive so are much easier to adjust accurately.

Edit: My mistake. As 5twins pointed out below the stock have the square nut top. It was the VW lash screws I once used that have the slotted head.
 
Last edited:
If you don't plan on removing the cylinders then I suggest you take some precautions to insure you don't break the seal on the base gasket. I would cut 4 long spacer sleeves from some pipe and place them on the outer 4 studs, then put their acorn nuts back on snug. Then you shouldn't have to worry about accidentally bumping the cylinders and breaking the gasket seal loose.

Once that's done, you could do some cylinder bore inspecting. Back the pistons down to BDC and you'll be able to see some of the bores. Look for vertical scrape marks on the front and rear sides. What you'd really like to find is a freshly honed surface all around with the crosshatch pattern still visible. If you clean the tops of the pistons, you should be able to determine if they're original or over-size replacements. Originals will have a 3 digit number in the high 900's stamped on them, something like this .....

0Bt3Ap5.jpg


This denotes the fractional portion of the piston size when new. These pistons are just under 75mm in size. The one pictured above was 74.953mm when new.

You'll also want to carefully inspect the front cam chain guide. This is a notorious weak spot on these. The guides are routinely failing now due to age. The rubber strip attached to it is coming loose, sometimes falling right off. On a proper rebuild, you replace that part. Also, besides the rubber failure thing, there's also a chance the guide wasn't centered when mounted. It could be "cocked" in there and that would allow the chain to run across it sort of diagonally. This will chew up the outer edges top and bottom on opposite sides .....

a3lxm3v.png


RMhQHYT.jpg


HcIylaP.jpg
 
Last edited:
Back
Top