Miss November XS2 tribute

Raymondo, regarding clutch slip. I found there to be a very fine line between a good clutch and slipping. Next time you are out riding and the clutch slips just pull over and loosen the clutch off 1/2 - 1 turn at the lever. If the slipping stops then you know the problem is the adjustment. If it keeps slipping slacken off another 1/2 turn. If slipping continues then the issue may be with the worm adjustment or a problem in the clutch plate area.

The XS clutch system suffers from thermal expansion in the clutch push rod area so it is common for people to make small adjustments at the perch depending on how hot the bike is running, or Summer vs Winter conditions.

With the worm adjustment you need to be backing off the screw a bit. I have used the spec 1/4 turn and also 1/8 turn and both have been fine. If you do not back the screw off a little then the thermal expansion will start to activate the clutch and give slip.

Good luck.
 
The carburation does in fact seem to have improved with running.

Yup - that parallels the experience of many many people with XS650s. I’m not sure quite why that happens, but they do run better over time.

On the clutch, I’d say to try one more oil change before you go over the top and bust into the engine to inspect / replace it.

One tip on the clutch:
  • Be sure to have a JIS impact driver to remove the clutch screws (the silver-handled Vessel #3 Impacta is excellent for this);
  • A set of six SHCS (Allen head) screws is available to replace the stock JIS screws - and these are good;
  • Before you disassemble the RH engine case cover, inspect the lower six screws to ensure that the little copper crush washers are there - and if not, I’d order a little bag of them.
OK - that’s three tips - so I can’t count.

The Vessel brand #3 Impacta is readily available on Amazon for not much money.
upload_2019-8-17_14-42-33.jpeg


Pete
 
Actually, the parts drawing only calls for 4 copper sealing washers on the right side case screws. They go on the 4 lowest screws, the ones than sit under the oil level .....

MqCsdcL.png


Many times you'll find some on the oil filter cover screws but it doesn't call for them there, and they aren't needed. Those 2 screws seal up fine without them. Unfortunately, what seems to happen many times is someone will steal 2 of the washers from the lower case screws where they are needed, and put them on the oil filter cover screws instead.
 
I've never understood the need for any of those coppers on the sidecover. There's blind holes in the case halves and the gasket seals all the way around the fasteners. I don't have 'em on the SG and it's tight as a ducks bottom... :whistle:
 
Well, Gentlemen, a lot of useful points.

I think perhaps I see a clutch rebuild coming up? But first I'll go with Paul and Pete's suggestions - do an oil change and continue to tinker with the adjustment. If (when) I decide to delve deeper, another oil change won't hurt. Especially since I'll be using up oil that's been sat around.

Pete, I fully intend to invest in some JIS screwdrivers. It's much easier to remove a tight screw using a driver that really fits properly and I'm sure that in the past I've damaged fasteners using the tools at hand instead of finding out what the correct tool is and buying it. With age and experience, come across something I can't shift, more likely now to stop, go and have a cuppa and try to think. Or google it.

But luckily, the bike has had all the engine case screws replaced by Allen heads, probably stainless. Not too sure how to check they are stainless, but if somebody has invested - that word again - in a set of case screws then that's almost certainly what they bought.

There are a few cross-heads, places like the points & advance covers. And the bands that tighten the inlet rubbers have long, thin cross-headed screws, which are showing their age, so I'll ride out to JM Falla and put them to the test. Should be a metric thread, so that's easy-peasy. They might have copper crush washers too.

JM Falla is an agricultural engineer, located in the tiny village of Bonchester Bridge. They seems to have everything. Almost. Once stumped them with a thread size on the Triumph. It turned out to be CEI - Cycle Engineers Institute. But they have BA, BSF, BPF, Whitworth, etcetera, etcetera. I suppose it's because farmers run old agricultural kit manufactured anywhere in the world over the last seventy years?

The other screw I'd like to replace is the tiny one that attaches the lead to the 'neutral' switch.

Now I'm going out to have a look at that camshaft oil seal.
 
Raymondo, if the screws are stainless then a magnet will either stick very weakly compared with a steel screw or not at all .It all depends on the grade. I often see a slight magnetic attraction to washers but usually nothing with screws/bolts and nuts.
 
It's been my experience,
source.gif

That GOOD, NEW Phillips screwdrivers work just fine on JIS. Old, worn, or cheap, off brand, phillips drivers need to be retired or repurposed. Get em out of your easy to grab tool rack/drawer! I recently bought four Stanley FatMax #2 Phillips screwdrivers and put one at every work bench. They have a nice thick rubber type grip to allow good torque vectors while using. I use tools a lot and haven't had a problem with a single screw with the fatmax. :whistle:
There is probably no easier way to tell a mechanic from a duffer than to watch them remove a tight screw. It's the technique guys. My personal feeling is that tool makers aren't dumb and the the good ones have "modified" the typical Phillips profile a bit to better match the JIS screws since they are so common these days. OR maybe the good ones with properly shaped and hardened profiles have always been "fine". It's kind of a common "thing" when we are just doing stuff to buy low cost supplies, but when it's a hobby or high value project We will invest the money and upgrade to quality or pro grade tools.
Carry on, Raymondo do you have a new lubed and well routed clutch cable?

A cautionary, instructive? fable;
The recent Radian shed bike wake up, the clutch cable was "stiff" the cable route has a low point and a way for water to enter, 2 more used cables were similar. I got them freed up enough to use and also tried a "good used" XS clutch cable but the motor would overcome the clutch plates at about 7000 RPM. When the new cable I ordered came in I funnel drip lubed it overnight and installed with a minimum bend route, "slipping clutch" problem, GONE!
 
Last edited:
Paul, thank's, tested the screws with my handy extending magnetic pick up thingy - not interested, so must be stainless.

Today's narrative is one step forward and a couple backwards . . .

Went out to look at the camshaft seal. And change it. But when I took the Boyer pick-up plate rotor, the seal looked dry. Soon spotted oil leaking down behind the points housing. Aha. Two of the three screws holding the housing were loose. Either some numbskull has forgotten to make them tight, or they have worked loose?

Best way to find out, pulled the housing off, wiped it clean. Also cleaned gasket and orange O-ring. Replaced all and tightened the screws. Except, they don't feel that they really want to go tight.

Four mile run to warm the oil. Looked down to see if there was oil on the fins. Yup. Much worse than before.

So we're back to this:


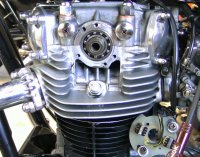
PICT1936.JPG


Decided to drain the oil anyway - doesn't do any harm after a rebuild and might cure the clutch. Hmm.

Points cover and housing off - two screws loose. That's the bike, not me, do try and keep up!

Clearly, the threads are a bit tired?


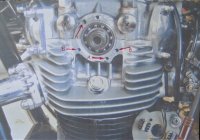
PICT1938.JPG


The holes marked A are for mounting the Boyer pick-up plate. Those marked B are where the flat-headed screws mounting the points housing just loosen off.
BTW, all 3 flat-heads have their conical spring washers. You might see that oil leaking from the screw holes is dark with alloy particles?

The upper of the Boyer plate holes is dodgy, and at least two of the housing mounts.

I suppose this area has been, uhm, visited many times over the bikes life?

Originally, cover on and off with people setting the points, then housing off for the change-over to the Boyer Bransden, then possibly further times to reset the timing. Whatever.

So now I need to have another we think. The threads will need to be repaired. Can this be done in situ? Or will the head need to come off? Is this just the bike's way of telling me it's time for that second rebuild? Do the clutch . . .
 

Attachments

  • PICT1937.JPG
    PICT1937.JPG
    254.2 KB · Views: 174
Gary, we crossed in the post. I took ages messing about uploading photos etc. Fully agree that when you work on your own bike - or car or boat, I suppose - it's worth it to buy the right tools. Pay for themselves first time you use them if the alternative is to pay a shop to do the job. And you invariably end up using them again and again.

And as for paying a shop to do the job. With the ancient bikes we all have? Well, there are specialist classic bike restorers but it ain't cheap to get a good job done. And although this is through gritted teeth right now, working on the bikes is a large part of the fun we get from them.

Still can't work out why I bought the bloody thing . . .
 
Been there (this week) LOL
Since these are not frequently used screws you might try some blue thread lock, ever so carefully tighten, let the threadlock set up overnight and see if you have cured the issue. Since these holes penetrate to the interior of the motor drilling oversize to use inserts is a bit hazardous with swarf going into the oil. On the other hand it's aluminum swarf not steel. :shrug:.
Just maybe might, slip a narrow strip of pop can into the hole before putting the screw. kind a like the old toothpick n wood glue to get a wood screw to hold in a chair leg (one more time).
 
Those M6-1.0 endcover threads are blind holes.
XS1 head-rt.jpg
They don't go all the way into the camshaft chamber, and *can* be repaired with helicoil. To help keep the drilling and tapping perpendicular, could "sacrifice" an old endcover as a guide.

Have a look at Mailman's helicoil repair post.

Post #485.
http://www.xs650.com/threads/mailman’s-xs2-a-full-on-restoration.51520/page-25#post-546624

Myself, to minimize the impact of a repair operation, I'd first consider carefully tapping the damaged holes to 1/4"-28, and use high-quality 1/4"-28 screws. Not the dimestore cheapos, which tend to have smaller diameter threads.
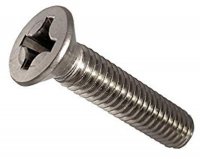
FlatHeadScrew.jpg

The 1/4"-28 thread is just slightly larger than the original M6-1.0, will give enuff grip strength (if not overtightened, abused), and minimizes material removal. The new screws' head and countersink angle will need to match the original, 82°, 90°, 100°.

If it doesn't work, the helicoil repair can still be used...
 
Last edited:
Thank you 2Many! Good to know those are blind holes - opens up the options for repair without dismantling/engine out.

Read Mailman's helicoil exploit with interest!

The first option which has been suggested is to just bung the screws back in with Locktite and hope for the best. My first reaction was to say, No, it's not the correct solution. But it was pointed out that if it works, fine. And if not, little has been lost.

Gonna give this more thought before I dive in . . .
 
Yeah, a good plan of attack is to make up a repair sequence, next one more serious than the previous, which gives more options and doesn't jeopardize the next attempt.
Like:
- Your Loctite trick
- Longer screws
- Going to 1/4"-28, or M6.3-1.0 (if you can find those)
- Going to M7-1.0
- Helicoil
 
Last edited:
Further development - went to see the village motorcycle engineer. His opinion is that if access is good, it will be simple to install a thread insert. And that a thread insert will give the best and most permanent fix for a lightly stressed area like the points housing.

So on Wednesday he is going to come and have a look. But I suspect he will bring his kit. If he feels access is good, I will probably let him go ahead. Might not be beyond me to do the job, but not easy to drill perpendicular with a hand-held drill plus he has the experience.

We shall see.

But at least, no need to lift the lump out.

Oh, and I've adopted Pete's suggestion and bought a Vessel Impacta JIS screwdriver. Which might arrive from Japan before Brexit?
 
Village m/c engineer has been to take a look. He is happy to fit inserts. I asked whether there is enough metal to fit inserts without breaking through into the O-ring passage?He says Yup, no bother. We agreed he will do all five on the l/h side. But he has no time to do the job till early next week. Probably Monday.

Oh well!

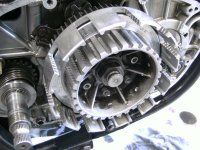
In the meantime, suppose I ought to pull the clutch apart and have a look.
 
Accordingly,


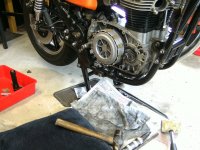
PICT1940.JPG


Note had to resort to impact driver and XS Tool #1 to shift the cross-head clutch screws. Once loosened off, all turned smoothly, except the one at 12 o'clock in the picture which was tight and stubborn all the way out.


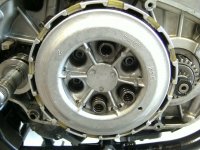
PICT1941.JPG


Also, three of the springs did not come out with the screws and had to be twisted and pulled with pliers to get them out. Never come across that before.

On above picture, note position of the marker hole in the pressure plate at 4 o'clock.


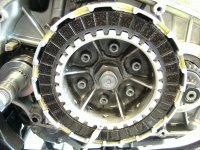
PICT1942.JPG


And on this one, screwdriver marks position of marker dot on the inner drum. The engine has not been moved.Clearly, the clutch has been assembled incorrectly. Both the Haynes manual and this site stress the need to align dot and hole - I would be very interested if anybody knows why or what the effect of not aligning might be?

Then I pulled the plates out. Seven friction and six plain steel. Only done very cursory inspection so far but the friction plates do not look worn down. The steel plates have some light rust but otherwise ok.

Have done some research on this forum and think this might be the correct number of plates. From looking at http://www.xs650.com/threads/number-of-clutch-plates.36725/ it seems that six-plate clutches have a steel plate in the bottom of the basket and a tab washer. But mine is just the alloy basket and plain washer.


PICT1943.JPG


The shoulders of the baskets show light scuffing from the plates. But my thumbnail cannot detect any wear ridges, so in terms of wear I'd say the clutch is AOK. Perhaps I'll check the thickness of the friction plates.

Makes me wonder if Jim hit the nail on the head - somebody has run with non-JASO oil? So after having a look at the plates, will leave them overnight in petrol. Which ought to wash the old oil out of 'em.

But looking forward to anybody's input on the clutch pressure plate being misaligned? And correct number of plates?
 
Also, three of the springs did not come out with the screws and had to be twisted and pulled with pliers to get them out. Never come across that before.
It's entirely possible those springs were staying partially compressed with the clutch fully engaged. Would definitely account for slipping. Never seen that before either... curious as to what you'll find causing that. Wrong size springs perhaps?
 
The upper of the Boyer plate holes is dodgy, and at least two of the housing mounts.

I suppose this area has been, uhm, visited many times over the bikes life?

Clearly, the clutch has been assembled incorrectly.
Buggars! :cussing:
Well, as a positive, you sure are contributing to us all in awareness as to cautious reminders of the dreaded PO’s
Your bike is in good hands now thank goodness .,
-R
 
Back
Top