I recently purchased a 1980 XS650 with everything working. I’m converting it into a flat tracker/bar hopper I wired my bike with a fuse box that also has ground ports. I wanted to ground everything from the fuse box instead of the usual ground neg (-) from battery to the frame I’m at the point of wiring my starter and it won’t go on. I feel like I have no ground getting to the starter. Is the starter usually grounded to the frame or motor? And is it possible to possibly ground the starter at one of its mounting bolts to one of the (-) ports of the fuse box ? Also If anyone has a simple wiring diagram for a 1980 with basically all stock components and as minimal as possible. I’m new here so not really sure how this forum works. Thanks in advance
-
Enjoy XS650.com? Consider making a donation to help support the site.
XS650.com receives a small share of sales from some links on this page, but direct donations have a much greater impact on keeping this site going.
You are using an out of date browser. It may not display this or other websites correctly.
You should upgrade or use an alternative browser.
You should upgrade or use an alternative browser.
1980 Yamaha XS650 wiring and ground (-)
- Thread starter Dxs650
- Start date
Starter grounds to the engine... engine grounds to the frame... frame ground is back to the battery neg. terminal. Don't change that. Starter draws about 50amps.... probably well beyond the capacity of any negative terminal on your new fuse box.Is the starter usually grounded to the frame or motor?
Oh.... and welcome to the forum.

fishandchips
XS650 Enthusiast
Welcome to the forum, you are in the right place to learn. I knew nothing when I started but I am still learning from this collection of wizards.
take a look at the tech section for wiring diagrams. There are complete ones and simplified ones.
http://www.xs650.com/threads/61
take a look at the tech section for wiring diagrams. There are complete ones and simplified ones.
http://www.xs650.com/threads/61
Welcome to the party, D! You'll find tons of help here, from people that've been there, done that.
Hey, D, send us pictures of your '80 (we're nosy)! We love pictures! And tell us all about how you got it, what shape it was in (maybe a "before and after"), whatever mods you're doing, etc.
New York is a big state, and there's a bunch of us here. What part of the state are you in? Again, welcome!
And Jim's expertise is top shelf! (Timely too, Jim. I'm writing my own schematic for "The Basketcase". Based on the original wiring diagram, it omits some things, adds others, but I'm keeping the starter...)Starter grounds to the engine...
Hey, D, send us pictures of your '80 (we're nosy)! We love pictures! And tell us all about how you got it, what shape it was in (maybe a "before and after"), whatever mods you're doing, etc.
New York is a big state, and there's a bunch of us here. What part of the state are you in? Again, welcome!
If you installed painted handlebars then you have probably lost the path to ground for the starter button. The starter button connects to the starter solenoid with a blue/white wire. That wire is grounded out when you push the start button and that activates the solenoid and starter. The path to ground for the start button is rather convoluted. It gets it's ground from the other handlebar switch, through the bars. The other switch has a ground wire run into the headlight. In that left switch assembly, the ground wire is attached to the switch housing with a screw. That effectively grounds the whole housing .....

Once mounted, that ground is transferred into the handlebars. The right switch assembly with the start button picks it up in the same manner, by being mounted to the bars. It doesn't have it's own ground wire. So, if your handlebars are painted, you'll need to clean the paint off in the areas where the ground clips contact the bars on each side. Another possibility is you've been trying to test your starter function without the left handlebar control assembly installed yet. You won't have a ground for the starter button like that so it won't work.
Once mounted, that ground is transferred into the handlebars. The right switch assembly with the start button picks it up in the same manner, by being mounted to the bars. It doesn't have it's own ground wire. So, if your handlebars are painted, you'll need to clean the paint off in the areas where the ground clips contact the bars on each side. Another possibility is you've been trying to test your starter function without the left handlebar control assembly installed yet. You won't have a ground for the starter button like that so it won't work.
5T,
He's got it covered until the big reveal!
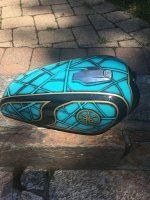
Nice tank, D!!! Wow! And those shocks, the seat, even the tire tread...awesome! "Gentlemen's ride"? That bike looks like it's decked out to ride with ruffians! (I resemble that remark!)
  . Can't wait to see the whole bike! I assume (and you know what happens when we do that!) the picture of the bike in the back of the truck is your "before" picture. Ride safe on the means streets of the Big Apple. (in other words, fast & reckless) Show no fear, or they'll EAT you!
He's got it covered until the big reveal!
Nice tank, D!!! Wow! And those shocks, the seat, even the tire tread...awesome! "Gentlemen's ride"? That bike looks like it's decked out to ride with ruffians!
(I resemble that remark!) . Can't wait to see the whole bike! I assume (and you know what happens when we do that!) the picture of the bike in the back of the truck is your "before" picture. Ride safe on the means streets of the Big Apple. (in other words, fast & reckless) Show no fear, or they'll EAT you! Thanks bro!!! I wanted to do something some what different then the typical cafe or chopper build I also have a 190HP zx10r. But I’m basically building this bike so me and my girl can bar/Resturant hop around my town. There’s so many good places to eat where I live and she always wants to ride but I don’t want her on my sport bike lol5T,
He's got it covered until the big reveal!
Nice tank, D!!! Wow! And those shocks, the seat, even the tire tread...awesome! "Gentlemen's ride"? That bike looks like it's decked out to ride with ruffians!
Ok cool. Thanks for clearing that up. Looks like ima have to sand some spots to get a good contact point. Didn’t know that until your great detailed adviceIf you installed painted handlebars then you have probably lost the path to ground for the starter button. The starter button connects to the starter solenoid with a blue/white wire. That wire is grounded out when you push the start button and that activates the solenoid and starter. The path to ground for the start button is rather convoluted. It gets it's ground from the other handlebar switch, through the bars. The other switch has a ground wire run into the headlight. In that left switch assembly, the ground wire is attached to the switch housing with a screw. That effectively grounds the whole housing .....

Once mounted, that ground is transferred into the handlebars. The right switch assembly with the start button picks it up in the same manner, by being mounted to the bars. It doesn't have it's own ground wire. So, if your handlebars are painted, you'll need to clean the paint off in the areas where the ground clips contact the bars on each side. Another possibility is you've been trying to test your starter function without the left handlebar control assembly installed yet. You won't have a ground for the starter button like that so it won't work.
Btw. I got the bike from a localWelcome to the party, D! You'll find tons of help here, from people that've been there, done that.
And Jim's expertise is top shelf! (Timely too, Jim. I'm writing my own schematic for "The Basketcase". Based on the original wiring diagram, it omits some things, adds others, but I'm keeping the starter...)
Hey, D, send us pictures of your '80 (we're nosy)! We love pictures! And tell us all about how you got it, what shape it was in (maybe a "before and after"), whatever mods you're doing, etc.
New York is a big state, and there's a bunch of us here. What part of the state are you in? Again, welcome!
Mechanic who couldn’t get it running With a title for 400 bucks. I got it home. Clean the carb bowls and jets real quick and it fired right up, it was leaking from the cam shaft side a bit but upon further inspection it looked like someone previous had opened it up because it looked like a total new gasket in place. It just wasn’t tightened enough. I’m loving this bike tho
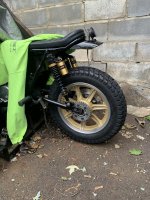
Gotcha. So I’m going to sand off the paint down to bare metal underneath the controls and starter button is so it’s metal to metal contact for the groundLooks like you've replaced all the handlebar controls with aftermarket? Just keep in mind that the start button you rig up must be able to put the blue/white wire to ground when pushed.
But where is your start button now? I don't see any electrical switches on the right side, just your aftermarket twist grip and master cylinder. The button on the left control assembly is probably for the horn.
When I built my 75 into a 750 the starter had a bit of trouble turning the engine. To help this I ran an extra ground cable from the battery negative down to a mount bolt on the starter.
This provides a cleaner ground path than trough starter to engine to frame to battery. When I ran that extra ground cable I also replaced the positive side cables. I replaced these cables with heavier cables. The stock cables are like 10 or 12 gauge cable. I replaced with 8 gauge. These heavier cables have less resistance to current flow so more of the battery power gets to the starter. Spins over well now.
You can let this new cable be your battery to frame connection or you can just add this along with your other battery to frame connection.
Leo