12-03 Igniter schematic ver 2

sleddog83

XS650 Addict
Messages
210
Reaction score
374
Points
63
Location
Vancouver Island, British Columbia
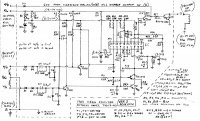
I have made some corrections to the 12-03 igniter schematic that I submitted previously. This igniter was off of a 83 Heritage Special SK. If you have any copies of the first version I submitted, get rid of them. This schematic was corrected using some reverse engineering methods.
Things to note: I suspect that the paired resistors R20/R21 and R22/R23 work with the tantalum capacitors C9 and C13 to produce a pair of integrator(ramp) waveforms. These waveforms are triggered by the pickup pulses P1 inverted through T2 and P2 inverted through T1. The pulses at the collectors of these two input transistors are positive going pulses. This is mostly speculation on my part since The IC on my igniter is dead. However comparing this igniter to an earlier one (12-01 igniter) I do see some similarities. What I thought originally might be fuses on the board, I now believe to be jumpers. The 12-03 igniter board is a single sided board with less components. Using a single side board required the use of a few jumpers on the component side.
From what I have read, the common failures of these boards are resistors R1, R2, Zener ZD1 which form part of the voltage regulation circuitry. The input diodes D1, D2, D3 and D4 are fairly low power diodes. The output transistor PTR also fails. Solder throughout the board , but especially at these components goes punky.
 

Attachments

  • 12-03.jpg
    12-03.jpg
    193.3 KB · Views: 201
Cool. Saved a copy.

Just for fun, here's a simulation of the input conditioner, up to the first transistor.

This first simulation is with a +/- 3v sinusoidal input signal.
The stimulus is at 20hz, about 1,200 idle rpm.
The purple line on the schematic is the stimulus signal, shown in the same purple on the trace plot.
The green line is the filtered input to the transistor's base.
The orange line is the transistor's output, at its collector. Barely 1v.
83xs650TCI-Inputs-Trace-03v.jpg


My other simulator allows me to adjust the stimulus waveform, shape and life-cycle. But, this simulator doesn't, so I can only input sine waves. Note that the +/- 3v signal is barely enuff to produce a useful output.

This next simulation is with a +/- 4v sinusoidal input signal.
Here the output (orange) has full swing, to 8v.
83xs650TCI-Inputs-Trace-04v.jpg


And, This last simulation is with a +/- 10v sinusoidal input signal.
The output (orange) still goes full swing, to 8v.
83xs650TCI-Inputs-Trace-10v.jpg


Fun stuff, huh?

I have no idea of the signals produced by the pickups. But, this shows that weak inputs won't make it thru the system. Also, due to the inverted logic design, with pullups on the transistors, they'll be mostly sinking current, producing heat, possibly a weak point...?
 
Last edited:
Interesting. What is the name of the simulator?
Initially, I thought the pulses from the pickups would be positive going. However when I started scoping it, I noticed that the pulses on the collectors were positive going. It was too difficult to measure a signal on the base of the transistors. It would appear that the pickup pulses are negative going, coming onto the board. I suspect that the input signals have a tendency to want to produce a positive voltage. It is probably picking up some of the generated voltage from the rotor. The little magnet inserted in the rotor probably has a reverse polarity that throws the pickup signal into negative territory. My guess is that it is a negative signal floating on a positive base. Course I could have measured it all wrong. Will have to check it again.
 
Well, I stand corrected.
I found the feature that allows me to define the waveform of the stimulus signal.

Assuming that the trigger magnet begins to influence the pickup about 4° (3.5mm) before it's right under the pickup coil, and its influence ends about 4° (3.5mm) after passing the center of the coil, for a total crankshaft rotation of 8°. Found that using only -2v of trigger voltage was the minimum to make this thing work.

83xs650TCI-Inputs-Trace-02v_20191116-EveryCircuit.jpg


The output (orange lines) swings to the full 8.2v, as a sharp spike.

So, you can ignore the plots in post #2.
It's the rapidity of the trigger signal that gets to the transistor's base...
 
Last edited:
I found my notes of when I measured the input signals. The bike was running on a fast idle above 1000 rpm on the Pamco ignition. I hooked up my 12-03 igniter to the harness and scoped the pickup signals going in. The signals at the base of the transistors were noisey(probably scope related) but were negative going to about - 0.7 volts riding on a positive 0.7 signal. The outputs on the collectors were positive going. Pulse widths were around 1 msec. There was around 3 msec delay between the two pulses, leading edge to leading edge. I hooked up my 12-01 igniter and saw some similar signals. Measured a 40 msec pulse repitition period running at around 1000 rpm. At some point the bike started overheating and I shut down the experiment. Figured I had enough info to make a bench test jig to output sample pulses. I did briefly scope the integrator signal coming off one of the tantalum caps. I have made up a breadboard jig using oneshots to simulate the pulses. Just bought a 4 channel scope off eBay, so I can start doing a bit more experimenting indoors.
 
did you see with a meter the kill switch cutting power to the box (r/w on the left side)?
 
Well, I stand corrected.
I found the feature that allows me to define the waveform of the stimulus signal.

Assuming that the trigger magnet begins to influence the pickup about 4° (3.5mm) before it's right under the pickup coil, and its influence ends about 4° (3.5mm) after passing the center of the coil, for a total crankshaft rotation of 8°. Found that using only -2v of trigger voltage was the minimum to make this thing work.

View attachment 154193

The output (orange lines) swings to the full 8.2v, as a sharp spike.

So, you can ignore the plots in post #2.
It's the rapidity of the trigger signal that gets to the transistor's base...
Interesting that about the magnets influence on the coil. I wondered hard and long how the early Boyer systems worked, I came to the conclusion that at low revs the magnet affected the coil from a few deg away and as the speed of the rotor increased the effect was nearer the pickups centre where you set the full advance. Quite a primitive system I thought, as the advance was like a switch rather than a curve, but at the time less fiddly than points.
 
did you see with a meter the kill switch cutting power to the box (r/w on the left side)?

Well, yes. The R/W is the main power coming into the igniter from the kill switch.

cutting off power to the coil is enough. if cutting off power to the ignition at random is fine with the box, it opens a possibility for an added (hidden) kill switch. it also begs the question why the later separate circuit for the kickstand kill switch -- they could have accomplished the same thing without any changes to the box.

what do you think about it, jim?
 
The kill switch kills main power to the igniter box and the coil together. The side stand relay connection only disables the output pulse to the coil, but leaves the igniter still powered. If you wanted to add an extra hidden kill switch to only disable the power to the igniter, that shouldn’t be a problem. You could also use the side stand relay connection, provided you have a 12-03 igniter. I also believe the more stuff like wires, connectors, switches and relays that you add to the circuit, the more likely it is going to cause you problems. Much like the factory side stand relay cutoff switch.
Turning off the igniter, should de-energize the coil. However if you had a cheap hidden kill switch that is cutting in an out that might put some unpredictable stresses on the board. The output transistor should be able to handle it though. The other thing to keep in mind is that the switch, extra wiring, solder and connections will add some small resistance to the circuit providing main power to the board. Over time these small resistances become larger to the point at which the board stops working reliably. You can do it, but just remember, it might cause you grief a few years later.
 
Last edited:
it makes more sense to just kill power to the box, except that i'd prefer a fail-safe switch. iow, would not kill the ignition if the switch itself went bad -- got dirty contacts or broken and went open. that is where the side stand circuit idea comes in. probably will never get around to either one :)
 
The above simulation, post #5, depicts what to expect from the 1st sensor, W/G to T2.

The 2nd sensor, W/R to T1 has C14 (0.001 uF) feeding back to T1's base.
So, I added in C14, and reran the simulation with the same settings.

83xs650TCI-Inputs-Trace-02v_20191119-EveryCircuit.jpg


It appears to be identical.

Perhaps C14 was added to feedback damp some hi-freq spurious signal, or to sharpen/soften the leading edge?

Also found a mystery component on your v2 schematic, R28 pullup, above T3?
 
Last edited:
Oops missed that one. This one escaped me completely the first time around as well. R28 is a 15k resistor. There is provision for another parallel resistor or component beside it, but nothing was added to the board. They use these parallel resistors in other places on this and on the 12-01 board. I think it was their way of tuning a circuit, kind of a precision resistance without actually using a precision resistor. R20/R21 and R22/R23 are other examples.
You are probably right about C14.
There may still be more omissions on my schematic. Doing the reverse engineering is kind of like translating a book of Klingon poetry by holding it up to a mirror and decoding all of the reverse image words separately.
 
Back
Top