-
Enjoy XS650.com? Consider making a donation to help support the site.
XS650.com receives a small share of sales from some links on this page, but direct donations have a much greater impact on keeping this site going.
You are using an out of date browser. It may not display this or other websites correctly.
You should upgrade or use an alternative browser.
You should upgrade or use an alternative browser.
White Trash Bobber Resurection and Top end rebuild...IT RUNS!!!!!
- Thread starter lidirtrider
- Start date
lidirtrider
XS650 Addict
Got new plugs in there too. Weather cleared up a bit so I dragged it out and gave it go. Still nothing. I do think that the battery might not be up to snuff. I've had it for a few years, and was pretty good about keeping it on the charger, but after a couple cranks it got really sluggish, then I could hear the solenoid click. It only read abuot 8.5 volts when I put a meter on it. So could be (also) be a battery issue. Just dosnt have the juice to turn over a 750.
So I'm gonna look for new one, but in the mean time, can I use a car battery to jump it?I know not to run the car if I do. Or a booster pack?
Also maybe I can describe what's happening a little better. When I push the elctric start it will crank a few revolutions then make kind of a metallic clank sound and wont crank anymore. Like it got kicked back from the compression. I can hear the starter motor humming and struggling like its trying to get passed it, and sometimes it would, but then would clank again and repeat.
With the plugs out everthing moves freely and easily with e start and kick lever. and even turn smooth by rotating alternator nut with a socket wrench.
E starting a 750 requires a good hot battery. I use a battery charger set at 10 amps when I'm working on my stock 650. It helps. A sulfated battery won't provide enough juice for the starter to operate. Also the bendix spring needs to be repositioned according to the service bulletin.Nice looking build.
lidirtrider
XS650 Addict
Thanks! yeah when I rebuilt it I adjusted the starter spring. I'm using a Ballistic Battery 8 cell, Lithium batt. but its a few years old so it may just be time to replace the battery.E starting a 750 requires a good hot battery. I use a battery charger set at 10 amps when I'm working on my stock 650. It helps. A sulfated battery won't provide enough juice for the starter to operate. Also the bendix spring needs to be repositioned according to the service bulletin.Nice looking build.
lidirtrider
XS650 Addict
Gonna go out to the garage and do some more trouble shooting today. I've searched all over the board and found a few suggestions to try. In addition to cam chain, valve adjustments, etc, I'm going to try disconnecting the PMA and the reg/rec. and disconnect any unneeded electrical (lights, etc) and see if that helps any. From reading it seems that there could just be too much draw at low rpm like on startup. So, we'll see.
lidirtrider
XS650 Addict
WAHOO!!! Got it to fire up for minute today! And....No smoke, as of yet. So seems like I OK so far.
I disconnected all electronics except for ignition obviously. Seems like the battery may be no good and/or too underpowered to turn the bike over. Once it was running It was idling ok with choke ON, but when I took the choke off, it started revving pretty high. So I'm guessing gotta adjust the idle screws. They were 1 1/2 turns out, and turned them in bout 1/2 turn each, so maybe turn them in a bit more.
I also retarded the timingon the PAMCO as much as possible. I had to remove the bottom screw on the plate to get it retard enough to fire. It still kicks like a bastard if I use the kick lever so might even need to take a little off the PAMCO plate to get it to retard a little more?
Its a start, and I'm happy it fired but still got some more trouble shooting to do. Thanks to everyone that chimed in here with advice. Couldnt have done it with this place.
lidirtrider
XS650 Addict
Well.....Here she is. Still a few adjustments and cosmetic stuff to do but, she runs. and I'm happy about that.
lidirtrider
XS650 Addict
Here's the other video I took that same day. Got some popping n the exhaust. So far seems like cam install is correct, timing chain, and valve adjustment seems ok. Having a little issue with the PAMCO, like I ran out of adjustment. plate is retarded as far as it can go, and still doesn't seem quite right. Could also be some carb issues. Had them redone by Rick at Oldskool, but still possible could be plugged up somewhere. Next step is to check for air leaks in all the usual spots. Somewhere on here I read about the exhaust not being sealed all the way at the flange. Running the Pandemonium Yo Mama's and have tried tightening the nuts down but seems like the flange is starting to bend a little and I'm also afraid of stripping the exhaust stud or just tearing it out of the head.
any other thoughts?
any other thoughts?
lidirtrider
XS650 Addict
Dug into the carbs today to check em inside and out. Looks like the jets are totally incorrect. So that could be at least ONE of my issues. The carbs I have appear to 76-77 BS38 linked type. looks like the correct Z-8 needle jet. And it looks like the proper small round Main Jet, but its size 125. Carb guide lists as 122.5 Although with the 750cc kit and open pipes and free flowing air filters I don't think the 125's would be too off. The pilot jets however look completely wrong. As far as I can see on the markings it says 27.5, but they do not look like the correct VM22/210 pilots. They don't even look like the BS30/96 style. There are no air bleed whatsoever on these pilots. I also checkedout the float levels and they were both by a few millimeters off so I set them back 24mm (+/- .5mm) measured from the carb body gasket area. I cleaned out all passages with some carb cleaner and blew everything out with compressed air.
So now gotta order some jets, and wait for the new (new old stock) advance assembly, and try all this again. So back on the back burner it is.
So now gotta order some jets, and wait for the new (new old stock) advance assembly, and try all this again. So back on the back burner it is.
Attachments
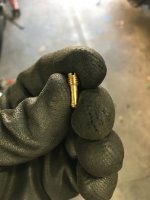
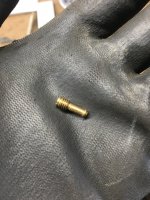
I think your pilots are correct original style "no hole" jets. Yamaha used them on the '76-'77 and '78-'79 carb sets. They're basically VM22/210 type without the bleed holes on the sides. They weren't required because the air is fed to the pilot circuit above the jet. The jet flows only fuel. A #25 was stock in the '76-'77 carb set, #27.5 in the '78-'79 set. That's a good size for you now with your mods, one size above stock. But, I'm thinking your mains are probably too small. The '76-'77 carbs had the smallest mains used in any 650 carbs. They're fine for a stock or near stock bike, but are quickly outpaced when you start modding. Usually, you need to go up several sizes into the low 130s. I would try 130s or 132.5s. Larger mains like that will probably require you to lean the needles a step.
The float level spec for the '76-'77 carb set is 25mm, so you're a little off, a bit richer at 24mm. You might be fine but if you have any tuning issues, you might want to try the actual 25mm spec.
Do you have the correct 4M1 needles? They're the match for those Z-8 needle jets.
The float level spec for the '76-'77 carb set is 25mm, so you're a little off, a bit richer at 24mm. You might be fine but if you have any tuning issues, you might want to try the actual 25mm spec.
Do you have the correct 4M1 needles? They're the match for those Z-8 needle jets.
lidirtrider
XS650 Addict
Ah, looks like the Ol' 650 wins again. lol. I was going by the Carb guide and mustve misread about the pilots. I thought it said 76-77 used the VM22/210 type. And I mustve brain farted while I wsa out there. I had 24mm for the floats in my head, but right after I posted before I looked again and see the guide shows the floats at 25mm. So all in all, not as bad as I thought. Floats are easy enough, just gotta order some mains. Needles appear correct just forgot to take pictures. Where would you recommend the needle clip position?
Yes, the '76-'77 carbs and the '78-'79 carbs do use VM22/210 type pilots. It's just that Yamaha must have special ordered batches of them without the air bleed holes down the sides when they were producing the bikes. Maybe they saved some money or something because the jets took less machining to make without the bleed holes. Any replacements you buy today will have the holes down the sides. The way they're installed and the way they flow (just fuel), the bleed holes aren't needed, but it won't hurt anything if they are there. Just make sure your 27.5's are VM22/210 style as far as the location of the metering orifice goes. It should be on top by the screwdriver slot and the bottom of the jet should be wide open .....

I mention this because Mikuni does make another pilot jet, the N151.067, without air bleed holes down the side, and it is basically a "no hole" version of the BS30/96 pilot .....

It has the metering orifice on the bottom.
Stock needle setting is in the middle or 3rd slot (from the top). Move the clip up one to slot #2. This will lower the needle in the slide and lean it out some. This is required because the larger pilots and especially the larger mains bleed over into the midrange and can make it too rich.

I mention this because Mikuni does make another pilot jet, the N151.067, without air bleed holes down the side, and it is basically a "no hole" version of the BS30/96 pilot .....
It has the metering orifice on the bottom.
Stock needle setting is in the middle or 3rd slot (from the top). Move the clip up one to slot #2. This will lower the needle in the slide and lean it out some. This is required because the larger pilots and especially the larger mains bleed over into the midrange and can make it too rich.
lidirtrider
XS650 Addict
I ordered a bunch of jets from mikes. got all the stock sizes for everything, plus a couple sizes up on the mains. I ordered some new sparks while I was at and a thought occurred to me. I'm running a PAMCO with 2 of the green monster coils, and what I believe are the resistor spark plugs caps. The plugs I have been running, and the ones I ordered, are BPR7ES. Those are the resistor plugs. Could some of my issues be because I'm running resistor caps AND plugs? I remember reading that I need resistor plugs with a PAMCO, but I never really considered the caps either. I think I have some NON resistor plugs around I can try. But basically with the PAMCO it's one or the other right? I also have both of the sets of wires coming from the PAMCO to the coils bundled together in one sleeve of heat shrink tubing. Could that cause some interference? I can't remember if it was for a Boyer or another ignition, but in the instructions it said not to have the wires too close because it "could" cause some issues like that.
I don't know, I'm just trying to eliminate any and all possibilities.
I DID replace the MikesXS advance unit with a NOS replacement, but still having issues. It also felt like sprigs were really weak compared the ones on the Mikes unit. Haven't had time to do much else lately, but I'm trying to get back to zero. Next time I can get out there, I have a whole list of things to do.
- Re-establish TDC for each cylinder with a piston stop and degree wheel, and mark the PMA rotor.
- Re-adjust Cam chain
- Re-adjust valves
- Clean (again) carbs, re-set floats, and jets back to stock specs
- New plugs (try non resistor type)
- Separate Ignition wires to coils
Then, hopefully everything works like normal, and all I'll have to do is play with jetting and ignition timing. I'm really losing patience with this bike now. I either want to ride it or sell it.
- - - I'm really losing patience with this bike now. I either want to ride it or sell it.
Hi 'rider,
my Mom used to say " then want shall be your master "
If it don't ride nice, tarp it down in the back of the garage until next spring when the weather will
be warmer for an easier sale and your patience will be restored enough to complete the fix.
Yes, you only want one instance of resistance in plug/cap/plug wire set-up. I can't say what having more may do, I never did it, but it's easy enough to change and eliminate it as a possible problem.
I suppose bundling all the Pamco wiring closely together might cause an interference issue. Again, easy enough to separate it and eliminate another possible issue.
I suppose bundling all the Pamco wiring closely together might cause an interference issue. Again, easy enough to separate it and eliminate another possible issue.
lidirtrider
XS650 Addict
Got out in the garage yesterday and went through my my laundry list of checks and fixes, and still getting major kickback, giant whites puffs of vapor out of the carbs, and loud backfires with blue flames from the pipes. So, next chance I get, I'm gonna pull the motor out and start from scratch. It all leads me back to the cam being a tooth off. I think I knew it all along, but was hoping it wasnt the case. Hopefully I can get out there sometime this week.
It's not starting running at all? Just for shit's n giggles swap ignition sides?
My 850 Norton Wouldn't start after working on it Kick only. Would let out a boom from one if the exhausts. Swapped power leads on the coils. Started right up!
lidirtrider
XS650 Addict
Sorry missed a few replies. I bit the bullet and pulled the engine the other day. Havent had a chance to crack it open yet, but gonna try to get out there today. 28 degrees here so gotta try to heat up the garage a little first. Gonna open the top end and start with ensuring the cam is set properly then work from there.
I can get it started but it runs like shit. When I first got it fired up, around Halloween, it ran OK but def needed some help. If you scroll back a bit inthis thread I posted some videos of it running. It just seemed to get worse a=everytime I tried to do anything. So I figure I'll just start over. Worst that hppens is a learn a little more.
It's not starting running at all? Just for shit's n giggles swap ignition sides?
I can get it started but it runs like shit. When I first got it fired up, around Halloween, it ran OK but def needed some help. If you scroll back a bit inthis thread I posted some videos of it running. It just seemed to get worse a=everytime I tried to do anything. So I figure I'll just start over. Worst that hppens is a learn a little more.
lidirtrider
XS650 Addict
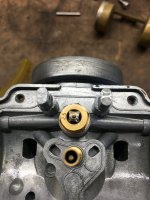
So heres what I got, Opened everything up to check the cam position. Brought it up to left piston at TDC and the notch in the cam is at 12 O'clock, and the punch mark sits right at the head mating surfaces. The pin on the advance side (right side) sits at about 1-130. SO, can anyone else with a rephase chime in to verify if that is correct?
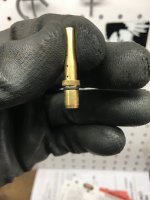
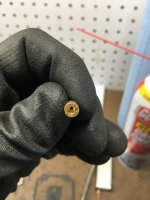
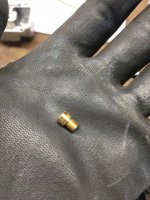
Sadly I'm also going to need a new oil pipe. I don't really know how the hell it happened, but both tubes on top ripped out of the vertical pipe. So if anyone has one, I'd be glad to take it off your hands.
Heres some pics:


Sadly I'm also going to need a new oil pipe. I don't really know how the hell it happened, but both tubes on top ripped out of the vertical pipe. So if anyone has one, I'd be glad to take it off your hands.
Heres some pics:
Similar threads
- Replies
- 7
- Views
- 719
- Replies
- 88
- Views
- 10K