-
Enjoy XS650.com? Consider making a donation to help support the site.
XS650.com receives a small share of sales from some links on this page, but direct donations have a much greater impact on keeping this site going.
You are using an out of date browser. It may not display this or other websites correctly.
You should upgrade or use an alternative browser.
You should upgrade or use an alternative browser.
For Sale - Rewound Alternator Rotor
- Thread starter Jim
- Start date
Better hurry, Spring is here.
") SOLD
SOLD
Last edited:
Hightower-Ash98
XS650 Addict
What are these things worth?
Price info is in comment #1.What are these things worth?
Hightower-Ash98
XS650 Addict
Oh I gotcha, forums sent me to the last page I thought this was a new listing
What are these things worth?
A heck of a lot more than Jim asks for them IMO.
Pete
+++ what Pete just said!
Stickysteve44
XS650 Enthusiast
'Nuther rotor ready to go.TCI version that will fit any stock XS charging system, regardless of which iggy you're running.
Better hurry, Spring is here.
View attachment 162530
Thanks for helping me out! New rotor has my charging system running smoooooth
Thanks for helping me out! New rotor has my charging system running smoooooth
75XSFLORIDA
XS650 Addict
Hey Jim. Slap test works on 75 but is a little weak. Dont feel a strong magnetic pull. Can i ohms test the rotor without pulling stator cage off?? Maybe finagle a probe thru a small opening somewhere??'Nuther rotor ready to go.TCI version that will fit any stock XS charging system, regardless of which iggy you're running.
Better hurry, Spring is here.
View attachment 162530
also your rotors, what are you currently charging and you dont need core or do you?
If nothing else... you could pull the brushes out to reach the rings. Not sure if there's another way.Maybe finagle a probe thru a small opening somewhere??
Prices are the same as what's listed in comment #1. I don't have to have a core. I'd prefer a core but I'll sell outright.also your rotors, what are you currently charging and you dont need core or do you?
75XSFLORIDA
XS650 Addict
If nothing else... you could pull the brushes out to reach the rings. Not sure if there's another way.
Prices are the same as what's listed in comment #1. I don't have to have a core. I'd prefer a core but I'll sell outright.
so $110 shipped to Florida??
Last edited:
75XSFLORIDA
XS650 Addict
I see your advice how how to check VR on 1980 and newer but not on prior 1980, the type A VR. Is there a way. ThanksTroubleshooting.
I'm not going to try to reinvent the wheel here....The following is from the charging system guide in the Tech section. Thanks @gggGary
1. First charge your battery to at least 12.5-12.7V.
Is the battery Good?
Will it hold voltage overnight or longer?
Will it light a turn signal or other bulb for 15 or 20 minutes and still have 12 volts?
EDIT by me. A good battery will run the headlight on low beam for 20 min. with only about a volt - volt and a half drop.
Is the fluid at the correct level? Use ONLY distilled water to refill if needed.
If the battery is questionable buy a new one. A too small battery can be a problem, while idling the charging system will not keep up to the load of a headlight ,tail light, ignition etc and the battery will slowly discharge. Small batteries discharge faster. Yamaha calls for a 1200 RPM idle speed is to keep the battery charging, a too slow idle won't keep a battery charged.
A good charging system won't fix a bad battery, and a bad battery will break a GOOD charging system.
A VOM (Volt Ohm Meter) is needed, It doesn't have to be fancy. One can often found at the hardware store, home center, farm store, auto store, electronics store for less than $10.00 Either analog (a meter with a needle) or digital will work . The digital are easier to read and they auto range so you don't need to pick a range You just need to know what you want to measure ,DC volts and Ohms are the functions we will use most. A diode test function is nice but not a "must have"
EDIT: Forum member @I am Carbon compiled some Youtube videos on how to use a multimeter into one thread. If you're shaky on using a meter, I suggest you have a look.
A jumper wire is nice to have. About 3 foot long, 16 gauge wire or more (14 is heavier than 16 in wire gauge) two alligator clips or a solderless lug U and an alligator clip are handy ends to have on it.
Normal hand tools. Flat and good philips screw drivers, wrenches etc. When loosening screws push firmly in, then apply torque. Do not strip the heads. Some of the screws may have been machine tightened 3 decades ago. If you don't have one a hand impact driver is a real time and money saver.
Does my charging system work?
Start the bike, shady area is nice, point the headlight at a garage door or wall, rev the engine, does the light get brighter and then dim a bit as the engine goes back to idle? If it does you have at least SOME charging.
Stock, 1980 or later, and the headlight doesn't light at all?
You may not have any charging, the headlight is controlled by a relay that is powered directly from the stator, no charging, the relay won't close, no headlight.
2. Find a really thin feeler gauge like 0.010" or 0.015" or a wrench, steel ruler, a putty knife, or any chunk of steel that can be lightly held near the alternator cover works too, see picture) and hold it pointed down about a half inch away from your generator cover on the engine. Now turn the key on. If your regulator and rotor are working the feeler gauge should slap the case when the magnetic field is created in the rotor. If nothing happens or the magnetic effect seems really weak then go on to the next test.
EDIT: Here's a quick video on how to do the "slap test."
3. On the solid state regulator models (1980 and newer) all you need to do is locate the green wire at the regulator plug and make a jump from it to ground. That bypasses the regulator and allows full battery current to flow through the brushes out of the rotor through the green wire to ground. That causes the rotor to make a stronger magnetic field which in turn causes more current to flow in the stator. If your battery terminal charge voltage jumps up to 14.5VDC when you rev the engine then the regulator or the ground connection for the regulator is your problem.
4. If nothing changes then it's time to check the voltage on the brown wire (It may be black on your bike) at the positive brush with the key on. It should be very close to battery voltage. The brown wire that feeds the brush gets its power from the brown wire at the keyswitch. If you don't have battery voltage at the brush then check the voltage at the switch connector while it's plugged in, by probing from the backside of the connector with the key on. Again you should see the same voltage as the battery. If you do get full battery voltage there then repair the brown wire circuit between the switch and the positive brush. If not then the switch is either bad or the red wire from the battery is not passing the full current like it should. If that's the case then keep going back along the red wire, through the main fuse until you find the source of the voltage drop. No more than 0.3 VDC drop is acceptable. Note* any more of a voltage drop could overcharge your battery... overheating the rotor in the process.
5. Once you have full voltage to the positive brush re-check the charging voltage to see if you're getting 14.5 VDC or better at the battery when revved to about 3,000 rpm. If you still don't have a charge then do the feeler gauge test again. If it slaps the case your rotor and regulator are working and you can go on to stator checks. If not then pull the brushes out of their holder and use an ohm meter to test the rotor. Measure the rotor first by touching the tester leads to the brass slip rings. Then take one lead and touch anywhere on the engine that's not painted. For the first test you should see between 5 and 5.5 ohms between the slip rings. On the second test between one slip ring and the engine you should see infinity on the meter. Any reading lower than 5 ohms on the first test or less than infinity on the second test means you have a bad rotor. Replace it. If it tests good then go on to the stator checks.
6. At the stator wire connector locate the three white wires. Use a voltmeter set on the AC scale to test the three possible connections between the white wires by probing from the backside of the connector. (The connector should be plugged togeter for this test) With the engine running at idle you should see about 10.5 to 11 AC volts (Not DC) on each of the three combinations of white to white that you make. If you get a very low reading on one or two legs then something is grounding your stator. If you have high readings on any of the legs (i.e. 16-18VDC) then your rectifier is bad.
EDIT: Here's a video on testing the rectifier.
7. If you got low readings on any of the stator voltage checks then unplug the connector and use your ohm meter to check the stator windings. Check the resistance between the three fabric covered wires (stator side) on the side of the connector. On each white to white connection you should read about 0.4 to 0.5 Ohms. If you get a very low reading on all of the three combinations find the single Yellow wire connector and disconnect it. Re-check your stator resistance. If the readings are now good then the yellow wire or safety relay are shorted. If there is one or more that still read low after disconnecting the yellow then check those legs by touching one lead to ground with the other on the white wire. You should see a very high Kilo ohm or infinite reading. If you get a low resistance check the stator lead pigtail to see if it is pinched by the cases or rubbed through on the frame. If that looks ok then your stator is shorted and needs to be replaced.
And that's about it except to say that dirty connections and worn brushes account for most of the charging system problems. Good Luck you'll find the problem.
The video shows how to check the rectifier (REC) not the regulator (VR). And yes the video applies to any full wave rec. For the reg, you'd need a test bench.I see your advice how how to check VR on 1980 and newer but not on prior 1980, the type A VR. Is there a way. Thanks
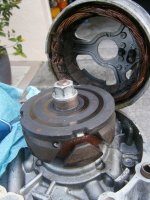
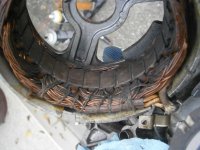
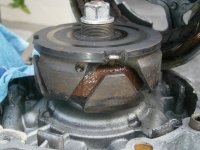
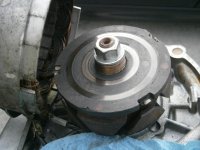
Another nice rabbit hole to explore.... Humm, now did I buy a puller already or need to find one... Going to get this thing off looking at black flakes bits under rotor. And, here I was looking to chunk this dead weight.
Humm, now did I buy a puller already or need to find one... Going to get this thing off looking at black flakes bits under rotor. And, here I was looking to chunk this dead weight.Attachments
JayTheWrench
You wont live forever, build something that will.
Was pointed in Jim's direction and can say he is a true master of his craft, the attention to detail was top notch and the rotor worked without a hitch. Thanks Jim!! Appreciate your service brother!
- Jay
- Jay
Thanks Jay! Appreciate your business.Was pointed in Jim's direction and can say he is a true master of his craft, the attention to detail was top notch and the rotor worked without a hitch. Thanks Jim!! Appreciate your service brother!
- Jay
Had to build 2 rotors for customers last week. Before I put all the tooling away I went ahead and built up a 3rd.
Has the TCI magnet, so it'll fit any year.
SOLD
Last edited:
I may have posted this before so if it sounds familiar just put it off to old age!
Looking at that picture of the latest rotor gave me a "flash-back" to a RD200 I had years ago. Forget the details but some how I figured out it had a charging problem and while investigating the cause found that some the screws that the slip ring plate on the rotor had stripped their threads. Guess they must have been over tightened at the factory?
Anyhow the the plate had come partially loose and was actually cracked. figuring I had nothing to loose I dug out the epoxy that covered the heads of the screws and got them out. Forget if I found some metric screws to replace them or I may have tapped the holes for standard machine screws, I'm thinking the latter. I was very lucky that the copper rings had held the two parts of the plate together and were only slightly bent. The fact that the heads of the screws were covered with the epoxy kept them from slipping out and destroying everything!
Then after cleaning everything real good I mixed up some epoxy and worked it under the slip ring plate and installed the screws and also covered them like the original ones were. After letting it set over night I chucked it in the lathe at work and took a very light cut to true everything up. To my surprise when reinstalled it actually worked and did for as long as I had that bike.