tunedbytyler
XS650 Member
Hey Guys!
purchased an old tired 1978 xs650 standard about a year and a half ago as my first bike. Used this bike to get my license, and rode it a good amount before getting tied up in other hobbies over the fall/early winter.
after sitting for a few months, and friends making fun of my "POS", one of my buddies recommended i turn it into an ART bike. I do custom bicycle paint for a living, so i jumped at the idea to paint something on a larger scale. Little did i know, this would turn into one of the largest projects i have attempted yet.
plans:
1. FRAME
-- remove airbox/battery box
-- make custom electronics tray under seat
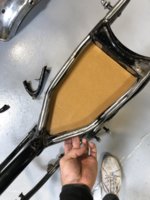
-- detab entire frame(remove fender mounts, centerstand+mounts, airbox mounts, seat mounts+lock, passenger foot pegs, reflector mounts, handle, exhaust mounts
--brass swingarm bushings
--angular head tube bearings
2. ENGINE
--electronic ignition (boyer)
--PMA (xscharge)
--new gaskets/seals/hardware
--new pistons(.025 over)
--barrels machined to match(work done at Marinos auto machine shop in Watsonville,Ca)
--paint entire motor black(gold leave logos)
--starter delete..never worked, never really minded. taking out starter motor + internal gears
3. SHOCKS
--14.25 progressive shocks
--will need to make something to protect the swing arm(haven't decided if i want to buy something and refab it or just make something from scratch.)
4. FORK
--emulators
--shave extra brake mount off left fork leg
--paint lowers
--new seals/boots/rock shox fork oil(15wt, slightly overfilled)
--fork brace(tarozzi)
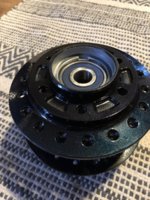
5. WHEELS
--new rims(slightly wider to run shinko 705's)
--new stainless spokes+nipples
--paint hubs
--new bearings+seals
6. COCKPIT
tracker bars(tc bros or builtwell)
--brembo 11mm master
--dogleg clutch
--magura 314 throttle assembly
--motone 3 button(blinkers/horn) not 100% yet
--motoscope mini, or motoscope pro...i think...
7. Exhaust
-- pandemonium ya mama exhaust
--shave welds off pipes
--paint black with heat resistant paint
--wrap just section under guard in black heat wrap
-- custom cl175 heat guard
8. TANK
--xs400 square tank
--make rear tank mount
--decide on petcock setup(very tight with rear tappet cover). may machine adapter plater for 3/8 npt petcock so its angled slightly outward.
9. SEAT
--fiberglass seatpan with upwards indent to help with electronics room
--figure out how to make a seat...
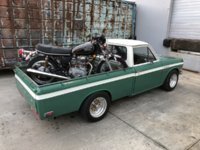
Here are a couple pics of first getting it home in my 72 datsun 521, and the early teardown stages


purchased an old tired 1978 xs650 standard about a year and a half ago as my first bike. Used this bike to get my license, and rode it a good amount before getting tied up in other hobbies over the fall/early winter.
after sitting for a few months, and friends making fun of my "POS", one of my buddies recommended i turn it into an ART bike. I do custom bicycle paint for a living, so i jumped at the idea to paint something on a larger scale. Little did i know, this would turn into one of the largest projects i have attempted yet.
plans:
1. FRAME
-- remove airbox/battery box
-- make custom electronics tray under seat
-- detab entire frame(remove fender mounts, centerstand+mounts, airbox mounts, seat mounts+lock, passenger foot pegs, reflector mounts, handle, exhaust mounts
--brass swingarm bushings
--angular head tube bearings
2. ENGINE
--electronic ignition (boyer)
--PMA (xscharge)
--new gaskets/seals/hardware
--new pistons(.025 over)
--barrels machined to match(work done at Marinos auto machine shop in Watsonville,Ca)
--paint entire motor black(gold leave logos)
--starter delete..never worked, never really minded. taking out starter motor + internal gears
3. SHOCKS
--14.25 progressive shocks
--will need to make something to protect the swing arm(haven't decided if i want to buy something and refab it or just make something from scratch.)
4. FORK
--emulators
--shave extra brake mount off left fork leg
--paint lowers
--new seals/boots/rock shox fork oil(15wt, slightly overfilled)
--fork brace(tarozzi)
5. WHEELS
--new rims(slightly wider to run shinko 705's)
--new stainless spokes+nipples
--paint hubs
--new bearings+seals
6. COCKPIT
tracker bars(tc bros or builtwell)
--brembo 11mm master
--dogleg clutch
--magura 314 throttle assembly
--motone 3 button(blinkers/horn) not 100% yet
--motoscope mini, or motoscope pro...i think...
7. Exhaust
-- pandemonium ya mama exhaust
--shave welds off pipes
--paint black with heat resistant paint
--wrap just section under guard in black heat wrap
-- custom cl175 heat guard
8. TANK
--xs400 square tank
--make rear tank mount
--decide on petcock setup(very tight with rear tappet cover). may machine adapter plater for 3/8 npt petcock so its angled slightly outward.
9. SEAT
--fiberglass seatpan with upwards indent to help with electronics room
--figure out how to make a seat...
Here are a couple pics of first getting it home in my 72 datsun 521, and the early teardown stages
Attachments
Last edited:
")