One of the most consistent, if not scary and depressing, lessons to be learned from regular reading of this forum is just how much total garbage Mikes XS sells. I don’t know how else you would know, or even be inclined to believe it. It is almost unbelievable.
-
Enjoy XS650.com? Consider making a donation to help support the site.
XS650.com receives a small share of sales from some links on this page, but direct donations have a much greater impact on keeping this site going.
You are using an out of date browser. It may not display this or other websites correctly.
You should upgrade or use an alternative browser.
You should upgrade or use an alternative browser.
What have you done to your XS today?
- Thread starter I am Carbon
- Start date
-
- Tags
- maintenance
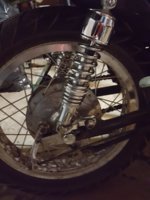
I have had a couple of days to look at the rack. My bag won't be in till middle of next month. It will work, dosen't look real busy as some do plus it fit perfectly, no mods. Sticks out past the tail light a lot. I just really liked the grab rail with the TS mounts on it.

Time to go to work on the Sissy Bar. The arms on the Sissy are 2 1/4 inches too long, 10 1/4 inches vs 8 1/4 inches.
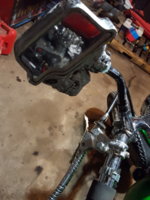
So, cut the ends of the arms off. What do you know? A piece of 5/8 round cold roll fits snug if you dremel the seam out of the inside of the tubing. ( also the area inside around the turn signal mount and mounting boss are beefed up with an inside piece of tubing! lucky I didn't cut too far back. The 5/8 round will be great for keeping the ends aligned with the arms. First thing is to square the end of the arm tips and skip back 3/8 inch and step drill a 1/4 hole, top and bottom of the arms. Cut off two pieces of the 5/8 round stock to 1 1/4 inches long. Mark back a precision mark at 5/8 inch, in the middle of each piece of round stock, with a Magic Marker. De-burr everything and try the fit.

Now we got to measure 6 times and cut the arms down 2 1/2 inches. Drill the tops and bottoms to 1/4, dremel out the inner seam, de-burr everything and slip together for a fit. So far so good. I'll take it.

Now we check the hole distance and it's 8 1/4 on center. Just right! Now we get a piece of all-thread, 4 washers and nuts to make a jig to keep everything straight. Made sure to set center spacing also, and bolt it up tight.

Now we gona mask the holes off just like a Doctor so the pills stay where there supposed to. Then we get a soaking wet red rag and were ready to drop a weld in those 1/4 inch holes.

We stick the welding wire in a hole, say a magic word, "rumpledforeskin", and pull the trigger. No gas, the wire jumps, starts and stop. Good thing we had a magic word! Pull the wet rag over the weld to keep the chrome from turning blue. Finish all the welds, hit them with a jewelers file and a little JB to smooth them up. It is what it is, but it's straight and strong!

We pull the rack, swap over the T/S and bolt up the Sissy. Welds are mostly hidden. Not bad. Have to put a little clear on the welds to keep them from rusting.

I think I like it better than the rack. I can hang my "Barbarians" shoulder bag on it. It will hold a 5th of Honey Whiskey and a Colt 45, not the kind you drink! I like this and I don't like nothing.


Next, highway pegs!
Time to go to work on the Sissy Bar. The arms on the Sissy are 2 1/4 inches too long, 10 1/4 inches vs 8 1/4 inches.
So, cut the ends of the arms off. What do you know? A piece of 5/8 round cold roll fits snug if you dremel the seam out of the inside of the tubing. ( also the area inside around the turn signal mount and mounting boss are beefed up with an inside piece of tubing! lucky I didn't cut too far back. The 5/8 round will be great for keeping the ends aligned with the arms. First thing is to square the end of the arm tips and skip back 3/8 inch and step drill a 1/4 hole, top and bottom of the arms. Cut off two pieces of the 5/8 round stock to 1 1/4 inches long. Mark back a precision mark at 5/8 inch, in the middle of each piece of round stock, with a Magic Marker. De-burr everything and try the fit.
Now we got to measure 6 times and cut the arms down 2 1/2 inches. Drill the tops and bottoms to 1/4, dremel out the inner seam, de-burr everything and slip together for a fit. So far so good. I'll take it.
Now we check the hole distance and it's 8 1/4 on center. Just right! Now we get a piece of all-thread, 4 washers and nuts to make a jig to keep everything straight. Made sure to set center spacing also, and bolt it up tight.
Now we gona mask the holes off just like a Doctor so the pills stay where there supposed to. Then we get a soaking wet red rag and were ready to drop a weld in those 1/4 inch holes.
We stick the welding wire in a hole, say a magic word, "rumpledforeskin", and pull the trigger. No gas, the wire jumps, starts and stop.
Good thing we had a magic word! Pull the wet rag over the weld to keep the chrome from turning blue. Finish all the welds, hit them with a jewelers file and a little JB to smooth them up. It is what it is, but it's straight and strong!We pull the rack, swap over the T/S and bolt up the Sissy. Welds are mostly hidden. Not bad. Have to put a little clear on the welds to keep them from rusting.
I think I like it better than the rack. I can hang my "Barbarians" shoulder bag on it. It will hold a 5th of Honey Whiskey and a Colt 45, not the kind you drink! I like this and I don't like nothing.
Next, highway pegs!
Got these beautiful shiny's put on my rear  , I even have the vintage lowering kit
  . Took a bit, but then got the vintage mirror mounted. Probably going to remount it later on. Just wanted to see how sexi it was
  THANKS AGAIN WILLIS!!
I'm thinking maybe in the future I'll grind out that old red gravel on the outside of the mirror and touch it up with some modern artness of mine. Just having a hard time figuring out what. I have 5 ideas so far lol
, I even have the vintage lowering kit . Took a bit, but then got the vintage mirror mounted. Probably going to remount it later on. Just wanted to see how sexi it was THANKS AGAIN WILLIS!!I'm thinking maybe in the future I'll grind out that old red gravel on the outside of the mirror and touch it up with some modern artness of mine. Just having a hard time figuring out what. I have 5 ideas so far lol
Attachments
I have had a couple of days to look at the rack. My bag won't be in till middle of next month. It will work, dosen't look real busy as some do plus it fit perfectly, no mods. Sticks out past the tail light a lot. I just really liked the grab rail with the TS mounts on it.
View attachment 165167
Time to go to work on the Sissy Bar. The arms on the Sissy are 2 1/4 inches too long, 10 1/4 inches vs 8 1/4 inches.
So, cut the ends of the arms off. What do you know? A piece of 5/8 round cold roll fits snug if you dremel the seam out of the inside of the tubing. ( also the area inside around the turn signal mount and mounting boss are beefed up with an inside piece of tubing! lucky I didn't cut too far back. The 5/8 round will be great for keeping the ends aligned with the arms. First thing is to square the end of the arm tips and skip back 3/8 inch and step drill a 1/4 hole, top and bottom of the arms. Cut off two pieces of the 5/8 round stock to 1 1/4 inches long. Mark back a precision mark at 5/8 inch, in the middle of each piece of round stock, with a Magic Marker. De-burr everything and try the fit.
View attachment 165168
Now we got to measure 6 times and cut the arms down 2 1/2 inches. Drill the tops and bottoms to 1/4, dremel out the inner seam, de-burr everything and slip together for a fit. So far so good. I'll take it.
View attachment 165169
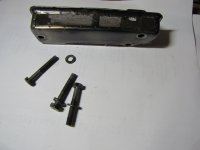
Now we check the hole distance and it's 8 1/4 on center. Just right! Now we get a piece of all-thread, 4 washers and nuts to make a jig to keep everything straight. Made sure to set center spacing also, and bolt it up tight.
View attachment 165170
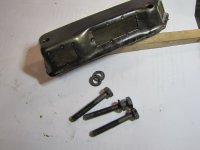
Now we gona mask the holes off just like a Doctor so the pills stay where there supposed to. Then we get a soaking wet red rag and were ready to drop a weld in those 1/4 inch holes.
View attachment 165171
We stick the welding wire in a hole, say a magic word, "rumpledforeskin", and pull the trigger. No gas, the wire jumps, starts and stop.
View attachment 165172
We pull the rack, swap over the T/S and bolt up the Sissy. Welds are mostly hidden. Not bad. Have to put a little clear on the welds to keep them from rusting.
View attachment 165173
I think I like it better than the rack. I can hang my "Barbarians" shoulder bag on it. It will hold a 5th of Honey Whiskey and a Colt 45, not the kind you drink! I like this and I don't like nothing.
View attachment 165174
View attachment 165175
View attachment 165176
Next, highway pegs!
Looking good! You did a really nice job adapting the rack and sissy bar to fit. Looks like it was made for it!
Thanks, Mailman. I read somewhere this Sissy was a Yamaha piece. Another reason I wanted it. I think I can put a little 1 1/4 inch wide chrome tape around that area but It looks ok as it is.Looking good! You did a really nice job adapting the rack and sissy bar to fit. Looks like it was made for it!
Take care
Tiesco
XS650 Addict
Went to the junk yard again and found another coil(so I don't have to rob the CB) and a brake switch off another Honda. I soldered the last one back together as a temporary repair.
I was trying to nab a few TPSs off some 90s Chevy trucks becuase I thought it be nice to have a few potentiometers to play around with but I didn't bring the right tools with me. The same goes for some GM coils I was trying to get as well.
The more you know about cars and bikes, the more a junkyard becomes a playground.
Attachments

Last edited:

Travellin' Stopper
Brought the 77 up from the shed; it fired right up and promptly scooted 10 inches down the drive. Saw the plastic trailer chock and applied it to the front wheel and it really slows it down.

Brat's Back in the Shed
Maybe I will have more patience once I work on the stock ' 77 for a while and get the garden ready to.plant and replace its saggy fence - only 34 feet and one gate - an afternoon, eh?
Tell me about it. 30 new chicks that are too big for the chicken containment center and the chicken pen is full of rotten post. Staples coming out of the wire...Too much Yamaha and not enough farm work. ( Excuse coming) It's been too wet to get in the garden but I have it planted! Hopefully I can get a fertilizer buggy in the meadow Monday before it starts raining. I did ride the yam today. I just had to!View attachment 165241
Travellin' Stopper
Brought the 77 up from the shed; it fired right up and promptly scooted 10 inches down the drive. Saw the plastic trailer chock and applied it to the front wheel and it really slows it down.
View attachment 165242
Brat's Back in the Shed
Maybe I will have more patience once I work on the stock ' 77 for a while and get the garden ready to.plant and replace its saggy fence - only 34 feet and one gate - an afternoon, eh?

But, this morning I put vinegar and water in a tank I got a few weeks back. It's not in bad shape, couple of dents. It was rusty inside big time! If I do nothing else, I'll get the inside clean and a good coat of oil and set it up. Never can tell.

Edit: I picked up a good looking set of buckhorn bars just to see. They are nothing like my pull-backs! I doubt I would like them and it's not worth the trouble of switching them out to see. There is really more difference than this shows.

I went out to check how the vinegar and water tank cleaning was going. I had previously rinsed the tank out with water and washed out what I thought was leaves. Nope, it's some type of rubbery tank liner that is turning loose inside the tank. It's not Red Kote. This stuff is cream colored, was cream colored.

I'm going to have to form a different plan of attack.
Edit: I picked up a good looking set of buckhorn bars just to see. They are nothing like my pull-backs! I doubt I would like them and it's not worth the trouble of switching them out to see. There is really more difference than this shows.
I went out to check how the vinegar and water tank cleaning was going. I had previously rinsed the tank out with water and washed out what I thought was leaves. Nope, it's some type of rubbery tank liner that is turning loose inside the tank. It's not Red Kote. This stuff is cream colored, was cream colored.
I'm going to have to form a different plan of attack.
Last edited:
Tiesco
XS650 Addict
Take 2 but this time on the Ernie stand, strapped down.

XsJosh
XS650 Addict
Cut up my old stock rusted and dented fender to fit it to my new front end!

Tiesco
XS650 Addict
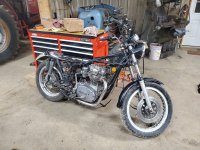
Out of curiosity, how much do yall reckon the motor weighs wet?
I've spend the last couple of years, maintaining my current bike and upgraded the bike to a full blown motogadget setup, all with the mo.unit blue and mo.button as well as their blinkers for the handlebar and added a led taillight and a led headlight.
Overall I've upgraded from the 650ccm to a 750ccm bigbore and the entire motogadget setup. That involved a complete new wire harness and fine tune.
New handlebar switches and levers for the brake and hydraulic clutch has also been mounted.
I'll add photos soon.
Btw hope your all doing great, my absence has been way too long..
I’ve spent the last week agonizing over which size jacket to go with. The 44 I ordered seems too roomy throughout, but the 42 that arrived yesterday is JUST a touch too tight in the chest. The question is - am I going to accept my weight and trajectory, or am I going to get back in shape and lose enough weight for the 42 to be safe? Also, I compression tested my left cylinder and only got 90. I didn't get around to testing the right. I just kicked the bike over like 10-20 times without power. Could that low of compression be the reason for my
Bike losing power and slowing down around my top speed? Or is my compression tester not being accurate? The last couple rides I took when I get up around 60-70, if I’m going uphill the bike loses torque and basically starts slowing down. I thought it was perhaps the carbs being gummed up but now I’m not so sure. It’s getting really nice here this week, I’m itching to ride to work in one of my jackets. Not knowing which size to keep and worrying about my Bike is agonizing.
Bike losing power and slowing down around my top speed? Or is my compression tester not being accurate? The last couple rides I took when I get up around 60-70, if I’m going uphill the bike loses torque and basically starts slowing down. I thought it was perhaps the carbs being gummed up but now I’m not so sure. It’s getting really nice here this week, I’m itching to ride to work in one of my jackets. Not knowing which size to keep and worrying about my Bike is agonizing.
Last edited:
We are all human.
Buy the bigger one!
Buy the bigger one!
I've spend the last couple of years, maintaining my current bike and upgraded the bike to a full blown motogadget setup, all with the mo.unit blue and mo.button as well as their blinkers for the handlebar and added a led taillight and a led headlight.
Overall I've upgraded from the 650ccm to a 750ccm bigbore and the entire motogadget setup. That involved a complete new wire harness and fine tune.
New handlebar switches and levers for the brake and hydraulic clutch has also been mounted.
^^^ I'm now extremely anxious to see this. This is what I was going to do to my chopper over the years, minus the moto gadget wiring. and unit.
Tiesco
XS650 Addict
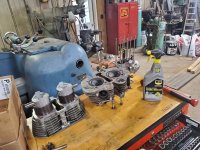
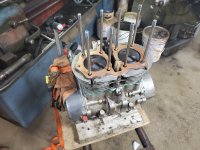
Got it apart and back together again yesterday. All that just to align the rings properly. Went home to wait for the gaskets to arrive and they were waiting for me on my door step so i went back down and reassemble it immediately. I decided to give the idea of spraying the head gasket with copper spray a try this time around.
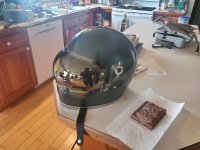
I was also gifted this nice helmet for my 19th birthday. Definitely feels good to have a modern helmet that fits right.
I was also gifted this nice helmet for my 19th birthday. Definitely feels good to have a modern helmet that fits right.
Attachments
tzimmerm, post: 642903, member: 11657"]I’ve spent the last week agonizing over which size jacket to go with...
Keep the bigger size. You don't have time to "get back in shape" and stay that way???
You know that one cylinder pulling harder than the other is going to limit your top end. But 60 to 70, even up a grade, shouldn't be too noticeable. It's not for my bike. If I roll it on a bit, it just picks right up.
scrapmetal
XS650 Addict
when opening the other XS1B motor I found the bottom oil filter amazing clean inside with all the oil sludge in the pan and what is the meaning of the holes in the 3 screw heads, was it standard equipment or was something else installed here, ( was it like a wire through all the heads to avoid opening the bolts??)
pretty sure some of you guys know it. LOL
pretty sure some of you guys know it. LOL
Attachments

The holes are so you can safety wire the bolts. It’s not entirely necessary, as later models did not have those holes.


Similar threads
- Replies
- 32
- Views
- 1K