RonXS' Build Thread - The Soft Cafe

Tank mounted securely... Will paint the bracket when I paint the frame. There's enough room for something... just don't know what.

IkRzsI2.jpg


Couldn't have drilled the holes without this Mikita I picked up on a whim at 'Habitat For Humanity'. That and a few resharpened broken drill bits... :thumbsup:

iNB6BCH.jpg
 
Last edited:
I'm sure you're aware that the rear mount on an original tank sits on a big rubber pad. You might want to add some more rubber on either side of your new tank mount to better support it.
 
I'm sure you're aware that the rear mount on an original tank sits on a big rubber pad. You might want to add some more rubber on either side of your new tank mount to better support it.
Thanks for the tip... That rubber damper under the bracket is very dense and mounts the bracket very solid... maybe too solid. I'll look for something wider and softer.
 
Last edited:
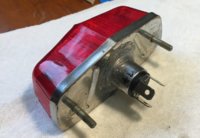
Spent the day looking on how to 'bob' the rear fender. I wanted to cut the front of the rear fender and rotate the fender forward as this keeps a nice edge on the fender. I did this on my SR500 and liked the result. Well the XS is enough different that I'm just gonna leave it. Did work on the tail light. Used an old LED headlight bulb. It worked poorly as a headlight, but works great as a tail/brake light. :thumbsup:

Recognize this bulb plug?
QuUMUkU.jpg
 
Last edited:
I wanted to use an SR500 wheel I have so bad, but after many hours, if not days of internet research.:banghead:
I've dropped that idea. I just couldn't resolve the gearing issue. I read somewhere that there was a 38T sprocket available, but couldn't find any reference where it's been used. Even using an 18T front sprocket, this 18/38 combo gearing would still be too low (numerically high) overall for me.

Ebay to the rescue...
oNn8D9w.jpg


You can read about the details of this mod here by ThatXS650Guy.
 
I saw that and can't figure out how he got it to work. How do you run a 15mm I.D. bearing on one side and a 14mm I.D. bearing on the other? Also, the original bearing had a tophat shaped insert to sleeve it down to fit the axle, just like our 650s have. That insert has a lip on the back side and that combines with the tube spacer between the bearings to give the correct spacing and support. Eliminate that and the tube spacer alone is now too short and the bearings will bind when the axle is tightened.

I had one of those wheels and sent it to the scrap yard because adapting it just seemed too complicated.
 
:thumbsup:
I saw that and can't figure out how he got it to work. How do you run a 15mm I.D. bearing on one side and a 14mm I.D. bearing on the other?
Never underestimate genius at work. Having seen other things ThatXS650Guy has done, and the people he keeps company with, I’m not surprised a bit. :thumbsup:
 
I saw that and can't figure out how he got it to work. How do you run a 15mm I.D. bearing on one side and a 14mm I.D. bearing on the other?

As I read it, the recommended bearing IDs were 25mm & 20mm. The XS500 wheel swap looked like it was composed of a bearing change and some spacers. Once I get the wheel, I'll be able to check for myself. Fingers crossed that it will work.
 
Used Weekendriders tip to shortened the stalks and fix the floppy turn signals. Now using LEDs. They tuck-in nicely. Definitely going to get some red lenses for them...

The bike reminds me of the RD400 so much... Thinking I'll put RD650 decals on the side covers. :)
VeaEYrz.jpg


A real RD...
n2xrFsV.jpg


I'm working on turn signals for the front. The fairing prevents turn signals in the original spot. Will probably use smaller signals with the Motolanna fork bracket.
 
Been cleaning up some old superbike bars. Sporty but not extreeme... No clipons for me... I'm too old.

Also pulled this out of my stash... '86 FZ600 dual piston front caliper. I used the other on on my SR500 project. It worked great.
eeWcVgN.jpg
 
Last edited:
Spent about 3 hours trying to determine how to mount the SR500 seat to the XS... This has turned out to be a little harder than laying the seat down on the frame... :doh:

Figured keeping the hinges would be to fussy... Then figured that I would need to weld mounts to the XS frame to use the stock SR500 seat mounts... So went back to keeping the hinges and yes its been fidelly and time consuming.

I settled on making hinge adapter extensions. I fabbed up some temp extensions that are bolted in place in the picture. I'll use these templates to make some heaver pieces that will be welded onto the hinges.
KHl7JLI.jpg


I used 8mm RivNuts to mount the new hinge extensions to the seat pan.
Rg8xUn7.jpg


Due to interference, I had to remove the sliding seat stay bracket (drilled out the spot welds ).
 
Last edited:
Taking a break from fabbing the seat hinges and latch (lots of fiddly trial and error - emphasis on error)...

What you are looking at is a petcock with 34mm center-to-center mount screwed into the stock location. I've read that the stock RD400 petcock won't fit as hangs to low and contacts the head bolt. I found a 'shorty' petcock but its too short and contacts the lower tank seam. For test fitting, I've installed it with spacers and now clears the tank seam (2mm) and the acorn nut head (3mm).
How much does the engine move around? Is 3mm enough of a gap?

ztkqAvo.jpg
 
Hey Ron,

A really simple seat mount would be a couple pins and mating sockets to secure the seat in place/prevent movement due to left-right & front-back loads, then Velcro or magnets to hold the seat in place when you are not sitting on it....... just in case a loss of gravity accident occurs.

Hey, here's one even better. Remember those old bikes that had the gas tank secured with a leather belt?

Good looking build. I'd stay with the seat cowl, the RD400/SR500/XS650 look will mess with a lot of old timer brains.
 
I'd be tempted to grind a few mm out of that tank seam and shorten those spacers. I really like that tank. It's my 2nd favorite tank on a XS650 :)
Thanks Jim. I will need to fab a spacer for that petcock. I have a couple of mm between the tank seam and the petcock... those and a mm from the seam will double what I have and get me 6mm total. :)

I was also thinking of changing out the acorn nut to a standard nut. With that petcock in place it blocks the view from the side anyway...

Hey Ron,

A really simple seat mount would be a couple pins and mating sockets to secure the seat in place/prevent movement due to left-right & front-back loads, then Velcro or magnets to hold the seat in place when you are not sitting on it....... just in case a loss of gravity accident occurs.
Hey, here's one even better. Remember those old bikes that had the gas tank secured with a leather belt?
Good looking build. I'd stay with the seat cowl, the RD400/SR500/XS650 look will mess with a lot of old timer brains.
Thanks Sir Ed
Using 'pins' is a good idea... However I've finished the hinges and latch (see the following post).

Yeah, I think it needs a cowl too. I need to source another cowl (that one in the photo is from my SR500 project). Or I'm thinking of making one from aluminum. I've been watching Youtube videos of aluminum brazing... ;)
 
I finished up with the hinges and latch and now the seat functions as Yamaha intended.
I've always liked the hinged seat. You don't need to look around for some place to set it like newer bikes. And I always tripped over it if set on the floor/ground.

Keeping the hinges involved a lot of fabrication and test fitting... so was slow going. It didn't help that I needed to remember that when working on the seat upside-down, moving it right had the opposite effect when right-side up. :doh:

I did not weld the parts in as originally planned because It would not allow adjustment and some of the pieces would make reupholstery very difficult. So everything is bolted/screwed in place.

P0Hwgyr.jpg


Speaking of adjustment, I found that lining up the center of the seat to the center of the tank was important... It just doesn't look right if they don't line up to me. I'm particularly pleased with the configuration of the front hinge. The bolts are welded to the back of the bracket. I set up the nuts so that I could move the seat right or left to make the alignment work. Like aligning a car. :thumbsup:

ba5iLV3.jpg


I still need to locate the rubber seat bumpers and install a cable to keep the seat from flopping when opened.
 
Last edited:
Back
Top