Sounds good. Will be riding home from work around 2pm and and it's been pretty warm here, so I'll give it till tomorrow. ThanksYes... the Yamaha book calls for cold clearances. Actually, they call it "room temperature" checks.
-
Enjoy XS650.com? Consider making a donation to help support the site.
XS650.com receives a small share of sales from some links on this page, but direct donations have a much greater impact on keeping this site going.
You are using an out of date browser. It may not display this or other websites correctly.
You should upgrade or use an alternative browser.
You should upgrade or use an alternative browser.
What have you done to your XS today?
- Thread starter I am Carbon
- Start date
-
- Tags
- maintenance
Re-organized the tool chest though . . . it feels good to have it paired down and neat.
Careful! That's probably how Mailman started out.
I was going to PM the Mailman to ask: On a scale of 1-10 where 1 is the hardness of your old rubber seat base rubbers, what number would you assign to new NOS seat base rubbers 10 being you can really deflect them with your fingernail...Now you know why I didn't PM him...I question if they make a seat of the pants difference in feel but, I do not know.
When I redid my seat I used this for edging on the seat pan.
https://www.amazon.com/gp/product/B07DGBH88M/ref=ppx_yo_dt_b_asin_title_o00_s00?ie=UTF8&psc=1
As far it just keeps the edge of the pan from cutting the cover.
https://www.amazon.com/gp/product/B07DGBH88M/ref=ppx_yo_dt_b_asin_title_o00_s00?ie=UTF8&psc=1
As far it just keeps the edge of the pan from cutting the cover.
I was looking at that stuff last week. Upholsterer when he saw me trying to keep the orig. bead on said he'd just use, build up duct tape on the edge of pan....
>> https://www.walmart.com/search/?page=1&query=ALL+CACA+Edge+trim+U+Shape&sort=price_low
I found this pretty special,lol : https://www.amazon.com/SKWOOSH-Pass...467946030401&ref_=sbx_be_s_sparkle_mcd_asin_1
May just strap that right on the front seat....
>> https://www.walmart.com/search/?page=1&query=ALL+CACA+Edge+trim+U+Shape&sort=price_low
I found this pretty special,lol : https://www.amazon.com/SKWOOSH-Pass...467946030401&ref_=sbx_be_s_sparkle_mcd_asin_1
May just strap that right on the front seat....
buzzword
XS650 Addict
Piston update! Per my earlier post, talked to @hooser via email, who said there's nothing to worry about with the existing valve pockets on his JE 750 kit when using 1mm oversized intake valves. That's a relief! Pun intended.
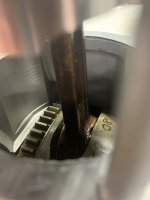
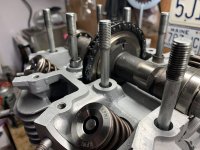
Assembled the bulk of the top end last night, but ran into a couple weird issues. Determined the Cometic 81mm base gasket sits a little proud of the internal case dimensions which interferes with the cylinder sleeves seating fully as it folds inward when the sleeve drops down. See gasket crease in the pic below. Also, I think the hollow dowels are really tight, which I prefer over having it all be really loose! I shaved the base gasket a bit, as seen in the 2nd photo, and then used marking dye to ensure the bottom of the sleeves weren't hitting anywhere inside the case and causing further interference. Definitely don't want any base gasket leaks.


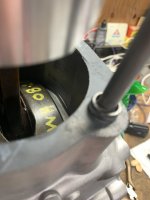
Thankfully the crank is well within spec, so it all went together quite nicely.
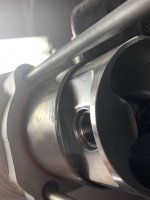
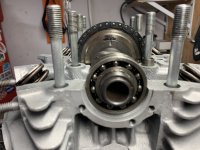
Also got the cam installed, but still need to assemble the rocker cover + put that on so I can torque the whole thing down. Hoping the marks that @hooser made are reliable, but the index notch on the cam + the indent on the opposite side of the gear seem to line up correctly, so fingers crossed I don't have to spend a bunch of time re-indexing the cam gear when I degree it. I don't have a press or access to one currently, and don't really want to buy one!


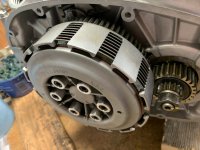
Also installed the 8 plate clutch (courtesy of @gggGary) with 7 new OEM steels and some fancy allen bolt spring keepers. Have I mentioned how much I hate Phillips / JIS screws used in mechanical settings? Yeah. Thank you, Gary, for organizing the clutch upgrade group buy! You're a prince.

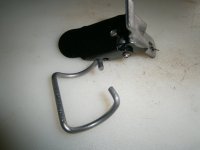
Note the missing kicker assembly Yes, that's on purpose.
Last but not least, check out this super cool one piece clutch rod that @TwoManyXS1Bs made. OoOOoOOoOo!! Shiny!! Thanks again, good sir.

Gotta replace those black allen bolts holding on the starter gear cover with silver at some point. Yuck!
Assembled the bulk of the top end last night, but ran into a couple weird issues. Determined the Cometic 81mm base gasket sits a little proud of the internal case dimensions which interferes with the cylinder sleeves seating fully as it folds inward when the sleeve drops down. See gasket crease in the pic below. Also, I think the hollow dowels are really tight, which I prefer over having it all be really loose! I shaved the base gasket a bit, as seen in the 2nd photo, and then used marking dye to ensure the bottom of the sleeves weren't hitting anywhere inside the case and causing further interference. Definitely don't want any base gasket leaks.
Thankfully the crank is well within spec, so it all went together quite nicely.
Also got the cam installed, but still need to assemble the rocker cover + put that on so I can torque the whole thing down. Hoping the marks that @hooser made are reliable, but the index notch on the cam + the indent on the opposite side of the gear seem to line up correctly, so fingers crossed I don't have to spend a bunch of time re-indexing the cam gear when I degree it. I don't have a press or access to one currently, and don't really want to buy one!
Also installed the 8 plate clutch (courtesy of @gggGary) with 7 new OEM steels and some fancy allen bolt spring keepers. Have I mentioned how much I hate Phillips / JIS screws used in mechanical settings? Yeah. Thank you, Gary, for organizing the clutch upgrade group buy! You're a prince.
Note the missing kicker assembly
Yes, that's on purpose. Last but not least, check out this super cool one piece clutch rod that @TwoManyXS1Bs made. OoOOoOOoOo!! Shiny!! Thanks again, good sir.
Gotta replace those black allen bolts holding on the starter gear cover with silver at some point. Yuck!
Attachments
Decided to just order a new stand. Once the old one is off I can get it repaired at some point and keep it as a backup.
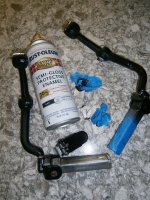
Also went for my first evening ride since getting the bike - man, this light sucks. So I also ordered a new light with the H4 bulb, and also new swing arm bushings, bolt tube, grease seals and grease fittings. Not really sure if I need the seals or the bolt tube, but they recommend it if your old one doesn't fit through the new bronze ones. With my limited time I'd hate to take stuff apart, have it not fit then end up needing to order and wait... Also I was already at the free shipping point, whereas if I ordered later I'd have to pay.
Also went for my first evening ride since getting the bike - man, this light sucks. So I also ordered a new light with the H4 bulb, and also new swing arm bushings, bolt tube, grease seals and grease fittings. Not really sure if I need the seals or the bolt tube, but they recommend it if your old one doesn't fit through the new bronze ones. With my limited time I'd hate to take stuff apart, have it not fit then end up needing to order and wait... Also I was already at the free shipping point, whereas if I ordered later I'd have to pay.
buzzword
XS650 Addict
Wrapped it up tonight. Degreeing cam tomorrow and keeping my fingers crossed the Shell #1 regrind from @hooser is in spec as-is.
Did not torque down the upper oil pipe banjo fittings yet, but did polish + install it loosely just in case the cam is perfect and it doesn’t need to all come apart. Then I’ll torque it! Used some new acorn nuts on the outer 4 studs but may replace the inner ones as well when it comes time to retorque the head after a few miles and heat cycles.


Everything worked according to plan by following the walk-thru and product recommendations in the top end thread @Jim made. You’re a gentleman and a scholar, good Sir! Thanks for all you do to support us dubious ruffians.
Did not torque down the upper oil pipe banjo fittings yet, but did polish + install it loosely just in case the cam is perfect and it doesn’t need to all come apart. Then I’ll torque it! Used some new acorn nuts on the outer 4 studs but may replace the inner ones as well when it comes time to retorque the head after a few miles and heat cycles.
Everything worked according to plan by following the walk-thru and product recommendations in the top end thread @Jim made. You’re a gentleman and a scholar, good Sir! Thanks for all you do to support us dubious ruffians.

Received chain adjusters from Cndn Mike's pictured with factory sample. Really pleased with the quality of the pair, almost look a tiny bit more substantial.
Time to get the wheel back on the '76.
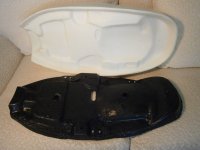
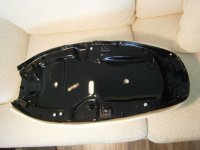
Paint drying...got my $ worth out of the semi-gloss on foot rests and seat catch. Look what came in the mail and it fits and feels good. Delivered was less than the shipping cost of the one I tried to get in the U.K.
Attachments

Trying Out Painted Fender on '76
Enthused about new rubber and newly sprayed fender, I got busy and put em together.

Tomorrow I will undo it and install the rotor which I forgot about. Must be the heat.
Can you post a link where you got the seat foam?Paint drying...got my $ worth out of the semi-gloss on foot rests and seat catch. Look what came in the mail and it fits and feels good. Delivered was less than the shipping cost of the one I tried to get in the U.K.
Can you post a link where you got the seat foam?
Came across it by accident. Was about out the door to bring the seat parts to Upholsterer.: https://www.ebay.com/itm/YAMAHA-XS1-XS2-TX650-SEAT-PAN-COVER-FOAM-LIKE-NOS-FOR-USE-WITH-366-24730-01-00-/254676828517
I will say after looking closely at fit and pushing the foam down with my hands into the pan....all the molded indents work well, no mods needed. If the battery top indent were too small, one could always trim that up. Off to the dollar store where I saw some packs of laundry like spring clips....
$87. It caught my eye, USofA.
Last edited:
Rode in the pissing rain to my local blacksmith and got the kicker bent to clear the brake pedal

Want to check seeing as I'm new to the forum and don't know the ropes here yet - there isn't a thread for stupid questions that don't really deserve their own posts. Is it cool if I ask that stuff in here?
Example - my new master cylinder and stainless brake lines came in, I assumed it would all come with crush washers (don't know why I thought that, but oh well), but only the m/c did. I don't have a way to measure accurately and am not seeing the specs - is it 10mm washers I need for the brake lines? I saw somebody claiming that it's dangerous to use aluminum crush washers but don't understand why that would be... is that true and I need copper or does it not matter? Going to be calling around to see what I can find in town.
Example - my new master cylinder and stainless brake lines came in, I assumed it would all come with crush washers (don't know why I thought that, but oh well), but only the m/c did. I don't have a way to measure accurately and am not seeing the specs - is it 10mm washers I need for the brake lines? I saw somebody claiming that it's dangerous to use aluminum crush washers but don't understand why that would be... is that true and I need copper or does it not matter? Going to be calling around to see what I can find in town.
Do you have the old copper washers? You can anneal them. Heat them to red hot and quench in water. I'm not even really sure you have to quench. I have conflicting info on that. Go with quench. I string them on a piece of stainless wire and heat with a propane torch or you can use the burner on the gas stove in your kitchen.Want to check seeing as I'm new to the forum and don't know the ropes here yet - there isn't a thread for stupid questions that don't really deserve their own posts. Is it cool if I ask that stuff in here?
Example - my new master cylinder and stainless brake lines came in, I assumed it would all come with crush washers (don't know why I thought that, but oh well), but only the m/c did. I don't have a way to measure accurately and am not seeing the specs - is it 10mm washers I need for the brake lines? I saw somebody claiming that it's dangerous to use aluminum crush washers but don't understand why that would be... is that true and I need copper or does it not matter? Going to be calling around to see what I can find in town.
From what I've read, both methods will anneal. Quenching just makes it a bit more softer/annealed.Heat them to red hot and quench in water. I'm not even really sure you have to quench. I have conflicting info on that.
From what I've read, both methods will anneal. Quenching just makes it a bit more softer/annealed.
Hi Jim,
carbon steel is hardened by heating to "the color of the rising sun" and then quenching it.
Carbon steel is annealed by the same heating and then letting it air cool.
Low carbon steel and non-ferrous metals are annealed by heating and air cooling.
Quenching instead of air cooling stops impatient folks getting their fingers burned.
Note that some aluminum alloys re-harden over time after being annealed.
(Remember the stores guys keeping the rivets in the fridge on weekends?)
Yabut! What about copper, Fred? We ain't usin' carbon steel washers on brake lines. I used to teach this stuff in A&P school and I swear I don't remember any of it. Fred, you must of done a lot of it over the years.
Similar threads
- Replies
- 32
- Views
- 1K