-
Enjoy XS650.com? Consider making a donation to help support the site.
XS650.com receives a small share of sales from some links on this page, but direct donations have a much greater impact on keeping this site going.
You are using an out of date browser. It may not display this or other websites correctly.
You should upgrade or use an alternative browser.
You should upgrade or use an alternative browser.
What have you done to your XS today?
- Thread starter I am Carbon
- Start date
-
- Tags
- maintenance
I did one four years ago. Did not try to start it until this fall and it worked! Have been referring to your and Jim's threads and others about the work to be done.
Pulled the front forks off of the TX650A tonight, having pulled the wheel off yesterday. Yesterday revealed not enough grease in the speedo drive, amd there were some metal shavings in the drive. Might explain the speedo needle bouncing a bit despite the new cable? Will be flushing and lubricating that one.
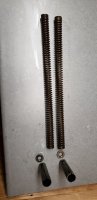
I've never taken motorbike forks apart before so have been reading a lot on the forum. I plan to install the progressive springs (from xs650direct) without the original spacers as they will be approximately 14 mm longer than the saggy clunky squeaky original setup.
I've never taken motorbike forks apart before so have been reading a lot on the forum. I plan to install the progressive springs (from xs650direct) without the original spacers as they will be approximately 14 mm longer than the saggy clunky squeaky original setup.
Attachments
Yesterday revealed not enough grease in the speedo drive, amd there were some metal shavings in the drive. Might explain the speedo needle bouncing a bit despite the new cable? Will be flushing and lubricating that one.
When I had mine off, the grease was dry and caked in there, I broke it down and cleaned it with kerosene, then fresh grease.
Your Speedo cable will likely need to be cleaned and lubed too, I pulled the cable out of the sheath and cleaned it up, lubed it with motor oil. You can hang the cable and rig up a funnel on top to drip lube the cable also.
So happy to be part of this forum. ") Thanks Mailman !
Thanks Mailman !
Thanks Mailman !Sporty pipes installed, along with Maxim 1100 slotted rotors.

wildboar58
XS650 Enthusiast
Decided to play with the advance/retard today on my Boyer Bransden ignition. Concluded the bike ran smoothest and with best acceleration when full advance matched the full timing advance line at 3000 - 4000rpm. Then accidentally burnt my arm on the exhaust pipe - I wish someone had told me they get hot!
But just remember, in those days I may have been using fresh or older petrol. Eventually I settled on slight retard for a smoother ride. Higher Octane ran nicely with full advance but the lower octane regular was more universally available for me. So set your advance to match your fuel supply.
Regular and Higher Octane both result in exhausts getting hot enough to burn.
Regular and Higher Octane both result in exhausts getting hot enough to burn.
scrapmetal
XS650 Addict
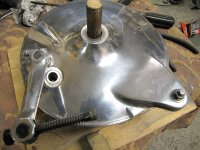
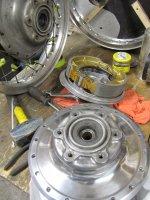
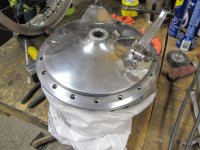
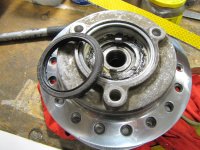
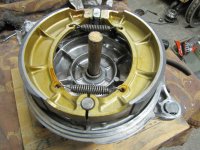
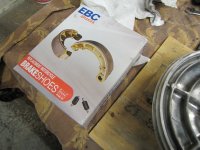
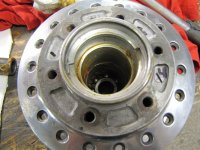
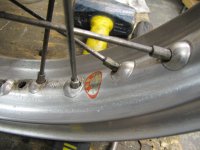
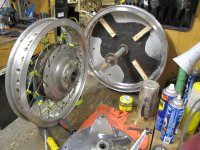
I started preparing my 3 sets of original Yamaha TX750 wheels, I ordered new spokes, new brake pads, new wheel bearings and seals, I have already received some parts, the others should arrive here the next few days and weeks.
It was not easy to get the spokes for the rear wheels, they are specially made to order, years ago I bought a set front spokes on eBay, the front spokes are identical to the TX650 wheels and easier to find, but the whole thing is of course not cheap,
when all this is done I will finally have a nice set of wheels for my XS1 project, another set for my future TX750 and one set I will offer for sale at some point,
All of this will keep me busy for the next few weeks, that means I'm prepared for the next Covid lockdown, the coming snowstorms with long winter evenings and Santa won't find me easy in the workshop either, luckily
Attachments
-
 spoekes front.JPG148.2 KB · Views: 116
 -
 rear brake plate.JPG188.8 KB · Views: 117
 -
 wheels.JPG204.8 KB · Views: 120
 -
 hub rear.JPG208 KB · Views: 125
 -
 hub front.JPG201.2 KB · Views: 118
 -
 brake pads.JPG220.1 KB · Views: 117
 -
 brake pads 1.JPG175.1 KB · Views: 115
 -
 bearing 2.JPG177.3 KB · Views: 111
 -
 IMG_9967.JPG145.1 KB · Views: 113
 -
 IMG_9971.JPG217.1 KB · Views: 115
Polished the bodywork on all the XS650's this afternoon,
then did a coolant flush-replace-burping to the FJR1300.
It's quite a labor intensive procedure; whew !

Merry Christmas from Dude's Garage !!

then did a coolant flush-replace-burping to the FJR1300.
It's quite a labor intensive procedure; whew !
Merry Christmas from Dude's Garage !!
I started preparing my 3 sets of original Yamaha TX750 wheels, I ordered new spokes, new brake pads, new wheel bearings and seals, I have already received some parts, the others should arrive here the next few days and weeks.
It was not easy to get the spokes for the rear wheels, they are specially made to order, years ago I bought a set front spokes on eBay, the front spokes are identical to the TX650 wheels and easier to find, but the whole thing is of course not cheap,
when all this is done I will finally have a nice set of wheels for my XS1 project, another set for my future TX750 and one set I will offer for sale at some point,
All of this will keep me busy for the next few weeks, that means I'm prepared for the next Covid lockdown, the coming snowstorms with long winter evenings and Santa won't find me easy in the workshop either, luckily
Youll have to change your name to The Wheel Man!
Polished the bodywork on all the XS650's this afternoon,
then did a coolant flush-replace-burping to the FJR1300.
It's quite a labor intensive procedure; whew !
View attachment 180506
Merry Christmas from Dude's Garage !!
View attachment 180507
That’s my kind of wonderland!


Ain't Pretty, Only Looks That Way

Soda Blasting Fuzz Throughout
This motor came with a project I rescued a few years ago and I thought it was about the best part of the deal as the bottom end had been gone through by the PO and seals replaced etc. etc.
It was all gritty from being po being careless about his soda blasting overspray - I checked - the residue dissolves in water, so I decided to open up the bottom filter plate.
Wow, the guy used a grey colored sealant on both !! sides of the green gasket and it took the second biggest persuader to get the plate off.
So on to the right side cover - looks like the same seal 'em up job.
That's my task for tomorrow. May start with the electric heat gun, skip the preliminaries.
Lessseee. Great looking morning so I got my riding togs on off I went. Ended up being 84 miles. Got cold and windy though. Weather guessers said it was to be "breezy".
>> Oh, it looks nice LV...seems only summer yesterday.View attachment 179241
Rode Today!
Almost 20 C in the third week of November, I could not call myself an enthusiast if I had not gone out for a putt-putt.
Only 29 k today, but each heat cycle it seems to go better.
Well, finally got 100% of the painting done on the bike now....just have to get the red n white bits now and finish the bike.
>> https://www.facebook.com/MoeColors/...2207520000../3482152481881834/?type=3&theater
>> https://www.facebook.com/MoeColors/...2207520000../3482152481881834/?type=3&theater
Well, finally got 100% of the painting done on the bike now....just have to get the red n white bits now and finish the bike.
>> https://www.facebook.com/MoeColors/...2207520000../3482152481881834/?type=3&theater
Hoo Boy! That came out nice!

Chrome Cover With Sealant

Not As Bad As It Coulda Been
Well I gotta give credit to the PO that despite putting sealant on both sides of the gasket, he did not use a machete to apply it, so there was hardly any squeeze out. I just had to slide (tap/hammer) a real thin putty knife all around and the cover came off in about 10 minutes.
I was glad I opened it as the clutch pressure plate had to be properly indexed. Springs look new and blue. Pretty sure it was easier to dismantle it and clean it up on the bench rather than in frame.
Found an old tin of paint remover which was quite effective in cleaning the surfaces. Tomorrow I'll see if I can get the locating collars out and dress the cover on a sheet of glass.
I have a "Mikes" 750 kit on the shelf which I will install. It's an 83 motor going into a 78 Special frame. PO had taken a lot of care dismantling and cleaning a set of BS34's, even separating the bits into left and right bags so that will be what I use.
Bike will be stock with a factory paint 83 tank and black side covers.

Big Job For Another Day
Got the gasket surfaces all cleaned, this machine screw can wait if and until I need to fix the starter spring. (Once the clutch pack is off there will be room for vice grips or dremel.)
Tomorrow's goal is to gather all the stuff together that I need to refresh the top end.
Scraping the gasket from the case cover would be a pita but I’d rather do that one vs the sump filter plate. The po of my bike put sealant on both sides of the gasket and when I removed it there was half of the gasket left on the crankcase and the other half on the plate. That was a major pita to clean up the gasket underneath, even with the bike on the lift.View attachment 180776
Chrome Cover With Sealant
View attachment 180778
Not As Bad As It Coulda Been
Well I gotta give credit to the PO that despite putting sealant on both sides of the gasket, he did not use a machete to apply it, so there was hardly any squeeze out. I just had to slide (tap/hammer) a real thin putty knife all around and the cover came off in about 10 minutes.
I was glad I opened it as the clutch pressure plate had to be properly indexed. Springs look new and blue. Pretty sure it was easier to dismantle it and clean it up on the bench rather than in frame.
Found an old tin of paint remover which was quite effective in cleaning the surfaces. Tomorrow I'll see if I can get the locating collars out and dress the cover on a sheet of glass.
I have a "Mikes" 750 kit on the shelf which I will install. It's an 83 motor going into a 78 Special frame. PO had taken a lot of care dismantling and cleaning a set of BS34's, even separating the bits into left and right bags so that will be what I use.
Bike will be stock with a factory paint 83 tank and black side covers.
Got the sump plate cleaned off yesterday. Not too bad with the motor on the bench.
Similar threads
- Replies
- 32
- Views
- 1K