79 Special II RestoCustom "Doomy"

20210127_211316.jpg

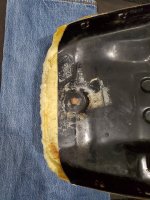
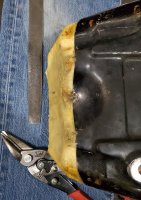
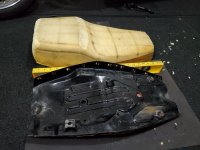
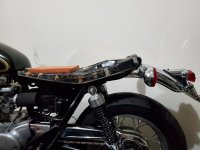
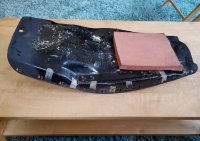
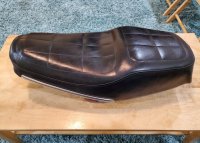
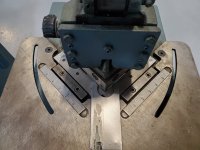
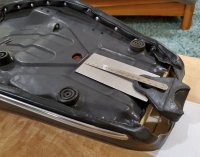
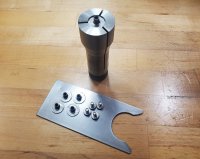
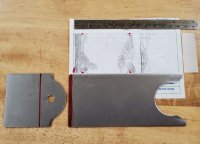
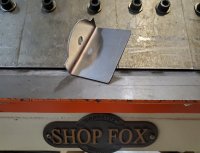
Cutting the seat pan down on both ends. Why not, the mounts have to be custom fab anyway. So the Special seat is taking shape shorter and sportier. Tin snips are a little awkward to cut straight lines with.
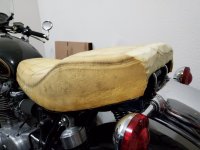
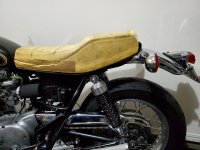
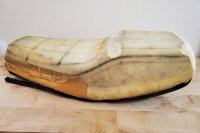
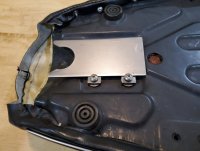
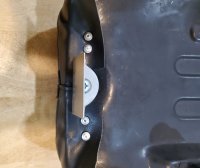
Trimming the foam with window razor blades to be more rounded on the back, more square front. Less swoopy. Being cautious trimming, I'm not yet happy with the overall length. Seems another bite off the rear will help.
Still, high hopes :thumbsup: and finding garage time this weekend.
-R
20210127_210208.jpg
 

Attachments

  • 20210127_210236.jpg
    20210127_210236.jpg
    144.2 KB · Views: 155
  • 20210127_193626.jpg
    20210127_193626.jpg
    330.1 KB · Views: 146
  • 20210127_211442.jpg
    20210127_211442.jpg
    276.9 KB · Views: 151
20210128_213908.jpg

Now, the seat pan is trimmed down to 23.25"
Seat pan shaping and Foam shaping is getting closer to the rounder rear corners shape I'm goin for.
Back seat edge is just in front of the rear frame loop now, little more shaping tomorrow.
:cool:
 

Attachments

  • 20210128_223055.jpg
    20210128_223055.jpg
    196.8 KB · Views: 153
  • 20210128_213750.jpg
    20210128_213750.jpg
    205 KB · Views: 151
  • 20210128_205244.jpg
    20210128_205244.jpg
    175.2 KB · Views: 154
Last edited:
20210129_200620.jpg

Seat Pan is Shaped/done.
Seat foam is shaped, refit into the loose seat cover now.
The Cover Front and Rear ends will be cut tight and riveted. To get the extra length in the cover tight fit cut down to the shortened pan shape.
Also trying to figure out to add a single rear seat latch between the two fender loops. In the high cut rear seat pan.
20210129_124250.jpg

:cool:
 

Attachments

  • 20210129_200723.jpg
    20210129_200723.jpg
    193.8 KB · Views: 166
  • 20210129_200701.jpg
    20210129_200701.jpg
    123.1 KB · Views: 161
  • 20210129_200600.jpg
    20210129_200600.jpg
    218.2 KB · Views: 164
Last edited:
View attachment 183781
Seat Pan is Shaped/done.
Seat foam is shaped, refit into the loose seat cover now.
The Cover Front and Rear ends will be cut tight and riveted. To get the extra length in the cover tight fit cut down to the shortened pan shape.
Also trying to figure out to add a single rear seat latch between the two fender loops. In the high cut rear seat pan.
View attachment 183785
:cool:

Did you add that red foam square, or was that already there?
 
Turns out "Special" seats have that red square of higher density foam right there under your butt.. I did actually add a 1/4" layer on that red square to aid in the "leveling" of the seat shape slightly. In these two pics it more clearly shows how most of the shortening to the seat pan was actually cut from the front, more than the rear. Folding and riveted those ends will turn out fine.
I was able to shorten this way as the original frame hinges are smoothed off anyway.
20210130_075437.jpg

20210130_075404.jpg
 
Turns out "Special" seats have that red square of higher density foam right there under your butt.. I did actually add a 1/4" layer on that red square to aid in the "leveling" of the seat shape slightly. In these two pics it more clearly shows how most of the shortening to the seat pan was actually cut from the front, more than the rear. Folding and riveted those ends will turn out fine.
I was able to shorten this way as the original frame hinges are smoothed off anyway.
View attachment 183801
View attachment 183802

Hi Machine,
l've had good results re-shaping foam seat bases using a sanding disk on an angle-grinder.
WARNING!
Mask up!. Breathing in foam dust is like inhaling razorblades.
 
Been one step at a time accurately shaping these sturdy steel seat brackets.
20210211_213428.jpg

The Front is a straight push forward on under the tank. This fitment check is a Go so, ready to drill.
The Rear will be a push down between the fender mount loops. after drilling to be bent 90°, catching the frame loop.
20210211_200321.jpg

20210211_213304.jpg

Have the hardware sorted even :) but, my 2nd old drill has totally died lol..
Snowed in, as everywhere will be shut tomorrow morning and more.
Yes, this shortened shaped seat is really going so much better than the previous custom seat'attempts. Currently-
There will be just a bit more rear bracket shaping and bending next week :(
20210211_213333.jpg

Snowed in too? TV says, yes you are too :laugh:
 

Attachments

  • 20210208_105217.jpg
    20210208_105217.jpg
    145.8 KB · Views: 158
  • 20210208_130919.jpg
    20210208_130919.jpg
    203.4 KB · Views: 149
  • 20210211_213204.jpg
    20210211_213204.jpg
    155.9 KB · Views: 147
wondering how you were making all those nice clean cuts, now I see you’ve been borrowing your employers equipment
20210212_094511.jpg

Oh yes! , fringe benefit of the trade.
Company Computers?, Not ! must never log in to internet sites because of Lots of Cyber crime attempts regularly. Very high tech companies are under Cyber attack ! :cussing:

Made these front mount spacers too..
Drill needed ! Layout work utilizing grid paper and scales to rough out the shapes so far. Then polish em into spec. Of course "spec" being well within the .004" tolerance.. very critical
:whistle:
20210212_100427.jpg


Well, off to the Tax Pro Preparer in a local snow storm now.. what could go wrong?
:laughing:
 
Last edited:
Feb 16th.. :cautious: ongoing seat project
20210216_212133.jpg

Oh my gosh, I see daylight at the end of this now. So many trips back and forth to the shop, home, hardware store, strip bar, shop. If I coulda just taken my motorcycle to work and left it there, this would be so much faster. I'll post pics again to show how these custom pieces are working out after more measuring and length changes. That rear stay is bent right in a sweet spot now tightly in front of the loop go be used (shorter yet) as a rear stay.
That front was shortened by about .25" and is being fastened with "weld nuts" from inside the seat pan out on top of the steel braces. I found them at the hardware store of course. They were just a tad long so I had to shave about .030" off in a lathe with a custom fit bored collet.
Starting to rivet the seat cover fr & rr ends on for good now slowly as I do not want to do this again! Just a note- Anybody who shaves the stock tabs off of a frame should be required to finish through with the job! This seat has been the hardest part of the whole XS project
:)
 

Attachments

  • 20210213_105500.jpg
    20210213_105500.jpg
    186.8 KB · Views: 153
  • 20210215_131140.jpg
    20210215_131140.jpg
    218.7 KB · Views: 151
  • 20210215_131121.jpg
    20210215_131121.jpg
    170 KB · Views: 148
  • 20210215_204438.jpg
    20210215_204438.jpg
    143.4 KB · Views: 151
  • 20210216_210031.jpg
    20210216_210031.jpg
    136.7 KB · Views: 147
  • 20210215_204408.jpg
    20210215_204408.jpg
    150.8 KB · Views: 145
  • 20210216_210303.jpg
    20210216_210303.jpg
    168.4 KB · Views: 151
  • 20210216_210249.jpg
    20210216_210249.jpg
    200.8 KB · Views: 149
  • 20210216_210216.jpg
    20210216_210216.jpg
    128.2 KB · Views: 153
  • 20210216_210149.jpg
    20210216_210149.jpg
    164.5 KB · Views: 140
Last edited:
Oh I didn’t know you were fixing that bike up to sell. Well it was a well sorted bike for a lucky new owner! :thumbsup:
 
Hello - I am the new & lucky owner of Doomey, who I call Honey:heart: and I just wanted to chime in here as I finally was able to read through ALL the posts on this excellent build. I've put about 300 miles on her so far and it has been an absolute joy to ride. I think maybe the vacuum hoses got plugged or something because I'm having to keep it on prime all the time but besides that it is totally perfect and awesome and I love it. I will probably switch to a tracker bar because I'm kinda of a geezer and after about 20 miles my hands are numb and my back hurts. LOL. Besides that I probably will not be making any other changes. Thanks again Randy you knocked this out of the park!:hump:

Marty Krogh - Portland, OR
:bike:
839F1254-8974-4478-93D7-1BE3F74FCA61.jpeg

(Also still learning to navigate this site)
 
Welcome to the group! Good bike you picked up there.

As to the vacuum petcocks, I suppose it's possible for them to be plugged, but what's more common is the seals give out and you have constant fuel getting into the carbs...so usually we hear about leaking petcocks vs. no fuel coming out from vacuum actuated petcocks. I could be that the tank isn't full enough for the main fuel circuit to work?

But even more likely would be a common mod people do to the vacuum petcocks. Since there's no "off" on these and because the vacuum actuators tend to leak...it's possible to change up the internals of the petcocks so prime is "On" and run is "Off"...I can't recall the details of the procedure off hand...but that would be my first guess. If that's the case, I would leave it as is. Way better than leaking petcocks.
 
Back
Top