I was just thinking about which way to hold it, it's been a long time since I used oneAnd don't forget to twist it counterclockwise to "load it up against the ramp." If it's not, all your energy from the hammer will be wasted taking up all the internal slack, with nothing left to actually loosen the screw.
-
Enjoy XS650.com? Consider making a donation to help support the site.
XS650.com receives a small share of sales from some links on this page, but direct donations have a much greater impact on keeping this site going.
You are using an out of date browser. It may not display this or other websites correctly.
You should upgrade or use an alternative browser.
You should upgrade or use an alternative browser.
Mikey's new to him 1980 650
- Thread starter Mikey
- Start date
I use the Impacta by giving it up to ten sharp short taps while keeping a turning tension on it. It's always worked.The Impacta really doesn't seem to be moving the screws at all
Another day with the 80
Decided that I didn't need to check the rotor for now but did pull the brushes and they look fine lots of life left in em
decided to buy some more Metal Rescue solution so now there's 3 gals in the tank so it gets the tunnel well covered while it soaks
I've got the tank from the 73 waiting for a soak so I guess money well spent
And Jesus H what was I thinking
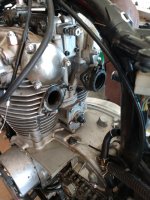
I said I'd never pull the heart out of a living ( running ) motorcycle but it's done
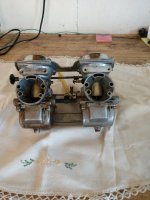
Tomorrow it's open carb surgery
And the owner of the 73 gave me a whole pack of gaskets (enough for an engine rebuild?)
I would think that the gaskets in that pack (for the carb boot to engine) should work?
Yesterday I couldn't spell mechanic and now today I are one (NOT)
Thanks to you all I am moving foreword !!
Damn friends are back again, ones even from Jim's neck of the woods Olathe KS I guess it's Beer 30 once again
Oh yeah and check out that doily I'm using for a bench cover now that's class
Decided that I didn't need to check the rotor for now but did pull the brushes and they look fine lots of life left in em
decided to buy some more Metal Rescue solution so now there's 3 gals in the tank so it gets the tunnel well covered while it soaks
I've got the tank from the 73 waiting for a soak so I guess money well spent
And Jesus H what was I thinking
I said I'd never pull the heart out of a living ( running ) motorcycle
but it's doneTomorrow it's open carb surgery
And the owner of the 73 gave me a whole pack of gaskets (enough for an engine rebuild?)
I would think that the gaskets in that pack (for the carb boot to engine) should work?
Yesterday I couldn't spell mechanic and now today I are one (NOT)
Thanks to you all I am moving foreword !!
Damn friends are back again, ones even from Jim's neck of the woods Olathe KS I guess it's Beer 30 once again
Oh yeah and check out that doily I'm using for a bench cover now that's class
Attachments
Last edited:
Notice how thick those intake manifold gaskets are. I like to use replacements that are thick like that as well. If the gasket set you have is an Athena then the manifold gaskets it comes with are the thick ones. Don't use any sealer on the engine side (like you have now), that only creates a major cleaning hassle down the road. I do apply a small bead of sealer on the manifold side though. This makes the gasket stick to the manifold and come off with it any time you remove it. It's not so much for sealing but rather to facilitate this.
I use high vacuum grease on both sides or the intake gasket. Does it's job sealing and doesn't stick to either side. Plus the gasket is reusable.
Never a problem cleaning the surfaces when reusing. LOL.
Never a problem cleaning the surfaces when reusing. LOL.
what was I thinking
I said I'd never pull the heart out of a living ( running ) motorcycle
Tomorrow it's open carb surgery
That’s how it always begins Mike…….today the carbs, six months from now the motor will be sitting on top of that doily!

At first I thought High vacuum grease never heard of itI use high vacuum grease on both sides or the intake gasket. Does it's job sealing and doesn't stick to either side. Plus the gasket is reusable.
Never a problem cleaning the surfaces when reusing. LOL.
If the LOL wasn't at the tail end of the post I would be searching to find the stuff
Good one
")
I quit at the carbsThat’s how it always begins Mike…….today the carbs, six months from now the motor will be sitting on top of that doily!
Ok now I'm just a parts replacer here would I use like a hylomer blue sealant ( On the manifold side ) let it set up and then put oil on the engine side to keep from sticking to the engine sideNotice how thick those intake manifold gaskets are. I like to use replacements that are thick like that as well. If the gasket set you have is an Athena then the manifold gaskets it comes with are the thick ones. Don't use any sealer on the engine side (like you have now), that only creates a major cleaning hassle down the road. I do apply a small bead of sealer on the manifold side though. This makes the gasket stick to the manifold and come off with it any time you remove it. It's not so much for sealing but rather to facilitate this.
No it's real.At first I thought High vacuum grease never heard of it
If the LOL wasn't at the tail end of the post I would be searching to find the stuff
Good one
Well you weren't just pulling the goof on me LOLNo it's real.View attachment 198395
The thing about these thick manifold gaskets is they will compress big time after initial install allowing the mounting bolts to become quite loose. So, if you have the time, install them, let them sit over night, then torque them again. You must do this before the carbs are in because they block access to the inner manifold bolts.
Yes, sealer on the manifold side of the gasket and oil, grease, or anti-seize on the engine side. I would put the sealer on and mount the manifolds over night to spread it and let it set up. I would leave the engine side dry for this. Then, remove the manifolds, apply whatever you're going to use on the engine side, and re-mount. As I mentioned, I don't totally coat or cover the manifold side of the gasket with sealer, just use a small, continuous bead around it. I'm doing this to glue the gasket to the manifold, not seal it. It seals fine on it's own.
Thanks for the advice !!Yes, sealer on the manifold side of the gasket and oil, grease, or anti-seize on the engine side. I would put the sealer on and mount the manifolds over night to spread it and let it set up. I would leave the engine side dry for this. Then, remove the manifolds, apply whatever you're going to use on the engine side, and re-mount. As I mentioned, I don't totally coat or cover the manifold side of the gasket with sealer, just use a small, continuous bead around it. I'm doing this to glue the gasket to the manifold, not seal it. It seals fine on it's own.
I had to take the left manifold off to get the carbs out easier but I'm putting new gaskets on both sides as long as I'm this far into it (be dumb not to)The thing about these thick manifold gaskets is they will compress big time after initial install allowing the mounting bolts to become quite loose. So, if you have the time, install them, let them sit over night, then torque them again. You must do this before the carbs are in because they block access to the inner manifold bolts.
That's how I usually do it too. Seems to go easiest that way..I had to take the left manifold off to get the carbs out easier
You can get the carbs in and out with the manifolds in place but it's one of the 650's "Rubic cubes", lol. You have to leave the top butterfly shaped bracket off the carb set and remove the acorn cover nut on the cam chain adjuster.
Last edited:
Ok here we go I found this 2L ultrasonic cleaner machine
On other previous post folks were using a Simple Green solution but scanning through the internet I saw where there was a Simple Green D which is supposed to be aluminum safe ?
Any way what ration of Simple Green to water should I be mixing up
Another video someone was using mineral spirits as a solution
And another was using gas in a plastic peanut butter jar which he just let it float in the cleaner machine
(I'm not sure I want to use gas because as it's shaking up in the machine the gas is going to turn to vapor and want to pop the top off the container)
I guess if I want those carbs clean ultrasonic is the way to go
https://www.walmart.com/ip/Ultrason...VH3xvBB3syQGdEAQYBSABEgJnOPD_BwE&gclsrc=aw.ds
Maybe get the 3L size instead
Ok here we go I found this 2L ultrasonic cleaner machine
On other previous post folks were using a Simple Green solution but scanning through the internet I saw where there was a Simple Green D which is supposed to be aluminum safe ?
Any way what ration of Simple Green to water should I be mixing up
Another video someone was using mineral spirits as a solution
And another was using gas in a plastic peanut butter jar which he just let it float in the cleaner machine
(I'm not sure I want to use gas because as it's shaking up in the machine the gas is going to turn to vapor and want to pop the top off the container)
I guess if I want those carbs clean ultrasonic is the way to go
https://www.walmart.com/ip/Ultrason...VH3xvBB3syQGdEAQYBSABEgJnOPD_BwE&gclsrc=aw.ds
Maybe get the 3L size instead
I found this stuff at Tractor Supply. It did a good job on my carburetors in the ultrasonic cleaner.
Hey Mikey! That looks like a nice ultrasonic cleaner. Reading the dimensions of the basket, it might be a tad on the small side. I’m running a crappy plastic housing Harbor Freight cleaner that is barely big enough for carburetors, sometimes I have to clean things one side at a time and then rotate the piece to get the other side. I use a solution of anywhere from 25% Simple Green 75% water, up to 50-50 ratio if I’ve got some really grungy stuff. I found the cheapest place to buy it was Walmart in 1 gallon jugs. Here’s a couple of write ups I did,
This one is just cleaning leaving the natural appearance,
http://www.xs650.com/threads/mailmans-77d-getting-a-makeover.54710/page-7#post-596046
And this one shows what they can look like if you’re a shine junky like me.
http://www.xs650.com/threads/mailman’s-xs2-a-full-on-restoration.51520/page-17#post-545051
Similar threads
- Replies
- 34
- Views
- 832