Setting Points, Advance unit and timing questions.

davetherave

XS650 Addict
Messages
104
Reaction score
1
Points
16
Location
Skelmersdale, England.
Hi,
I wonder could someone help me out with a few points/timing questions?

I have been trying to set up my timing but am not quite sure about the advance mechanism.
When the engine is not running, the advance unit weights are "in", does this mean the timing is retarded at low RPM and advanced with faster RPM?

If so how does this affect setting timing?
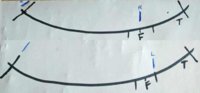
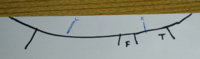
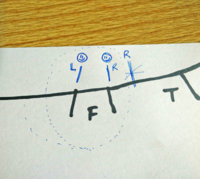
The manual says the points should begin to open when the time mark is between the F marks. I have tried setting by eye and that wont work, I also tried using a meter across the points but that buzzes even when they are open ?? :banghead:

I will be getting hold of a timing light tomorrow but cant seem to find any info regarding the Advance unit, rpm and timing mark positions .I am not quite sure what I should be looking for.

I am guessing for each cylinder at low rpm the the timing mark should be somewhere close to the rightmost F Mark and expect it to move left towards the other F mark as the increasing rpm throws the ATU weights out and the timing advances ?? is this right?

It doesn't help I have no rev counter on my bike so I can only set at idle (as long as it don't stall) and then rev it to look for a change.

And advice greatly appreciated.
Cheers.
 
#1- hello, and yes.
#2- correct
#3- if you notice that the points plat is actually 2 halves, the bottom half is the #1 cylinder(left) and the upper, #2 cylinder(right) I cant help you much more than that. I got frustrated with the very same, threw on a basic pamco and started rite up.
#4-any timing light will work. the one I have is from the 70's. just make sure its 12volts, you don't need the ones with all the fancy digital stuff.
just look behind the low plate on the left that says Yamaha on it, it should fire between the 2 marks on either side of the lFl, and when you rev the throttle, since you don't have a tach, just make it loud, you will see the timing mark go towards the mark that is to the left of the lFl mark. that is full advance. anywhere past that, and your points plate needs to be turned to retard your timing.
#5-yes
#6- get a temporary tach for tuning. On my 80 chopper I just have a speedo, and when I tune it, I just put the tach back on, and zip tie it to the down tubes.
#7-your welcome.
 
So I got hold of a timing light  . There seems to be a big difference between cylinders! Rotating the backplate fully anticlockwise will put the mark with the F marks at idle for the right cylinder, but when I adjust the bottom plate fully the timing seems way advanced at idle and disappears completely of the scale when i rev it up? So far the best i can get to share the difference is as shown in the pic but the right side is firing very close to TDC.. any thoughts/ideas ??

points gap on right side was too small. reset gap and re-timed right then left,
Gott a much better result. pic2. On the limits of the f mark now. Seems to start and run better now. Is this acceptable?
 

Attachments

  • timing.jpg
    timing.jpg
    29.1 KB · Views: 346
  • t2.jpg
    t2.jpg
    116.6 KB · Views: 340
Last edited:
This is what makes setting this dual points system so difficult. Besides timing both cylinders individually, you have to try and match them to each other. That includes matching the points gaps as well. The way you have it now wouldn't be acceptable to me. The left cylinder will most likely be over-advanced at full advance. It'll run that way if you don't mind putting a hole in that piston. Here's some info on doing the points and timing adjustment. If you understand what happens when you adjust this or that, and how the adjustments relate to one another, it can simplify the process .....

http://xs650temp.proboards.com/thread/7984
 
This is your full advance mark. With the engine revved to 3K or so, you don't want the rotor mark to go past it .....

ZazdLwN.jpg


Slightly before the mark as shown is acceptable and I actually prefer it that way.
 
Last edited:
Thanks for the info 5Twins,
nice to see a clear pic of what it supposed to look like, mine is a bit mashed.
Points seem tricky to set. every time it tighten the screw the gap changes. :banghead:
I will have another go at it.
Kind regards,
Dave.
 

Attachments

  • IMG_20150429_140620-2.jpg
    IMG_20150429_140620-2.jpg
    156.5 KB · Views: 360
That's why many of us switch to the Pamco, lol. Points can and do work, but this initial dialing in can be difficult. Once timed, gapped, and matched, future maintenance is simplified. The whole set-up usually wears together so re-timing just requires a slight turn of the main backing plate in most cases. If the points gaps have worn smaller, re-gapping is sometimes enough to pull the timing back in spec.

I still run the factory single points set-up on my old BMWs and it is a wonderful system. Yamaha's dual point set-up is a nightmare by comparison.

If you're determined to keep the points, I recommend getting a dwell meter for use in setting the points gaps. It's the most accurate way and the ONLY way to accurately gap used points.
 
I think I will be getting the pamco in the future. Bike budget running low :( Points will have to do for now!
I see Pamco have a new version with E-advance box, do you have any experience of this, is it worth getting over the original?
Dave.
 
Yes, there is an E-advance available now. Mine is an old version without it. If I were getting a new one, I would get the E-advance.
 
I have run both versions of the Pamco on my 75. Switching from points to the basic gives you a certain degree of improvement, lets say 100 %, adding the E-advancer would bring this up to around 115% or a bit more. The mechanical advance has some play in it. It has to have some. This lets the timing flutter a bit. The E-advancer being solid state, no moving parts, no need for the play. This makes the bike run better. as in stronger and smoother.
If you are on a budget you can get the basic and add the E-advancer at a later date.
Leo
 
So here is were i'm up to today. Starting to go a bit crazy!
Don't really want to adjust the gaps again, both seem good at about 0.014
Timing on the Right side is bang on the F but a little too advanced at higher revs.
Left side is just on right F marker & advances to limit.
Bottom points plate is fully clockwise so can't advance left side any more.
So... question is:
a) leave it like this,
b) turn whole plate counter clockwise to share the error, or
c) turn whole plate counter clockwise till R side is at full advance at high revs and L is at TDC at idle?
or
boo option d) mess some more with the points
1) R gap bigger or,
2) L gap smaller and rotate whole plate counter clockwise..?

one more bit of info. It now sometimes seems to hang at higher revs, taking a while to drop back to idle. Could this be the advance mechanism, carbs, or because how the timing is now set?

Thanks for all your help so far. hopefully it will be right soon and I won't have to bug you guys much for a while.

Cheers.
Dave.
 

Attachments

  • pic6.jpg
    pic6.jpg
    12.9 KB · Views: 290
You don't want to go past the full advance mark ..... ever. Sustained running like that can hole a piston. Your advance unit has some wear. It's advancing more than the 25° it did when new. Looks like it's moving 27° or 28° now. The idle timing spec is given as a 5° range, 13° to 17° BTDC. This allows you to compensate for a slightly worn advance unit and still be in spec at idle but not go over advanced. I would retard the right side a bit more. If you want to do it without effecting the left side, close the right points gap up a little.

If the points are used, you should be setting them near the minimum gap anyway. Points develop pits when used. The spark jumps between these pits. You can't measure between the pits with your feeler gauge. The gap you have set with the feeler is actually larger than you're measuring. That's why, as I mentioned above, a dwell meter is the only accurate way to set used points.

There was a slight change to the timing spec early in the 650 production run. The idle timing was originally 10° to 15° BTDC. By moving the right side so it doesn't over-advance and putting the left idle timing slightly to the right of the current range, you will still be OK. Your left idle timing will probably end up at 10° or 11°.
 
Last edited:
Yes, a sticking advance rod can cause the RPMs to hang. The timing is hanging in the advanced position and not retarding as it should. If you haven't done so, you need to service the advance rod. It needs to be pulled out and the bushings in the ends of the cam that it rotates in need to be greased. The outer bushing on each end of the cam has grooves cut into its I.D. These are to hold grease and provide a reservoir of lube for the rod .....

dhXcM3V.jpg


Pack them full of grease like so and the rod will have a lube supply for many years to come .....

cc8H22E.jpg


You can re-do it probably every 5 or 6 years.
 
Last edited:
Yes, a sticking advance rod can cause the RPMs to hang. The timing is hanging in the advanced position and not retarding as it should. If you haven't done so, you need to service the advance rod. It needs to be pulled out and the bushings in the ends of the cam that it rotates in need to be greased. The outer bushing on each end of the cam has grooves cut into its I.D. These are to hold grease and provide a reservoir of lube for the rod .....

GreaseGrooves.jpg


Pack them full of grease like so and the rod will have a lube supply for many years to come .....

GreaseGroovesFilled.jpg


You can re-do it probably every 5 or 6 years.
5twins, I'm going to service my advance rod this evening. Do you happen to have pictures regarding lubricating the rod? They aren't showing anymore on this thread - it will probably help my newbie eyes know what to look for.
 
OK, done. No need to remove the advance/points housing as shown in the 1st pic. It just happened to be off when I took that pic. There's no need to remove the points or the advance unit either. Just take the little disc off the end of the advance rod on the advance side and pull the rod out the points side, points cam still attached. However, when re-assembling it, there is an alignment issue to watch out for. There is a locating pin in the advance rod for the little disc and one for the points cam too. They must point in the same direction. It's possible to install them 180° off from each other and that will throw the timing off 180° .....

LhHXTz4.jpg


There are slash marks on the little disc and the advance unit backing plate to help you get this right .....

oOmaPmF.jpg
Thank you 5twins - I appreciate your help!
 
Back
Top