-
Enjoy XS650.com? Consider making a donation to help support the site.
XS650.com receives a small share of sales from some links on this page, but direct donations have a much greater impact on keeping this site going.
You are using an out of date browser. It may not display this or other websites correctly.
You should upgrade or use an alternative browser.
You should upgrade or use an alternative browser.
“Garage built, shed built”... stable built!
- Thread starter Bewarethemoon
- Start date
Nice, I'm curious to see what results you get from the porting.
Me too! I’ve seen photos of the intakes utilising the modified guides to Lillie specs’ and I’m impressed!
Very much looking forward to getting the completed product back in my hands. I have access to a flow bench, my friend has a head worked by a highly skilled pro, guide bosses shaped and compound added for d-shaped intake ports.
I intend to compare the two.
Daniel.
I have access to a flow bench, my friend has a head worked by a highly skilled pro, guide bosses shaped and compound added for d-shaped intake ports.
I intend to compare the two.
Wow. That will be interesting to see. Someone on here did a D shaped intake, idk now it turned out. I'm going to search it.
@JackSomeone on here did a D shaped intake,
Yes Jack, I found the thread. He posts flow #s in the 12th post I belive, I can't rightly say I know what it means. Why does it say lift and are the , to show position of digits or did #s? I just understand the concept. Also how do you achieve a " bathtub" combustion chamber?
Changing Intake ports to a D shape for better flow.
Changing Intake ports to a D shape for better flow.
buzzword
XS650 Addict
Out of curiousity, what does he get for a full CNC port job?
Out of curiousity, what does he get for a full CNC port job?
https://650performance.com/cnc-head-porting
Considering that I'm back actively contributing to the forum I thought it was about time I attempted to update this thread, I can't believe it's almost been two years!
Towards the beginning of last summer we underwent some of the same beatification work that we carried out on the TX750 swingarm on the '79 Special frame. There's obviously still a long way to go but I wanted to clean up the subframe first for reasons I'll list in the next post.


Daniel.
Towards the beginning of last summer we underwent some of the same beatification work that we carried out on the TX750 swingarm on the '79 Special frame. There's obviously still a long way to go but I wanted to clean up the subframe first for reasons I'll list in the next post.
Daniel.
. . . for reasons I'll list in the next post . . .
We're all waiting with bated breath.
So my reasoning for wanting to clean up the subframe was that I had booked my self onto a fabrication course that I never got to sit due to, well life..
https://www.ettomotorcycles.co.uk/copy-of-home-1
I have a clear idea in my mind of what I want the rear of this bike to look like and always felt that the seat cowl would have to be handcrafted. I thought that going into the training with a goal of a piece to be produced would be hugely beneficial but that wasn't my sole aim, I love the idea of learning how to create and shape forms from aluminium for motorcycles.. I can't climb trees forever!
Ian from ETTO recommended I should try and produce my own former for us to work off. It would save us spending a day just creating the former.
As I will be using the tank from a XS750 (more on that a little later) I thought it wold make sense aesthetically to use the seat cowl from one too.
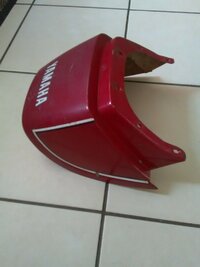
I set my mind to thinking on how I could somewhat accurately replicate the shape. I thought if I produce some datum points then I could use a contour gauge to trace these.

With each contour that I felt I had sufficiently copied I then had to create a template that could be cut from plywood.
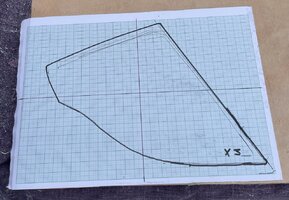
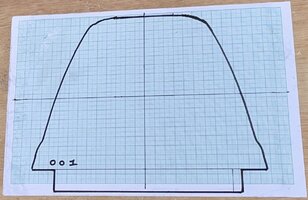
The XS750 being a triple, is a wider frame, by approximately 50mm at the subframe, so I knew I had to 'tuck' the shape I wanted to fit the skinnier frame. Luckily the XS750 cowl is near enough flat on it's top plain so all I had to do was remove 25mm from either side of the centre point.
Once I had all of my templates for the former glued to sheets of plywood I spent an evening with a Friday evening with a friend with a bandsaw and some beers and we cut them all out and assembled the shape.


At this point it's worth noting that, although I was fairly happy with my efforts, I didn't feel that they were nearly good enough to get the results that I was after. The very rear of the former (where the loop begins to kick up) was proving incredibly difficult to produce. I couldn't work out how I was going to make the cowl accurately fit the compound curve of the frame (which is why I imagine most bikes with seat cowls have flat subframes).
This is where things really leap forward into the modern era technologically speaking...
Daniel.
https://www.ettomotorcycles.co.uk/copy-of-home-1
I have a clear idea in my mind of what I want the rear of this bike to look like and always felt that the seat cowl would have to be handcrafted. I thought that going into the training with a goal of a piece to be produced would be hugely beneficial but that wasn't my sole aim, I love the idea of learning how to create and shape forms from aluminium for motorcycles.. I can't climb trees forever!
Ian from ETTO recommended I should try and produce my own former for us to work off. It would save us spending a day just creating the former.
As I will be using the tank from a XS750 (more on that a little later) I thought it wold make sense aesthetically to use the seat cowl from one too.

I set my mind to thinking on how I could somewhat accurately replicate the shape. I thought if I produce some datum points then I could use a contour gauge to trace these.
With each contour that I felt I had sufficiently copied I then had to create a template that could be cut from plywood.


The XS750 being a triple, is a wider frame, by approximately 50mm at the subframe, so I knew I had to 'tuck' the shape I wanted to fit the skinnier frame. Luckily the XS750 cowl is near enough flat on it's top plain so all I had to do was remove 25mm from either side of the centre point.
Once I had all of my templates for the former glued to sheets of plywood I spent an evening with a Friday evening with a friend with a bandsaw and some beers and we cut them all out and assembled the shape.
At this point it's worth noting that, although I was fairly happy with my efforts, I didn't feel that they were nearly good enough to get the results that I was after. The very rear of the former (where the loop begins to kick up) was proving incredibly difficult to produce. I couldn't work out how I was going to make the cowl accurately fit the compound curve of the frame (which is why I imagine most bikes with seat cowls have flat subframes).
This is where things really leap forward into the modern era technologically speaking...
Daniel.
Last edited:
I'm sensing we're moving at a gallop from stable built to . . . . . . cadcam.
Sorry, with the thread name, you were always going to be saddled with a lot of that type of humour, I must learn to rein it in.
Sorry, with the thread name, you were always going to be saddled with a lot of that type of humour, I must learn to rein it in.
I must learn to rein it in.
So this now brings us to May of 2022 and well into the computer age if you will.
As I said in the last post I have a very clear image in my mind of how I want this build to turn out and to me the seat cowl of a 'Cafe Racer' is a crucial component of that.
This next paragraph may take some imagination on the readers behalf.
I always wanted to retain the rear loop on my build because I felt it was one of the defining characteristics of the frame. I also wanted to still have the frames tubing visible rather than have the cowl cover it, so if I could have the cowl, across it's entirety, sit along the centre line of the top of the frames tubing then I would be satisfied.
I hope you're all still with me and this goes someway to explain my next move.
I booked myself back in with Ian of ETTO Motorcycles for end of June. I've had a lot of correspondence with Ian since I first learned of him and during our conversations about producing formers he alerted me to a company http://www.a2p2.co.uk/index.php?idPage=7
Now A2P2 can take whatever you have, whether it's a motorcycle frame or a car bonnet, digitally map it and then remodel it to fit another frame or chassis. They then work closely with another firm to produce a former from CNC cut plywood and composite segments.
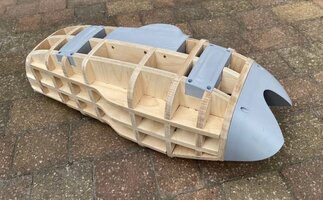
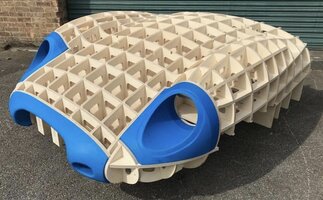
So as of today A2P2 have digitally mapped my frame & XS750 seat cowl and are about to perform their computer wizardry to make the two meet exactly as my rather picky standards dictate.
Daniel.
As I said in the last post I have a very clear image in my mind of how I want this build to turn out and to me the seat cowl of a 'Cafe Racer' is a crucial component of that.
This next paragraph may take some imagination on the readers behalf.
I always wanted to retain the rear loop on my build because I felt it was one of the defining characteristics of the frame. I also wanted to still have the frames tubing visible rather than have the cowl cover it, so if I could have the cowl, across it's entirety, sit along the centre line of the top of the frames tubing then I would be satisfied.
I hope you're all still with me and this goes someway to explain my next move.
I booked myself back in with Ian of ETTO Motorcycles for end of June. I've had a lot of correspondence with Ian since I first learned of him and during our conversations about producing formers he alerted me to a company http://www.a2p2.co.uk/index.php?idPage=7
Now A2P2 can take whatever you have, whether it's a motorcycle frame or a car bonnet, digitally map it and then remodel it to fit another frame or chassis. They then work closely with another firm to produce a former from CNC cut plywood and composite segments.


So as of today A2P2 have digitally mapped my frame & XS750 seat cowl and are about to perform their computer wizardry to make the two meet exactly as my rather picky standards dictate.
Daniel.
Last edited:
I'm sensing we're moving at a gallop from stable built to . . . . . . cadcam.
Sorry, with the thread name, you were always going to be saddled with a lot of that type of humour, I must learn to rein it in.
Yep, he’s had to jump a few fences, but he’s going at a fair canter. I’m sure he will whip it into shape. Trot along for a while before heading to the finishing post at a gallop!
So this now brings us to May of 2022 and well into the computer age if you will.
As I said in the last post I have a very clear image in my mind of how I want this build to turn out and to me the seat cowl of a 'Cafe Racer' is a crucial component of that.
This next paragraph may take some imagination on the readers behalf.
I always wanted to retain the rear loop on my build because I felt it was one of the defining characteristics of the frame. I also wanted to still have the frames tubing visible rather than have the cowl cover it, so if I could have the cowl, across it's entirety, sit along the centre line of the top of the frames tubing then I would be satisfied.
I hope you're all still with me and this goes someway to explain my next move.
I booked myself back in with Ian of ETTO Motorcycles for end of June. I've had a lot of correspondence with Ian since I first learned of him and during our conversations about producing formers he alerted me to a company http://www.a2p2.co.uk/index.php?idPage=7
Now A2P2 can take whatever you have, whether it's a motorcycle frame or a car bonnet, digitally map it and then remodel it to fit another frame or chassis. They then work closely with another firm to produce a former from CNC cut plywood and composite segments.
View attachment 214438View attachment 214439
So as of today A2P2 have digitally mapped my frame & XS750 seat cowl and are about to perform their computer wizardry to make the two meet exactly as my rather picky standards dictate.
Daniel.
That’s some cool information Daniel. Just read this whole thread and enjoying the progress
That’s some cool information Daniel. Just read this whole thread and enjoying the progress
Thanks for reading @Adamc
I’m really hoping to get a rolling chassis together by end of Summer and then the engine built over the winter, it does feel like a realistic goal at this point.
Daniel.
You'll soon be on the finishing straight . . .Thanks for reading @Adamc
I’m really hoping to get a rolling chassis together by end of Summer and then the engine built over the winter, it does feel like a realistic goal at this point.
You'll soon be on the finishing straight . . .
Thanks @Raymond
I really hope so, I do have the bit between my teeth...
Daniel.
My Cognito Moto hubs are getting dropped off for bearing & seal installation. I dare not tackle it myself, it would break my heart to damage them.
The nerd within me couldn't not get NOS bearings & seals.

Daniel.
The nerd within me couldn't not get NOS bearings & seals.
Daniel.
Similar threads
- Replies
- 5
- Views
- 3K

