-
Enjoy XS650.com? Consider making a donation to help support the site.
XS650.com receives a small share of sales from some links on this page, but direct donations have a much greater impact on keeping this site going.
You are using an out of date browser. It may not display this or other websites correctly.
You should upgrade or use an alternative browser.
You should upgrade or use an alternative browser.
Rhy650, do you remember what make the engine enamel was? Did you ever try it on the cooling fins?
Thank you.
Thank you.
I used VHT ceramic engine primer and VHT Engine Enamel:Rhy650, do you remember what make the engine enamel was? Did you ever try it on the cooling fins?
Thank you.
I have put about 100 miles on the bike since the rebuild and only the jugs have showed any discoloration, including the cooling fins. They discolored after the first ride, but have luckily not gotten any worse from subsequent rides.
This '71 has a high-end ceramic coating that Dad had professionally applied, I am hoping it does not suffer the same fate
Thank you, I have an engine that needs touching up.
Update
This week was focused on getting the electrical components mounted to the bike so I could begin to wire it. Made up a bracket for the coil:


And made this sheet-metal monstrosity to hold the solenoid, igniter, flasher, reg/rec, fuse box, and relay:


It mounts to the front of the stock battery box and I am actually very happy with how it turned out. Everything is all tucked away and should not be especially visible once the side-covers are on. Also rebuilt the horn (had some fun with the yellow):

and went ahead and mounted the chain and drive sprockets, for no other reason than to get some parts off the bench and on the bike:

Now out of side-projects (i.e. excuses) - I started to wire the bike:


Wires...
I ended up having to scrap most of the pre-made harness I bought, but it was still a good purchase. It supplied me with an idea of how to wrap the new harness and also provided many wires in a color to match my diagram. Waiting on some PVC sleeves and harness tape before I go much further.
A couple of questions... could someone provide me with a picture of a stock XS1B battery bay, similar to this:

Trying to get a better idea of what the finished product should look like. What goes in that tray? Did the battery box have a lid? What attaches to the two open holes on the damper mounts? etc...
Also, I know I will need to get a lithium battery to fit in this bay and provide enough power for the starter. Anyone have any experience pointers on this? I know you have to be careful with the charging output... Anyone know if an XS puts out more than 14.8V? Thanks!
This week was focused on getting the electrical components mounted to the bike so I could begin to wire it. Made up a bracket for the coil:
And made this sheet-metal monstrosity to hold the solenoid, igniter, flasher, reg/rec, fuse box, and relay:
It mounts to the front of the stock battery box and I am actually very happy with how it turned out. Everything is all tucked away and should not be especially visible once the side-covers are on. Also rebuilt the horn (had some fun with the yellow):
and went ahead and mounted the chain and drive sprockets, for no other reason than to get some parts off the bench and on the bike:
Now out of side-projects (i.e. excuses) - I started to wire the bike:
Wires...

I ended up having to scrap most of the pre-made harness I bought, but it was still a good purchase. It supplied me with an idea of how to wrap the new harness and also provided many wires in a color to match my diagram. Waiting on some PVC sleeves and harness tape before I go much further.
A couple of questions... could someone provide me with a picture of a stock XS1B battery bay, similar to this:
Trying to get a better idea of what the finished product should look like. What goes in that tray? Did the battery box have a lid? What attaches to the two open holes on the damper mounts? etc...
Also, I know I will need to get a lithium battery to fit in this bay and provide enough power for the starter. Anyone have any experience pointers on this? I know you have to be careful with the charging output... Anyone know if an XS puts out more than 14.8V? Thanks!
Tool pouch.What goes in that tray?
Not positive, but I believe the air filters were bolted in through those holes.What attaches to the two open holes on the damper mounts?
I recently read there's Li battery's out there with built in charge controllers. Not sure if they're available in the size you need. Might be worth investigating.Also, I know I will need to get a lithium battery to fit in this bay and provide enough power for the starter. Anyone have any experience pointers on this? I know you have to be careful with the charging output... Anyone know if an XS puts out more than 14.8V? Thanks!
Tools.What goes in that tray?
No.Did the battery box have a lid?
Air boxes.What attaches to the two open holes on the damper mounts?
This a XS2. Similar, I believe the battery is smaller in a XS1.
Very nice...
If you want to keep the harness tidy as you work then that plastic spiral wrap works well. It automatically leaves gaps for wires to be feed in and out. It is easy to remove when you are ready for the final wrapping:

I eagerly await launch day.

If you want to keep the harness tidy as you work then that plastic spiral wrap works well. It automatically leaves gaps for wires to be feed in and out. It is easy to remove when you are ready for the final wrapping:

I eagerly await launch day.
@GLJ - Thanks for the picture! Given how tight many other spaces are on the bike I find it funny how large the tool bay is. Were the engineers trying to tell us something...?
Thanks! Great idea with the spiral wrap, I have been concerned about cutting wires too short/too long and this will let me size everything properly.Very nice...
I like this stuff.Very nice...
If you want to keep the harness tidy as you work then that plastic spiral wrap works well. It automatically leaves gaps for wires to be feed in and out. It is easy to remove when you are ready for the final wrapping:

I eagerly await launch day.
Your bike is looking great Rhy! My hats off to you for creating your own wiring harness, wiring is something I find very challenging.
Not much to report this week. When I have been able to get my shop warm enough to work, the name of the game was wiring - and then some more wiring. I think this was the peak of the birds nest chaos:

As terrible as that looks, there is some method to the madness. Those green tags label the source and destination of each wire and they have been invaluable to keeping all this straight. Finally got my harness supplies in the mail so the cleanup can begin:

Looking better already:


I am not going to tie things up for good until I have had a chance to test some of the electrical systems. @Paul Sutton - I looked high and low for the spiral wrap and am convinced there is none to be had in SW Missouri. Should have just ordered some online, but we are just about past that point, had to settle for zip ties...
Tired of wiring and inspired by @Mailman I took one day to work on my petcocks - they were in VERY bad shape:

I worked all night cleaning these and eventually decided they were too degraded to be of any use. Shortly after resigning I found a box of bike parts in Dad's shop, including four already cleaned and polished petcocks and rebuild kits, you can see yourself in the damn things!!

Off subject, but I also found this sprocket that has the wrong tines for an XS. I assume that Dad ordered/was sent the wrong part. Does anybody in the US have a use for this? If so, I would be happy to make you a gift of it:

As terrible as that looks, there is some method to the madness. Those green tags label the source and destination of each wire and they have been invaluable to keeping all this straight. Finally got my harness supplies in the mail so the cleanup can begin:
Looking better already:
I am not going to tie things up for good until I have had a chance to test some of the electrical systems. @Paul Sutton - I looked high and low for the spiral wrap and am convinced there is none to be had in SW Missouri. Should have just ordered some online, but we are just about past that point, had to settle for zip ties...
Tired of wiring and inspired by @Mailman I took one day to work on my petcocks - they were in VERY bad shape:
I worked all night cleaning these and eventually decided they were too degraded to be of any use. Shortly after resigning I found a box of bike parts in Dad's shop, including four already cleaned and polished petcocks and rebuild kits, you can see yourself in the damn things!!


Off subject, but I also found this sprocket that has the wrong tines for an XS. I assume that Dad ordered/was sent the wrong part. Does anybody in the US have a use for this? If so, I would be happy to make you a gift of it:
The part number is for a MikesXS 17 tooth for an XS650. I guess they received an incorrect delivery at some stage.
I worked all night cleaning these and eventually decided they were too degraded to be of any use. Shortly after resigning I found a box of bike parts in Dad's shop, including four already cleaned and polished petcocks and rebuild kits, you can see yourself in the damn things!!
Your wiring is looking great, I really love your attention to detail.

I can’t tell you how many parts I have worked for hours only to wind up not using them. As for the petcocks, good old Dad to the rescue!
Thanks! Right back at ya.Your wiring is looking great, I really love your attention to detail.
... could someone provide me with a picture of a stock XS1B battery bay...
Some pics in Angus67's thread, but they aren't showing up for me.
http://www.xs650.com/threads/giddy-71-within-my-grasp.40322/
So, here's some from my library...
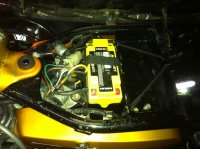
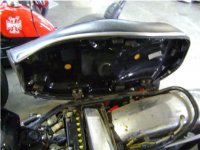
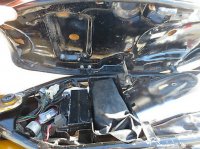
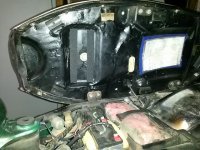
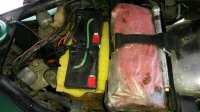
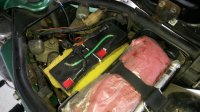
Thanks, very helpful. These also gave me some insights as to the original routing of the wires. It has been an interesting experience building something I never saw assembled.here's some from my library
On that subject, I could use a little help with the early headlight assembly. After doing some reading it seem that the early models had a slightly different design. I know the bezel (rim) was different, but did they use a different lamp, too? My bezel is in terrible shape, looks like someone laid the bike down at speed on it, huge scrapes and gashes in it. Any suggestions for sourcing a new one? Mikes only has the '74 and later rim and it sounds like these parts are hard to come by.
They are a bit on the rare side yes the bulb is odd too.
They do show up on ebay now and then. 70-73 all the same.
The ring 256-84315-60
otherwise keep slogging though XS650 headlight listings till you find an early one some bobber builder is getting rid of.
They do show up on ebay now and then. 70-73 all the same.
The ring 256-84315-60
otherwise keep slogging though XS650 headlight listings till you find an early one some bobber builder is getting rid of.
Last edited:
the bulb is odd too.
That’s funny, I never noticed the difference between my two bikes.

