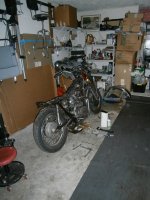
You two are certainly an inspiration for my long summer project: 1972 SX pretty much all there original but no ignition trigger. that seat foam was stuck to everything every where...looked like rust / bread crumbs. I'm going to have to go through the whole bike after I can get it cranked up for a minute. Funny that I had been looking all over for a *nice* original '72 almost nabbing one here or there. I found this 10 minutes from my front door. I love the way the paint pops in the sun after it cleans up. I can see the fine silver layer over the base coat and under the translucent red where some paint has worn..Since I'll take everything apart to check integrity, I will repaint frame where needed, probably leave the panel, tank re paint until next summer and focus on getting the bike running flawlessly.
-
Enjoy XS650.com? Consider making a donation to help support the site.
XS650.com receives a small share of sales from some links on this page, but direct donations have a much greater impact on keeping this site going.
You are using an out of date browser. It may not display this or other websites correctly.
You should upgrade or use an alternative browser.
You should upgrade or use an alternative browser.
1972 Resto/Retro Project
- Thread starter jones5944
- Start date
-
- Tags
- restoration
David, if you make a seat foam for your '72 project...please make me one as well for my '72Hello Bob!!!!!!!!!!! I was on the other day and looking for you but it kept returning a message that there was no one by your name and I was getting worried that something had happened.
Yes, I am getting ready to start a new Yamaha 650 project that I just picked up. I found a 72 that is probably the most original that I have ever seen. Probably 99.9% The problem is that it sat in a Minnesota dairy barn for nearly 30 years uncovered so, it is going to be one of those real challenging resto's that I think will be fun and probably cost me way more money than what its worth . I have a project on my table now that I need to finish for a gentleman in Ohio and then I will begin posting pics here in the near future.
My brother gave me a XS 650 calendar for a Christmas present and I was really happy to see you 650 on the cover. I told him the story of how we got together regarding the seat and it was pretty cool.
GEEZ, totally forgot I wrote the above in May...seems like a year ago.
Again, so glad to see that your still around. I look forward to continuing our chatting in the near future.
David
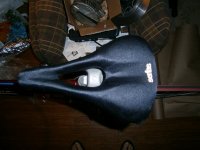
") I'd like to get in touch..and see pics of your '72 XS. not finding early XS seat foam anywhere now...I may have to carve out the hard, petrified original and sink this seat into the appropriate spot (see photo). I'm in the same boat as you are with a 30 year "sitter" resto...but, except for the foam, seat is fully intact and cover pliable, together.
I'd like to get in touch..and see pics of your '72 XS. not finding early XS seat foam anywhere now...I may have to carve out the hard, petrified original and sink this seat into the appropriate spot (see photo). I'm in the same boat as you are with a 30 year "sitter" resto...but, except for the foam, seat is fully intact and cover pliable, together.Attachments
Last edited:
David, if you make a seat foam for your '72 project...please make me one as well for my '72
If you can’t find a replacement foam, there are a lot of how to’s in the online. I had seriously considered that at one point, the best ones I saw involved layering different density foam pads up and then contouring them. Buying quality foam is not an inexpensive proposition. I had also considered taking my seat to an upholstery shop. I had a fully custom made seat made for a BMW I used to have and it came out nice. And when I say custom made, I mean one that appeared stock but was all handmade.

This? https://www.ebay.com/itm/YAMAHA-XS1...784606?hash=item2892ee549e:g:qp4AAOSwzZNb1iwa
@Mailman didn't you point me at this?
The seat I put on WJL was doing the same thing, a constant orange rain of seat foam particles EVERYWHERE. Found a different one with "good foam". It's either original or a long ago recover.
@Mailman didn't you point me at this?
The seat I put on WJL was doing the same thing, a constant orange rain of seat foam particles EVERYWHERE. Found a different one with "good foam". It's either original or a long ago recover.
This? https://www.ebay.com/itm/YAMAHA-XS1...784606?hash=item2892ee549e:g:qp4AAOSwzZNb1iwa
@Mailman didn't you point me at this?
Ha! I knew I found one somewhere! I couldn’t remember where. That one looks exactly right and I think, given all the options, the price is right too.
 Thanks Gary!
I bought one from that seller last winter.This? https://www.ebay.com/itm/YAMAHA-XS1...784606?hash=item2892ee549e:g:qp4AAOSwzZNb1iwa
@Mailman didn't you point me at this?
The seat I put on WJL was doing the same thing, a constant orange rain of seat foam particles EVERYWHERE. Found a different one with "good foam". It's either original or a long ago recover.
http://www.xs650.com/threads/its-past-time-to-start-xs2-resurrection.53396/page-26
It fit well and sits well.
On a long trip it is going to get some help.
Their site,
https://www.pandkclassicbikes.co.uk/A-GUIDE-TO-SEAT-RE-COVERING.html
Some good info there!
https://www.pandkclassicbikes.co.uk/A-GUIDE-TO-SEAT-RE-COVERING.html
Some good info there!
Last edited:
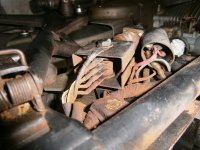
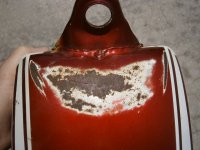
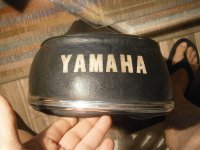
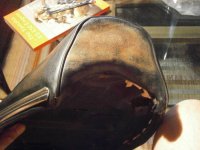
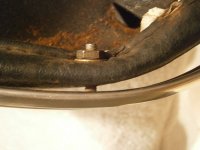
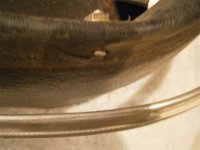
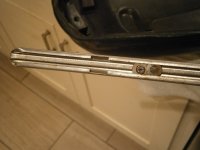
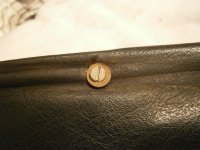
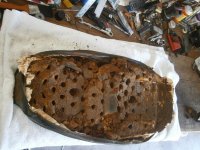
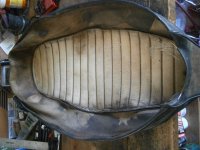
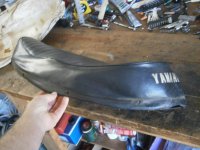
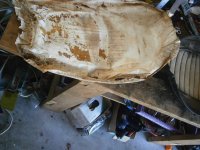
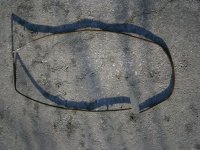
Thanks to the guys who mentioned the seat foam website yesterday..OK, started into that original seat last night and promptly quit...total PIA. This morning, Had to cut off a few small flat head screws that slid in a channel of the stainless outer seat trim band that were just turning in the channel with the nut. Then I could carefully slide off the stainless trim band. See photo of the cut out in channel where the screw heads can slip out , releasing the trim strip. I don't know if anyone has photographed this mess in the state I found it. The foam had a plastic cover on to which kept any moisture in the foam not out. I had to put the seat in a garbage bag to remove the black cover and plastic as the foam was the constancy of petrified charcoal briquettes! Some of it was just burnt sugar cookies. Found a pipette rubber trim along edge of the seat pan...it came off ok. Went to Lowes and replaces all the seat pan and outer trim hardware with same for later. Now, I have to brush off the stuck foam/ surface rust off the top side of the pan and let it sleep overnight in Evapo-Rust. I might even get something else to expedite the at surface rust removal. The cover is a toss up. In tack, no tears pr punctures,pliable but, YAMAHA is discolored if it was white....fixable. A nylon cord is still around the sewn edge below where the metal outer trim goes...I think I know where I stand now and can just get some foam and a little polyester batting (no plastic bag over it this time).
Attachments
-
 P7230669.JPG171.5 KB · Views: 112
 -
 P7230672.JPG183.5 KB · Views: 121
 -
 P7230674.JPG158.8 KB · Views: 113
 -
 P7240675.JPG130.5 KB · Views: 119
 -
 P7240677.JPG123.6 KB · Views: 106
 -
 P7240678.JPG124.8 KB · Views: 114
 -
 P7240679.JPG143 KB · Views: 110
 -
 P7240680.JPG202.5 KB · Views: 119
 -
 P7240684.JPG181.2 KB · Views: 111
 -
 P7240685.JPG158.6 KB · Views: 113
 -
 P7240686.JPG191.7 KB · Views: 113
 -
 P7240687.JPG390.3 KB · Views: 108
I bought one from that seller last winter.
http://www.xs650.com/threads/its-past-time-to-start-xs2-resurrection.53396/page-26
It fit well and sits well.
On a long trip it is going to get some help.
Humm, forgot I had read your seat...post Greg. I might just shine up the old black cover and use it. I really don't like the way that UK company packaged your new seat.
You may have seen this already but I’ll throw this in there, just in case you can find something useful in there.
http://www.xs650.com/threads/installing-a-new-seat-cover.52293/
http://www.xs650.com/threads/installing-a-new-seat-cover.52293/
I read that several months ago now...just read it again, TY. Actually,logged on looking for something that stuck in my mind about adding another extra rubber someone suggested to keep seat level. That was an excellent job Mailman....as I type with heavy nitrile gloves. I have my seat pan in the garage bathing in acid metal prep and after sleeping in evapo-rust. light prime n gloss paint. I'm going to use the old cover since it is pre-stretched lol and all my clips and screws will located and hold cover. I found some 1''x 27" x cut off roll $16/ yd. poly batting I will try and fix, glue edges over foam and use clips,screws . This may or may not be needed other than to smooth out foam marks. found that at a Joann's fabric outlet. I did order the UK foam.....
Found that detail from 2014...x-tra bumper: Two Many.." Here's the bottom of mine. It's had a lot of welding too. The oval opening clearances the seat catch hoop. One weak part of the seat is where it 'floats' above the frame rail in front of the seat latch, opposite of the front hinge, so I added another rubber support bumper there (tan colored)."
>> https://www.xs650.com/threads/72-xs...ed-to-be-a-piece-of-rubber-under-there.38656/
Last edited:
They packaged it just fine. I screwed up opening it. I reused my original cover. The plastic under it was toast so I removed it from the cover. I wanted a vapor barrier between the seat and foam. I used a thin sheet of rubber. I'm glad I did. After getting caught in a downpour yesterday my seat had no water coming up out of the foam today.Humm, forgot I had read your seat...post Greg. I might just shine up the old black cover and use it. I really don't like the way that UK company packaged your new seat.
They packaged it just fine. I screwed up opening it. I reused my original cover. The plastic under it was toast so I removed it from the cover. I wanted a vapor barrier between the seat and foam. I used a thin sheet of rubber. I'm glad I did. After getting caught in a downpour yesterday my seat had no water coming up out of the foam today.
Oh, wow, a water trap...I'll keep that in mind. yes, as an afterthought looking at that cut, it looked like a package opening cut...I've done that more than I can remember. I didn't want to ask.