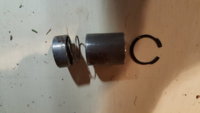
The fork stanchions (aka fork tubes) on My XS2 are bent. I purchased replacements from Mikes XS. The new ones have some kind funky part on the lower end where damper attaches. Pics to follow. I'm not sure why. I intend to remove and install original dampers. Anyone else experience this? Any suggestions?
-
Enjoy XS650.com? Consider making a donation to help support the site.
XS650.com receives a small share of sales from some links on this page, but direct donations have a much greater impact on keeping this site going.
You are using an out of date browser. It may not display this or other websites correctly.
You should upgrade or use an alternative browser.
You should upgrade or use an alternative browser.
1972 Yamaha XS650 project
- Thread starter scanney
- Start date
Hi Scanney,
I’m trying to figure out, that photo on the left, did that part come out of your new fork legs? Your internal parts should look like this, I’m wondering if your mystery part is intended to replace #7 on the diagram. I have no experience with the replacement legs from Mikes.


I’m trying to figure out, that photo on the left, did that part come out of your new fork legs? Your internal parts should look like this, I’m wondering if your mystery part is intended to replace #7 on the diagram. I have no experience with the replacement legs from Mikes.
wrenchjohns
XS650 Addict
Scanney have you put the front end together, I'm looking at the same deal from Niche Cycle pretty soon. It looks to me like some damping changes are involved and any insight is always welcome.
john
john
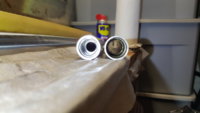
Yes the front end is re-assembled. I used the damper piston, spring, and collar which came with the new tubes. The original damper piston would not fit. I contacted Mikes XS and was assured this will work. It went together okay and seems good to go. A road test in the spring will be the real test. See attached pic of original damper and new piston, spring, and collar.
Attachments

wrenchjohns
XS650 Addict
Just ordered 2 pair from Niche Cycle. They have many of the same parts for better prices and some surprising additions (like the right compression release trigger/starter switch) with free shipping over $100.
john
john
New question, I disassembled and cleaned the two petcocks on the XS2. The gasket on the plate on the backside of the petcocks appears to have been sealed with some type of gasket sealer. Also, the two screw bolts which attached petcock to tank also seem to have gasket sealer. Is this necessary? I've cleaned and replaced gaskets on other petcocks and never used gasket sealer.
The two places you’ve identified are absolutely notorious for leaking, that’s probably why you found sealer on them.
If everything is perfect, you probably don’t need to apply sealer ( even so, I still do , because I absolutely hate leaky petcocks!)
Here are some tips for leak proof petcocks. First a disclaimer, I have aftermarket petcocks on both of my bikes, but the theories still apply.
1. That black gasket for the back plate is tissue thin and will not seal if there are surface imperfections. They will seal if the surfaces are perfect, but I like to make my own gaskets from a good gasket paper.

So, this idea came from Gary, Wet sand all the flat surfaces with 400 grit to make them absolutely smooth and level. Gary also recommends always replacing the internal seal, that round rubber part with the four holes, with OEM Yamaha parts.

you can see the difference from original on the left to sanded on the right

The mounting screw sealing washers are also problematic, sometimes they seal, sometimes they don’t, and I don’t recommend ever reusing them. I go to either Ace Hardware or True Value and I buy these small, rock hard grey fiber washers that are just a hair smaller than 6mm. They are indestructible and reusable. You can run a 6mm tap through them and thread them right onto your mounting screws.

Here’s a good tip from Jim, concerning leaks around the o-ring. Take a wooden popsickle stick and grind it to a rounded point and use it to spread black RTV silicone , to create a better seal for that o-ring. Be sure to let it dry for 24 hours. I’ve done this , it’s easy and works great!


And lastly, I usually use Hylomar Blue to coat the back gasket and the sealing washers, with good results. Just be sure to let the Hylomar dry before assembly.

These are all just things that have helped me in the past, none of them are absolutely necessary, if all of your sealing surfaces and gaskets are perfect, you shouldn’t need to do any of this. But if you continue to have trouble, some of these ideas might help. Trust me, a lot of us have struggled with leaky petcocks. I hope this helps. Good luck, Bob
If everything is perfect, you probably don’t need to apply sealer ( even so, I still do , because I absolutely hate leaky petcocks!)
Here are some tips for leak proof petcocks. First a disclaimer, I have aftermarket petcocks on both of my bikes, but the theories still apply.
1. That black gasket for the back plate is tissue thin and will not seal if there are surface imperfections. They will seal if the surfaces are perfect, but I like to make my own gaskets from a good gasket paper.
So, this idea came from Gary, Wet sand all the flat surfaces with 400 grit to make them absolutely smooth and level. Gary also recommends always replacing the internal seal, that round rubber part with the four holes, with OEM Yamaha parts.
you can see the difference from original on the left to sanded on the right
The mounting screw sealing washers are also problematic, sometimes they seal, sometimes they don’t, and I don’t recommend ever reusing them. I go to either Ace Hardware or True Value and I buy these small, rock hard grey fiber washers that are just a hair smaller than 6mm. They are indestructible and reusable. You can run a 6mm tap through them and thread them right onto your mounting screws.
Here’s a good tip from Jim, concerning leaks around the o-ring. Take a wooden popsickle stick and grind it to a rounded point and use it to spread black RTV silicone , to create a better seal for that o-ring. Be sure to let it dry for 24 hours. I’ve done this , it’s easy and works great!
And lastly, I usually use Hylomar Blue to coat the back gasket and the sealing washers, with good results. Just be sure to let the Hylomar dry before assembly.
These are all just things that have helped me in the past, none of them are absolutely necessary, if all of your sealing surfaces and gaskets are perfect, you shouldn’t need to do any of this. But if you continue to have trouble, some of these ideas might help. Trust me, a lot of us have struggled with leaky petcocks. I hope this helps. Good luck, Bob
I've had good luck using copper crush washers on the mounting screws. Have mounted 2 sets of aftermarket petcocks on tanks with factory paint with no extra sealing and have had no problems.

Speak for yourself Mister!Trust me, a lot of us have struggled with leaky petcocks
Thanks for the info another vendor for us !!Just ordered 2 pair from Niche Cycle. They have many of the same parts for better prices and some surprising additions (like the right compression release trigger/starter switch) with free shipping over $100.
john
RTV sealant Harbor Freight good enough
Pro Seal
3 Oz. Black RTV Silicone $3.99
Pro Seal
3 Oz. Black RTV Silicone $3.99
"Trust me, a lot of us have struggled with leaky petcocks. I hope this helps."
Good write up Thanks Bob
Good write up Thanks Bob
Last edited:
I need to replace the rear tire on the XS2. Any recommendations? Thanks, Sean
Some tires I have experience with are the Dunlop K70’s I’m running on my XS2, they are a vintage tread pattern and are decent tires if you’re trying to stay faithful to the original look, I like them.


On my ‘77D I’m running a modern performance tire, Michelin Pilot Active, which are a really nice tire.
GLJ ( Greg ) runs Continental ContiGo tires and loves them. They are reasonably priced and a modern, good handling tire.
It's been awhile, but I have been working away. Just got rear wheel back today with new Dunlop K70 mounted and balanced. It looks good. I began taking oxidation off and polishing engine side covers. Yes! it's a lot of work. I am using 400, 800, 1,000, and 1,500 wet sand paper. Next polish with 0000 steel wool and WD40 and finish with metal polish. Question: any advise on getting recessed areas where bolts go cleaned up? Also, and other methods to suggest in cleaning and polishing? Thanks, Sean