Starting today, with daylight savings time, aren't you supposed to move the master link one tooth back?
-
Enjoy XS650.com? Consider making a donation to help support the site.
XS650.com receives a small share of sales from some links on this page, but direct donations have a much greater impact on keeping this site going.
You are using an out of date browser. It may not display this or other websites correctly.
You should upgrade or use an alternative browser.
You should upgrade or use an alternative browser.
1976 XS650 restoration and rebuild, advice and help welcomed!
Also note - the master link on the timing (cam drive) chain does not have any sort of removable clip like the master on the drive chain.
You're such a card T-M.
GeorgeOC
XS650 Junkie
Thank you 5twins, that's what I had hoped. Much appreciated. I'll get some photos and updates on the top end finish here hopefully within a few days.
Thanks for your help!
Thanks for your help!
GeorgeOC
XS650 Junkie
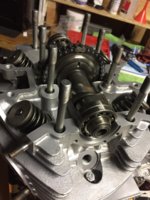
Made a big step forward finally, head is set into place, cam chain installed. I used 5twins illustration on where to apply Threebond to the head gasket. Cam is set with the timing mark noted in place while at TDC. Riveted the cam chain master link.
Does this rivet look flared sufficiently? (Sorry, first timer!)
Does this rivet look flared sufficiently? (Sorry, first timer!)
Attachments
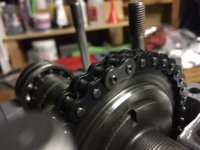
...Does this rivet look flared sufficiently?
A bit fuzzy pic, but looks alright. A test would be to grip that master link with needle nose pliers, and see if it can be wiggled.
Looks like a bit of grit on the chain rollers.
And, what's this thing?
GeorgeOC
XS650 Junkie
Thanks TM. Great eyes there. On close inspection, I thought that arrow might be pointing to a piece of the retainer that might be headed south. On close inspection I couldn't locate anything resembling the indication, the retainer seems to be in good shape, and everything in place.
I do have some questions though. I cycled the engine by hand. Here's what I have found. I did have a sense of joy hearing it cough and pushing a lot of air!
1. When the riveted master comes back around, its no longer in the same position over the timing mark, each time its one link further off center. Is that normal?
2. As I push on the cam tensioner blade where the tensioner spring would be, there is nearly no slack, maybe a mil or two of movement allowed. Is that too tight, or the chain too short?
Is it possible I have installed the cam chain with some sort of asymmetry by mistake?
#1 stop turning the motor over!
The only way you can be going a tooth different per rotation is if you have a mis-matched cam and crankshaft. Do you know the history of both?
There are 2 different crank/cam pairs early 70-73 have 17/34 sprockets late 74 on are 18/36
Yes a new camchain will be very tight.
Edit; Just wanted to prevent a possible disaster. Need to chew on this link moving thing a bit.
Edit #2 As long as the marks stay aligned the chain moving in relation to the teeth is fine. Gotta go look up the number of chain links.
Last edited:
GeorgeOC
XS650 Junkie
#1 stop turning the motor over!
The only way you can be going a tooth different per rotation is if you have a mis-matched cam and crankshaft. Do you know the history of both?
There are 2 different crank/cam pairs early 70-73 have 17/34 sprockets late 74 on are 18/36
Yes a new cam chain will be very tight.
Noted on the turning over, thanks gggGary. Have I caused a problem that will need to be addressed? About the history on the cam and crank... I didn't have any reason to think they were not stock original for the 76' motor. Will the current combination be a non-starter? No pun intended there.
GeorgeOC
XS650 Junkie
Edit #2 As long as the marks stay aligned the chain moving in relation to the teeth is fine. Gotta go look up the number of chain links.[/QUOTE said:Thanks again Gary. I presume you're mentioning the timing mark in the cam in relation to TDC? I fear that the only way to check that is to turn'r over?
I'm a bit fuzzy on this, still reeling over the political situation LOL But I think the master link moving is just fine, that is an effect of the number of chain links not being evenly divisible into the sprocket teeth Sorry if I scared you! As long as the timing marks stay aligned, which if the cam and crank are original, is not an issue
All the exit polls showed this to be a problem but the voters thought differently. LOL Just the old when in doubt STOP and think it over. You're good! If there was ever a doubt about something there are no worries about turning an XS650 motor backward. Since the cam crank have completed several revolutions before the master link reappears, any "going out of time" problem would have already shown up as a piston contacted a valve!
Your master link rivet job looks fine but you can finish it off a little more with a small ball-peen hammer and some hand peening if you like. That will smooth out the tooling marks from the rivet tool and flare the pin ends a bit more .....

Back the chain and sprocket up with a block of wood during the operation. When done, make sure the bearings are still fully seated inward on the cam and that it is still centered. Check that the bearing inset on each side is the same .....

Back the chain and sprocket up with a block of wood during the operation. When done, make sure the bearings are still fully seated inward on the cam and that it is still centered. Check that the bearing inset on each side is the same .....

GeorgeOC
XS650 Junkie
Thank you gentlemen as always, MUCH appreciated! Now to get the valve cover on...
GeorgeOC
XS650 Junkie
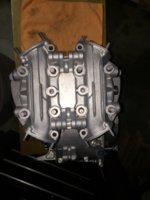
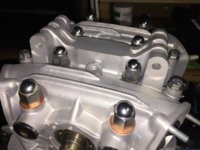
Valve cover on! Put down a thin layer of Yamabond on valve cover, and lowered it into place. Valve feet loosened slightly. Everything settled into place nicely. Torques the 17mm nuts to 24 ft/lb, and the 8mm bolts down at 18, following the Clymer diagram for the sequence. I tried to do a lot of reading on the usage of different washers, sealing washers etc. I changed the rubber sealing washers only, to a Suzuki OEM part. I reused the stock thick plain washers on the inner 4 17mm bolts.
Sort of looks like an engine now...
Sort of looks like an engine now...
Attachments
GeorgeOC
XS650 Junkie
Edit: I followed the manual for the torque values... It looks like I might be shy a few ft/lbs based on prevailing wisdom here. It will be wise to double check them of course, and again after running the engine. Someday... ha!
Yes, you want to set those 8 large acorn nuts in your pic to about 30. You can stick with the factory specs for all the other smaller bolts. Yes, you will need to do several re-torques in the first few hundred miles. Even one the next day or a few days after the motor has been assembled, and even if it hasn't been run, is good. All the new gaskets really compress. After a couple runs and heat cycles, things will be loose again, requiring another re-torque.
GeorgeOC
XS650 Junkie
Thank you 5twins... Much appreciated. Probably a good idea to check the lower case bolts too before stuffing this thing back in the frame eh?!Yes, you want to set those 8 large acorn nuts in your pic to about 30. You can stick with the factory specs for all the other smaller bolts. Yes, you will need to do several re-torques in the first few hundred miles. Even one the next day or a few days after the motor has been assembled, and even if it hasn't been run, is good. All the new gaskets really compress. After a couple runs and heat cycles, things will be loose again, requiring another re-torque.
GeorgeOC
XS650 Junkie
Next task, to set the valve clearances. I came upon this guide from 650Central.com, submitted by Farrell. The guide looks to be pretty well written, and provides a step by step sequence.
http://www.650central.com/fsetting_the_valves_on_an_xs650.htm
http://www.650central.com/fsetting_the_valves_on_an_xs650.htm
Similar threads
- Replies
- 0
- Views
- 217
- Replies
- 12
- Views
- 513