1976 XS650 restoration and rebuild, advice and help welcomed!

That looks pretty good but I wouldn't recommend setting your intakes at .002", that's a bit tight. Use .003". It's become common practice to use 3 and 6 on all models. As you can see by the specs listed in that link, Yamaha changed the recommended settings several times over the years. I have no idea why. The motors never changed all that much. My '78 speced .004" for the intakes and I tried it but they ticked like crazy. Closing them up just .001" to .003" quieted them right down.

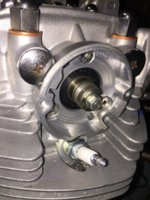
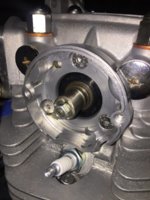
You can check the cam chain tension but if it's a new chain, it's going to be quite tight. It will initially loosen rather quickly once you start running the motor so do check it again after a couple runs. The easiest way to check/adjust the cam chain is to watch the plunger movement as the bike sits there idling. You want to see it bouncing in and out a MM or 2. If it doesn't move at all, the adjustment is too tight, more than a couple MM, too loose.
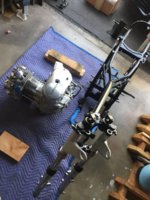
 
Thankfully this weekend looks promising for some forward progress... On this rebuild I am going to take the plunge and give Hugh's CDI PMA a go. I understand there are plethora of options for ignition and charging out there. I believe in the HHB concept, and support model. My question at this juncture is what to do with the empty breaker covers where the advance and points were? Here's where I am now. Breaker covers, seals, gaskets fitted, breaker shaft and cam refitted. There is a tiny tiny bit of play in the side to side of the breaker shaft.

Is it wise/just the same to leave the assembly as is, with the advance and points assemblies completely gonzo?
 

Attachments

  • IMG_0836.JPG
    IMG_0836.JPG
    235.7 KB · Views: 206
  • IMG_0837.JPG
    IMG_0837.JPG
    231.3 KB · Views: 213
Gosh that looks nice George - you do good work.

Others may differ but I think it's ok to leave those spots empty - just as long as everything is secure and nothing will come adrift. You might want to put a little dot of Loctite (the mild grade removeable stuff - blue I think) on those screws just to be sure.
 
You can take the advance rod right out if you don't need it for the new ignition. Really no reason otherwise to leave it in. The '80 and newer models with the TCI didn't have it, the cam was just left empty inside.
 
Gosh that looks nice George - you do good work.

Others may differ but I think it's ok to leave those spots empty - just as long as everything is secure and nothing will come adrift. You might want to put a little dot of Loctite (the mild grade removeable stuff - blue I think) on those screws just to be sure.

You can take the advance rod right out if you don't need it for the new ignition. Really no reason otherwise to leave it in. The '80 and newer models with the TCI didn't have it, the cam was just left empty inside.

Thank you gentlemen. Greatly appreciated!!!
 
Probably be cruising any day now... :laughing:

Engine returned to its natural habitat. Laid the engine on a padded bed, on its right side. Carefully lowered the frame over the engine and secured the lower, front and back motor mounts. Vroom vroom!
 

Attachments

  • IMG_9181.JPG
    IMG_9181.JPG
    182.3 KB · Views: 244
  • IMG_9172.JPG
    IMG_9172.JPG
    217.8 KB · Views: 232
Contemplating a Brembo upgrade for the front. I've read a number of good thread here about that swap,(thank you RG). I do have a couple of quick questions if anyone might want to weigh in... I am running 34mm forks, with stock front hub. Have the stock rotor, but may invest in an upgraded rotor kit from MM at 650Central.

- Will the Brembo calipers (with adapter) work / mount for 34mm forks? (threads I have seen seem to all be 35mm forks)
- Am I on the right track with the pictured caliper?
 

Attachments

  • brembo 1.jpg
    brembo 1.jpg
    191 KB · Views: 156
  • brembo 2.jpg
    brembo 2.jpg
    208.8 KB · Views: 161
Excellent progress today on the intake and carburetor. Airboxes were powder coated, new filters, and rubber joints etc. Carbs rebuilt as well. Bolted everything back into place. Minus a run to the hardware store for a few new fasteners...
 

Attachments

  • IMG_9293.JPG
    IMG_9293.JPG
    196.9 KB · Views: 196
  • IMG_9298.JPG
    IMG_9298.JPG
    157.6 KB · Views: 212
Contemplating a Brembo upgrade for the front. I've read a number of good thread here about that swap,(thank you RG). I do have a couple of quick questions if anyone might want to weigh in... I am running 34mm forks, with stock front hub. Have the stock rotor, but may invest in an upgraded rotor kit from MM at 650Central.

- Will the Brembo calipers (with adapter) work / mount for 34mm forks? (threads I have seen seem to all be 35mm forks)
- Am I on the right track with the pictured caliper?
Have you seen the Pandemonium website?
http://www.pandemoniumc2.com/parts-...&-34MM-for-XS650/p/46227518/category=11951480
 

Thanks RG, yes. I finally stumbled on that, and a few threads here that gave some solid guidance. I went ahead and bought a 34mm adapter from Pandemonium, and a right side Brembo 4piston 65mm pattern caliper. I will report on the fitment. Had I been smarter about this, or down this road before, i might have swapped out for 35mm forks, and triples from the start. The empty fender mount on the lowers will probably bug me! I plan on posting a good reply on this thread about the brake fitting later this week. Thanks again!
 
The infinite mystery of the 75' year gas tank cap and gasket has been solved!
 

Attachments

  • IMG_0848.JPG
    IMG_0848.JPG
    99.2 KB · Views: 178
  • IMG_0849.JPG
    IMG_0849.JPG
    96.8 KB · Views: 176
  • IMG_0850.JPG
    IMG_0850.JPG
    85.4 KB · Views: 195
  • IMG_0851.JPG
    IMG_0851.JPG
    108 KB · Views: 193
New work space! Slight delay in progress due to moving, but its going to be worth it! Exhaust, wiring, here we go.
 

Attachments

  • IMG_0905.JPG
    IMG_0905.JPG
    117.7 KB · Views: 179
Getting there George - it's going to be very pretty!

You can get a set of red '76 decals at: RDDecals.com.

Pete
 
Yup - I've learned now to read & research first, before reaching for the wrenches.

Pete
 
Back
Top