1976 XS650-C Project From Ireland

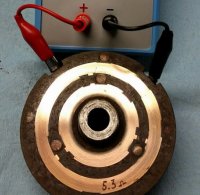
It was time to remove the rotor, I must give a big shout out to my brother who made me up a tool on the lathe to remove the rotor. As you can see the resistance is sky high (should be 5.25 I believe).


vMTzfaVl.jpg


There’s an auto electrical guy local to me, totally old skool, he really loves older stuff and he was good friends with my dad back in the day, so I'm probably gonna get him to rewind the rotor for me and with a bit of luck we will have her running and charging soon!!
 
Last edited:
Ok so, I managed to get a good bit done lastnight!

As superjet noted above, something seemed odd about the multimeter reading so I grabbed a new one on my way home from work and well………..


0xskVkJl.jpg


So the old multimeter has found itself a new home in the bin.

I then refitted the rotor, but before I could start the bike again, there was something big that needed to be addressed.

This is something which I should have caught much sooner but for some reason only became apparent to me recently while I was removing the carb manifolds:


JKKWc2Ol.jpg


As you can see there is are some chunks missing from the casting face where the manifold boots attach.

Further inspection revealed a previous repair attempt where the threads for the allen head screws had obviously been stripped at some stage, the hole had then been drilled through and a bolt inserted from the rear between two cooling fins.


VPC7GXhl.jpg
 
Last edited:
This may very well have contributed to my original problem, so I mixed up some JB Weld and sanded it flat.


Dtcnn8rl.jpg


I had already received new manifold gaskets as part of the last order. So I cleaned up the faces on the manifolds and reinstalled.


nfuxAKPl.jpg


RB1TWJOl.jpg


Ok so its not exactly pretty, but I'm pretty sure it is now sealed.


2p2JhzLl.jpg
 
Last edited:
So I fired her up, adjusted the idle and got the pressure in both exhaust pipes roughly equal, however the right hand carb is still not happy.

I've uploaded a video below if anyone would like to have a look and share their thoughts.


I still have air leaks......

The leaks in the choke area can be easily rectified, but its the throttle seal that concerns me most. To me its a sign of either the throttle shaft itself having worn slightly undersize, or the seal not seating properly.

I think the next course of action will be to disassemble the shaft again and measure the diameter of the throttle shaft with a micrometer. does anyone know what the O.D of the shaft is supposed to clock in at??

At least the left hand carb seems to be ok, there's no leaks anywhere that I can determine anyway.

Gotta love old bikes, one step forward and all that!!
 
Last edited:
Unfortunately I ran out of time and never got a chance to pull the carbs again before the weekend ran out.

I won’t be back home again until next weekend which is frustrating, because I really wanted to get to the bottom of this but that’s how it goes.

So If anyone has any thoughts on my predicament then I’d love to hear it, I’ve got the whole week to ponder my next move!
 
Not familiar with those carbs, as mine came to me with a pair of Mikunis.
However, I know a lot about SUs, if that's any help :)
Is there a plain bush or bearing and seal on the throttle shaft, or is the shaft running in the body casting? Probably the latter, as that's far more common on cooking carbs. If so, check the 'ole for wear. The shaft might be worn, but the pot metal of the body is more likely so.
On the sealing side of things - sometimes it's a pukka small seal, sometimes it's an o-ring that's gone hard / fallen to bits in many years. Easy fix if so.


Yeah the carbs are Mikuni BS38's, I can't really remember if there was a brass bush that the shaft was running on, I did check for play during reassembly and didn't notice anything out of the ordinary

But now that I know its my problem area I can home in on it next time I have them apart, and inspect it more rigorously. The seal is brand new so im thinking its either the shaft or the body/bush.

I suppose its all speculation until I have them out again but said id post up here in case there's something obvious that im missing??

Thanks for the reply anyway @Grimly :cheers:
 
Last edited:
I don't think there's a bushing in there. I think the butterfly shaft just runs right through the carb body.
 
Hello again.

Just a quick update on my carb situation and what Iv'e been up to and of course some advice sought :)

First up I pulled the carbs and swapped the new throttle shaft seals around to rule out a dodgy seal and while I was at it, I checked the choke bodies for flatness and am now pretty sure I've found the cause of my choke leaks.


FQ6nW5vl.jpg


Apologies for the terrible pic, its the only one I took, but hopefully you can still see that the choke body is twisted. I applied some sealant as a temporary cure.

Then I fired her up and repeated the air leak test, the results were somewhat better, with the choke leak now fixed it confirmed the throttle shaft on the RHS was still letting air in, the only curiosity now being that the revs dropped instead of rising when sprayed with carb cleaner.


So I pulled the carbs again and stripped them down to see if there was any obvious clearance issues between the throttle shaft and the bore of the carb body.

This pic was taken with the top of the shaft flush with the bore.


06W9zeVl.jpg


This is a pic with the shaft in position showing the clearance at the bottom of the shaft.


LUwrdn2l.jpg


And the same again but this time showing the clearance at the top half.


tBfaRb4l.jpg


Now the above images clearly show some degree of clearance, but the left carb was near identical and it doesn't leak so I'm just wondering if I'm missing something obvious??

There was a thread a few weeks back where someone seemed to have some success swelling their throttle shaft seal with some brake fluid. Post #6 in the link below:

http://www.xs650.com/threads/mikes-carb-throttle-shaft-seals-problems-and-fixes.54624/

Failing that its looking likely that I will need to source a new right hand carb body so I'm keeping an eye out on eBay to see if any come up.

Any input is very much appreciated :D
 
Last edited:
Yes that was my fix on my 77D carbs Beano. I had same problem, new seals helped but not a total cure.
I soaked the seals in brake fluid and they swelled ever so slightly ,just enough to tighten the fit. No
issues with seals falling apart yet.Solved my problems. Make sure the seals open end face in.
I had no measurable play on my throttle shafts so that wasn't the issue. After soaking over nite dry off
and add bit of grease to each seal and reinstall.If u spray cleaner to test after assembled u will wash off the grease unfortunately,
I cant confirm if this fix will work long term as the seals may lose some integrity but time will tell. Tranny slip fluid
products do something similar,im sure they wouldn't use if it didn't work on something that expensive! How things in Ireland.Hope to get back there for a holiday soon and see family .
 
Whoops,sorry, bad info, i guess I may have my seals in backwards then.Not sure if its critical or not.
 
Yes, I think it is. Maybe that's why you had sealing problems? This seal works on vacuum and gets sucked in tighter as the vacuum through the main bore increases. With the open side facing out, that allows the inner lip to be sucked in tight to the shaft.
 
September Update:

Hello again, progress has been slow but I have been chipping away here and there as often as I can get home, since the last update I have done the bendex spring tightening trick. I had my doubts about it working because my starter was slipping so badly, I was sure I was going to have to replace something but wow, what a difference it made. You can literally spin her over for 10 seconds now if you wanted to and it’s a free fix too!! All thanks to this brilliant thread by garyr.

http://www.xs650.com/threads/starter-gear-fix.18060/

I did however suffer the misfortune of having the kickstart mechanism fall out whilst removing the crankcase cover, but a look at peanuts excellent youtube video on the matter soon put me right, along with some brute force, and a productive evening was had.


I also drained the oil while I was at it and the filter was pretty bad, hopefully the next one will have all the gunge gone once and for all.


qO0ZpZ9l.jpg


kt2YOvEl.jpg


The carbs have been mostly sorted thanks to snagging a set on eBay for small money a couple of months back. I wasn’t expecting much due to the cheap price and really only wanted the R/H carb body, so was pleasantly surprised when they did show up that on the inside at least, they were quite clean and apart from the later model float bowl with no overflow, and a homemade choke mechanism, began to look a bit like a bargain!


nF5X7crl.jpg


The jetting and settings were very weird though, with a 112.5 main jet and a 30 pilot, the mix screw was wound out about 5 turns with the standard needle jet and needle on the second from bottom clip, so I swapped the jets and set the mix and needle to spec and she fired right up, bike seemed much happier than on the previous set and the idle was much, much better too but time will tell, and now at least I have a backup set should it ever be needed for parts etc.

That wasn’t the end of the online shopping however and I have also purchased a genuine parts book for the 75 Euro 447 type, along with the 76 supplement. This was necessary because the Euro bikes are different to the US spec machines, and I was finding it damn near impossible to find a parts list for the Euro machines on any site (the closest I got was finding the 76 supplement on a couple of sites, but there is only a few pages in that so it had limited value), so I took the plunge and made the purchase to make my life easier in the long run.


F0oJBm0l.jpg


I also have made a reasonably substantial order with Jerry Heiden so hopefully my care package will be ready and waiting for me when I arrive back home next weekend with plenty of brand-new goodies to get this recommissioning moving in the right direction.

Top of the to-do list will be getting the bikes charging system working. Currently I have the full 12v at the green brush and 5.2 ohms across the slip rings, but the alternator is not magnetizing, and the battery is not being charged, there’s a new set of brushes in the order from Heiden so hopefully that will be the easy cure that I need right now fingers crossed.
 
Last edited:
Very nice story beano - best wishes for a smooth return to the road. I had a 1975 XS650B with that very smart black and gold colour scheme back in the day.
View attachment 124473
Now, I have a 1976 C-model (the formidable, but troublesome Lucille :yikes:) and, at least in Canada and the US, the colour scheme was entirely different.
View attachment 124471
The carbs are very similar (both BS38s) but the 1975 had two separate throttle cables while, beginning with the 1976 model, only a single cable was employed. Also, the front brake caliper on the 1975 was mounted to the front of the fork leg, while the 1976 and later caliper were mounted behind the leg.

On your bike, I note that the front fender in the recent photo is from a much later bike (no fender stays which both the ‘75 and ‘76 models normally have) and the front fork / brake set-up appears to be from a 1976 or even later bike - although, we never got the double front disk set-up here on any XS650 model as far as I am aware.

Cheers,

Pete


G'day Pete,

Greetings form Down Under.

Is that a ding in the LH header pipe??

I thought that Brilliant Red was only for Canada, the USA and the rest of the world got French Blue.

Cheers & Beers,(or maybe in your case Cheers & Bears).

GeeDub
 
October Update,

Things have really started moving this month and progress has been quite visible, starting off with the arrival of my order from Jerry Heiden.

zhNGaayl.jpg


First up was the installation of the new alternator brushes which so far seems to have completely cured my charging issues, fingers crossed that it holds up.

Next up was a new ignition switch, I had been using a bodged switch from an fzr which I crudely attached to the handlebars, so now with the proper switch finally on hand I could install the gauges and instrument cluster.

Having the above installed meant I could get started on the wiring in the headlight bucket and see if I could get everything working correctly. Good progress has been made so far with this, I’ve had the headlight and tail light working, as well as the indicators lighting up, but they’re not flashing yet. Just waiting on some new double and triple tail connectors to arrive from eBay, and also may possibly need a new flasher unit.

I then managed to get the clutch hooked up. The side case cover was missing the clutch worm adjuster screw, however when I checked my dads stock of new parts there were two brand new screws in their packages, stapled together. I wonder why he bought two?? I know they look very similar to the valve adjuster screws, maybe he was planning on replacing one of those?? It’s a mystery!!

Anyways with that completed I just did some more tidying up, installed new air filters new bp7es sparkplugs to replace the b8es and mounted the airboxes, then routed the wiring properly around the rear of the bike.

So that brings me to the next stage, the front end……… I do need advice on this.

First up let’s talk master cylinders. My bike being a Euro 447 has a slightly different front end compared to the US models. The standard master cylinder that’s fitted to the Euro twin disk models is a 13/16-inch diameter (20.6mm). As you can see from the pic, mine is in pretty rough condition and was seized.

MbqBKj5l.jpg


mWRkg0Bl.jpg


Upon freeing the piston and stripping the master cylinder it became obvious that it would not be possible to save it due to severe corrosion and scoring in the bores, so I just want to get a bit ahead of the game and start working out options for a possible replacement.

B468HcMl.jpg

h1RCeNfl.jpg


I’ve seen the master cylinder sizing chart posted on several threads now and the general consensus seems to be that a bore to piston ratio in the region of between 23:1 and 27:1 for twin opposed calipers is considered ideal.


mastercylinder.gif


Doing the math on the standard master cylinder diameter which is 13/16 inch, converted to metric gives 20.637mm

Multiplying this by π D/2 ² gives us 334.49mm².

Taking the area of the twin opposed caliper pistons as 7238.25mm² and dividing it by the area of the master cylinder gives us a ratio of 21.64:1 which is a touch outside what the recommended range should be.

From the chart a 19mm (3/4 inch) master cylinder would give a 25:1 ratio which is smack bang in the middle of the recommended range.

So I’m looking for an opinion on whether I should go in search of a 19mm master cylinder, or go for a reproduction 13/16 standard sized one? The ratio for a standard item is very close to the recommended range and from my very brief google search, there doesn’t seem to be many 19mm master cylinders in the classic style of the original.

Generally speaking, from what I have found so far, they all seem to be radially mounted items to fit modern superbikes. Obviously being a safety critical component, I am willing to compromise on the aesthetics to a certain extent.I have found some ¾ inch items that seem to have been common on old Harleys, they look the part, but there aren’t many of those on this side of the Atlantic.

Much more common seem to be Harley 11/16 inch (17.5mm) master cylinders, but this pushes the ratio out to 30:1............ I dunno am I overthinking it?? Any and all advice is appreciated, thanks guys.
 
Back
Top