1980 Build for Dad

UPDATE

I was able to get quite a lot done this week! Picking back up with installing the jugs - first step was to split the rear cam chain tensioner as I am using an endless chain. I found that a ½” drill bit was the perfect size to knock that lip off the rivet so I could separate it enough to get the chain in.


upload_2021-1-5_8-19-41.png


@Jim, your method of using the 4” pieces of wood worked great, but I found it made much more sense for me to insert the pistons from the bottom. @Mailman, your Popsicle stick method worked great, so simple! Stuffing the crankcase full of rags was also a good idea, as I dropped the clips about 10 times while trying to install it…

upload_2021-1-5_8-20-9.png


The head went on without issue and that left me with the cam chain. From now on when people ask me, “Rhy, what are you most proud of…” the answer will not be “my family” or “my career”, it will be “getting that f@&%ing cam chain installed”. It was tight, really tight. I went through a good period of thinking it was the wrong chain, that I had assembled something wrong, it was not allowable by the laws of known physics, etc… If anyone else is struggling with and endless chain I found that it was necessary to get the chain over the cam without the cam bearings. Even that was a struggle and it was only possible by inserting the cam into the chain from the left side of the engine, make sure there are no kinks in the chain down in the crankcase. Once you get the chain over the cam put one bearings on one side, then another bearing the other. I was able to gently tap in the two remaining bearings once it was seated. Expect to use much force the whole time.

upload_2021-1-5_8-20-27.png


Next up was torqueing down the whole top end. I did lots of prep work on this, clamped the engine to my workbench and it went very smoothly.

upload_2021-1-5_8-20-47.png


After getting it tightened down, I installed the breather, cam chain adjuster, and point covers. Really liking the black/stainless/aluminum combination.

upload_2021-1-5_8-21-11.png


All that was left was to set the valves, valve covers, oil delivery, and spark plugs. I attempted to polish the old valve covers, but couldn’t get them to where I wanted them, so I splurged on a set of new ones. In my opinion, the head of this engine is a big part of what makes it look so cool, certainly my favorite part of the bike.

So here it is, the finished product (I built the carbs before starting this log):

upload_2021-1-5_8-21-32.png


upload_2021-1-5_8-21-41.png


upload_2021-1-5_8-22-8.png


Now to get it into the motorcycle… I am very grateful to have this engine hoist jig that Dad made. Together with the engine lift I was able to get the old one out without much issue, even as a single man operation.

upload_2021-1-5_8-22-32.png


upload_2021-1-5_8-22-41.png


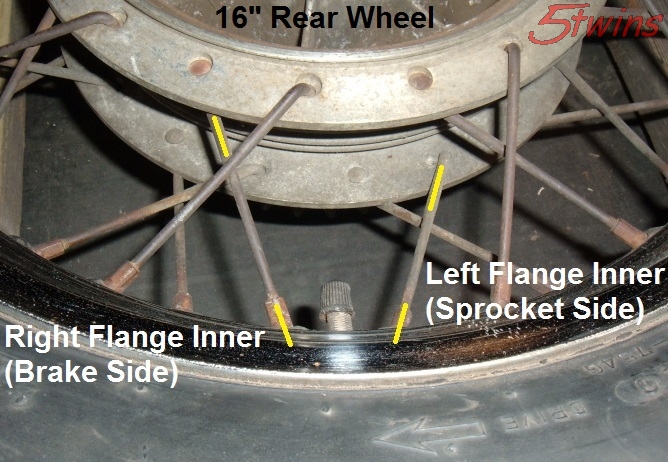
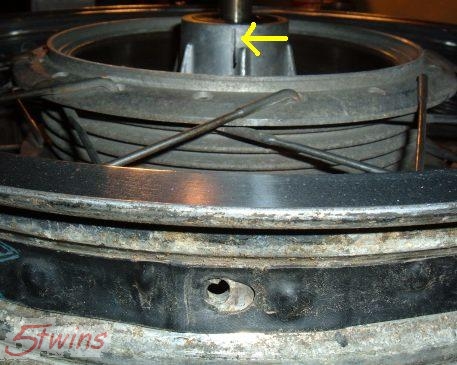
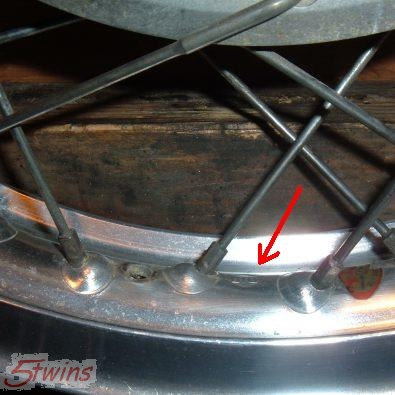
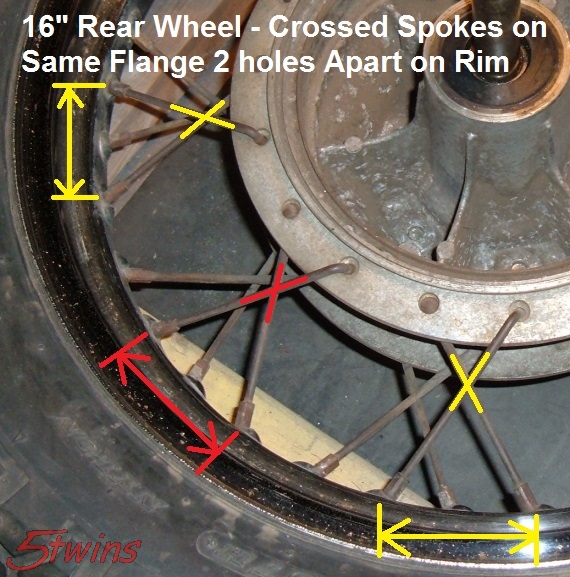
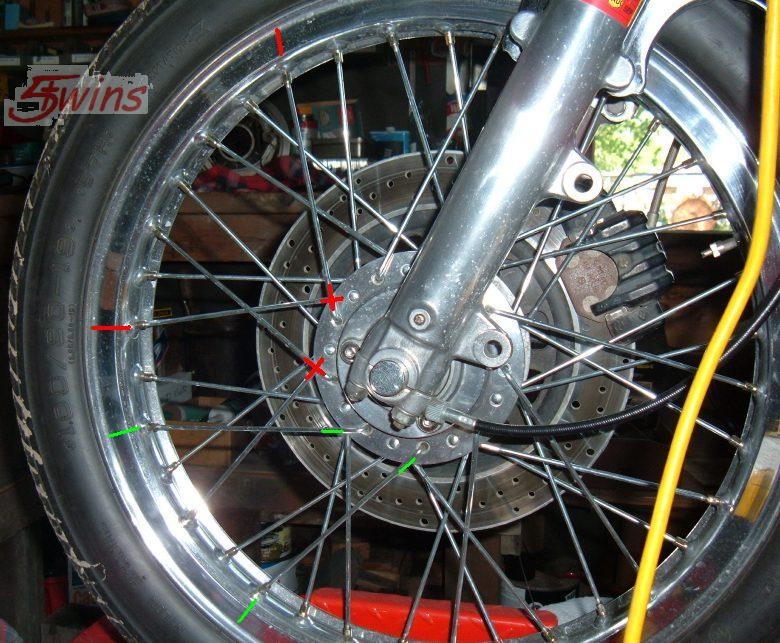
My OCD is having a hard time not just ripping the whole bike apart and cleaning/repainting/polishing everything. However, the desire to have a running motorcycle prevailed so I have resigned myself to putting it back together. I’m going to try and save the real neuroticism for the ’71. The final steps to finish this bike are to recover the seat and rebuild the wheels. I plan to re-lace with stainless spokes, polish the hubs, and replace the bearings/seals. Anyone have a good source of information about lacing wheels they could point me towards? Also, I will likely end up replacing the rear tire if anyone has any recommendations for tire brands, vendors, tread, etc... I believe it is a 130/90-16. Thanks in advance!
 
That engine is brilliant, literally. And as you can handle lifting the engine in and out, you should be confident there is nothing you cannot do with the bike.

I had similar problems fitting cam chain on my XS - very tight.

Fully agree - run the bike before you get too carried away making it perfect.
 
WOW - that looks like something that could have come out of the MSoP* in Surprise AZ!

Congratulations! Don’t forget to give a few squirts of oil underneath those valve covers get things damp while starting her up.


* MSoP = Mailman’s Shop of Perfection
 
Great work Rhy! You built that motor like a pro! And it looks fantastic. Everyone , and I mean everyone struggles with that cam chain, so well done.
FB6BC394-1556-42D5-8945-4C77A7349485.jpeg
Here are a couple of videos on wheel lacing and trueing. There are inexpensive options on EBay for trueing stands, spoke wrenches etc. As for torquing spokes....maybe some of the more professional mechanics among us own spoke torque wrenches, but I’d say most of us just listen for the “ ring “ a tightened spoke makes when you tap on it with a wrench. Good luck on your wheels. ( and by the way, I can totally relate with OCD desires to clean and polish everything! :D )
 
...actually, I spoked an 18" rim onto the 48-spoke hub of a 1981 Special last year because I wanted the sharper handling of the larger diameter tire.

The task isn't really that difficult, but I lacked recent experience and there are some subtleties and so I had quite a number (like A LOT) of false starts. I had that thing together and apart and together again at least half a dozen times before I got it right.

EDIT: A key complication was that I was working on one of the XS Special "mega-spoke wheels. These unique wheels were on <I think> 1981-up XS650 Heritage Specials and were 19" front wheels with 64 spokes (versus the usual 36 spokes) and 16" wheels with 48 spokes on the rear (versus the usual 36 spoke 18 inchers). Those extra spokes look neat ( IMO ) but they do dictate a totally different spoking pattern and a fair bit more work in trung the wheel. As noted, I was spoking an 18" 48-spoke rim onto the XS-Special hub and so I had to use a non-standard rim and set of spokes of the appropriate length.

c9cf0f19-7d83-4a69-b814-d5cb1eb445f6-jpeg.162298


Anyhow, the tale is told here and I strongly suggest that you start on about page 29 and read ALL of it as there was a lot of to-ing and fro-ing involved:

http://www.xs650.com/threads/build-thread-special-to-cafe-bike.48165/page-30


Pete
 
Last edited:
Thanks all for the nice words and encouragement! I had blast working on it and yes, the buffing wheel and I have a great relationship. A couple of questions:

Don’t forget to give a few squirts of oil underneath those valve covers get things damp while starting her up.

Good idea. On that subject, I am assuming that I need to follow "break in" procedures since I replaced the pistons? This seems like a somewhat controversial topic looking around the forum. Run it hard? Run it easy? Split the difference and run it normally?

most of us just listen for the “ ring “ a tightened spoke makes when you tap on it with a wrench

Haha, I am legitimately tone-deaf (amusia), this literally sounds like my nightmare. Would you describe it as "ring vs. no ring" or "ringing at the same pitch"? Might look into one of those torque wrenches! Good news is that I have a nice trueing stand (again from Dad) and indicators aplenty.
 
T'was me, I'd start with "ring-no ring" and then true it with indicators from there. As noted elsewhere, equal torque on each spoke does not necessarily result in a true wheel.

Also, dead-nuts true in all planes is a pursuit, not a goal. You'll NEVER get there. At some point, "close enough" has to do.
 
Tightening spokes, tone deaf? You're really just listening for the difference between 'Ding!' and 'Dunk!' Finer musical appreciation not required.

Edit: Downeaster and I crossed in the post.
 
Tightening spokes, tone deaf? You're really just listening for the difference between 'Ding!' and 'Dunk!' Finer musical appreciation not required.

Edit: Downeaster and I crossed in the post.

Yup - I agree with DE and Raymond. Just get it as good as you can "by ear" and sight don't worry about the rest. I am ashamed to admit that I have still not used that fancy spoke torque wrench I bought....:whistle: 
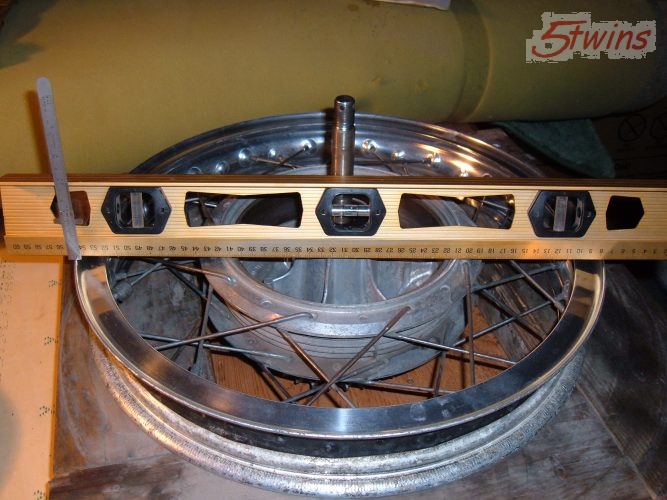
(but please DON'T TELL my wife). Remember that there is a fairly flexible tire filled with quite flexible air - between your bum and the road and so a mm of up-and-down and sideways isn't likely to feel like much to the rider (totally aside from how smooth the road itself is). Balancing the wheel and tire assembly (using lead weights) will help a lot with smoothness.

As for breaking-in the engine - yup, lots of different theories on that issue. Obviously, the basic idea is to smooth down any imperfections in the newly installed and machined parts (pistons, barrels, valves etc.) and ensure that they all develop good wear patterns that can retain lubrication to sustain them for the long-haul. Having worked with numerous car companies over the years and spoken to many many engine development engineers, I am definitely in the camp of:
  • ride moderately at varying speeds and loads with a very occasional application of relatively open throttle;
  • then change the oil & filters (or at least flush out both of the XS650 filter/strainers) after a couple of hundred miles.
The idea behind the early oil change is that any machining swarf or other debris such as bits of gasket etc. should be in the oil within the first hundred or two miles and then you might as well get it out of there. After that, just keep riding moderately until the first normally scheduled oil change and then you can regard the engine as broken-in.

The other thing is to plan on pulling the tank and the spark plugs when you do that first oil change so that you can (in this order):
  1. re-torque the cylinder head (this is done cold and requires removal of the upper engine mount - not a big deal. Be sure to use the torquing chart in the manual - there are A LOT of fasteners of several different sizes and torque ratings);
  2. re-tension the timing chain (this is often done while running - despite what it says in the manual);
  3. set the valve clearance (again, done cold) and I suggest erring slightly on the "loose" side (the rule of thumb is that a slightly noisy valve is a happy valve while a tight, but quiet valve is at risk of being burnt).
EDIT: This routine of re-torquing the head and re-setting the timing chain tension and valve clearances is normally done approximately annually by most experienced XS650 owners. The re-torquing helps to prevent base gasket leaks. The whole task only takes an hour or so (a two-beer job - four if it is American beer ;)) so not a big deal. I did this whole task standing around in front of the Iron Horse Lodge in NC one afternoon during the Vintage Yamaha Rally a couple of years ago - very pleasant indeed.

I see no reason to imagine that blasting it hard down a freeway would accomplish anything beyond overheating the tight engine and beating up on old and new components alike.

Cheers and again, congrats on a beautiful job on your Dad's bike. I'm sure that he is looking down with pride.

Pete
 
Last edited:
You betcha!

Now, I will freely admit that others have way more experience than I and their opinions may differ, so I'd hold off until other folks have had a chance to weigh-in.

The key thing is that hundreds of millions of engines are built and re-built every year and virtually all of them do just fine if they are correctly assembled and properly supplied with lots of good clean oil. Your enemies are heat and lack of lubrication (also, oil is a key source of cooling in all IC engines) - so keep it fairly cool and keep watching the oil and you should be fine.

Pete
 
Yes, tight spokes will "ring" when tapped, loose ones will produce a dull thud sound. It's very easy to tell the difference, you'll see. I don't have or use a spoke torque wrench either. I don't see the point. Make all the spokes the same tightness and chances are very good the wheel won't be true. You want them all tight but some will need to be a bit tighter or looser than others in order to pull the rim left or right and make it true.

Pete's break-in tips are good. The things I consider important are not cruising at a steady speed or RPM for long periods of time, and doing lots of engine braking. You're trying to get engine compression to force the rings out into the cylinder walls so they seat. Engine braking is very good at this, so is accelerating with a big handful of throttle which puts a load on the engine.
 
I'm in the run it hard camp. As was explained to me by a Lycoming rep, and I fully agree... all you're doing at break-in is seating the rings against the cylinder walls. The higher the combustion pressure, the more force is exerted by the rings against the cylinder walls... which seats them sooner. Running the engine easy runs the risk of the cylinder wall glazing over before the rings seat, in which case they never will.... and you'll always burn some oil.
Here's how we broke in the engines on the small airplanes I worked on: Take off at full power. During climb-out, pull the power back as required to keep cylinder head temps (CHT) as low as possible. We'd continue a reduced power climb to 6-8 thousand ft and level off, pull the power back to about 60% and allow the CHT's to stabilize as low as they will at that power setting. Once stabilized, we'd advance the throttle to full power and make lazy ovals over the field for about an hour. During that run we'd see an oil burn as high as 1 1/2 to 2 qts an hour. Land, change the oil and filter(s) and do it again. If the engine was well built, we'd see almost no oil burn on the second flight. Change the filter again, top off the oil and turn it out for normal service.

Baby it 'till you're satisfied all is well with it, then run it like you stole it for a hundred miles. :sneaky:
 
Down the years, I've seen & heard so many discussions of running in/breaking in. And I've run a few new engines meself.

Doing a kind of 'averaging' of the things I've heard, and giving due weight to whoever said it, for me the ideal would seem to be, start the new engine, run it for a few minutes, enough to get the oil pumped all round, then use the engine. Fairly hard - don't need to cane it, but don't be afraid to give her a bit of throttle. Drive up your local hill even. Vary the load, use engine braking. But don't let things get too hot, so after a short run, stop and let the engine cool down for a while. Repeat this a few times. Treat her to an early oil change. And ideally you end up with an unbreakable engine which doesn't burn oil.

But also, don't worry too much.
 
Yup - a variety of opinions suggests that it is likely hard to go wrong - and I should certainly have mentioned using as much engine braking as is practical.

As said above, the engine braking will help to seat the rings and avoid cylinder glazing.

Pete
 
Here's a pretty good thread on wheel lacing .....

http://www.xs650.com/threads/wheel-lacing-101-it-looks-so-easy.27731/

A few things I'll add to that are, assuming your wheels are still assembled, take plenty of pics for reference, so you can get the spoke pattern correct. You'll also want to take some notes and check the rim to hub offset. I make a note of where the spoke on each side of the valve stem runs to .....

full


I also like to mark the hub in line with the valve stem hole so it can be laced back up in the same position .....

full


You'll also usually find some writing or size numbers stamped in the rim either to the left or right of the valve stem hole. I note which that is and then the rim can be installed exactly as it was .....

full


I should also mention that I do all my reference note taking and assembly work with the right side (brake side) of the wheels facing up. Now let's talk about rim to hub offset a little. On our wheels, the rims are centered over the spoke flanges on the hub, but that doesn't necessarily mean centered over the hub itself. On the front they are but not on the rear. Now, you can figure out the offset by doing a bunch of math, and you may have to do some of that if replacing your rim with one of a different width, but if re-using the same rim, it's easiest just to take some offset measurements before taking it apart. For the rear, I lay a straight edge across the brake drum and measure to the edge of the rim .....

full


For the front wheel, I put a disc back on, lay the straight edge across that, and measure down to the rim edge.
 
One more thing I'll mention pertains to the spoke patterns. While the 19" front and 18" rear use the same pattern, the 16" rear differs. On the 16" wheel, an inner and outer next to each other on the same flange that cross are 2 holes apart on the rim .....

full


On the 18" and 19" wheels, they are 6 holes apart .....

full
 
Agree with Jim... I've been building and racing old '70's Honda twins for the last 4 yrs and have built up 4-5 motors over that time that I've raced. We run them wide open on the track and usually around 9-12000 RPMs across all gears! If the bike is going to smoke, it will do it pretty quickly I assure you. In a quest for ultimate performance, I've torn down engines over a weekend to see if I can get more oomph out of them....thus, I've learned quite a few lessons over these short years (some lessons are harder than others unfortunately...ha ha). For engine break-in, I've done it a few ways...I'm no expert but this has been my experience (Non-scientific).

My first engine--Take it easy/slow method:
Warm up the engine...then gradually build up to 3-5K RPM's, quick starts w/on/off the throttle utilizing engine braking. Shut it down, let it cool...then begin again, this time working up to 7K, same deal...repeat cool down, and finally WOT, same deal. Outcome: Solid engine, rings seated OK, and overall performance was OK. Took me the better part of an afternoon. Not a rocket on the track and slight oil burning--usually on deceleration (Due to the intake valves not having oil seals--by factory design). This engine has become my back-up engine in case I or anyone else that races in my group may need it.

My second engine--Dyno method:
I took my second bike to get broken in via Dyno. Slight warm-up and then 3-5 hard pulls on the dyno---cool down to tweak the carbs, and a few more runs on the dyno to dial it all in. The Dyno pretty much did all the work. It cost me a couple hundred $, but with the cam/valve and piston work I had done...it was nice to see the HP numbers pay off. And the bonus of having the rings seat within an hour or two was a bonus. Outcome: Solid engine, rings seated without issue, no smoking (different valve guides with seals all around) and a rocket on the track. I ran it for 2 years without issue, until I crashed due to the cam chain tensioner seizing up...big bummer.

My third & 4th engines--Straight to the track method:
I took my fresh rebuild from my cam tensioner failure and another bike I had built during the off-season to the track to break in. During the practice rounds of a race weekend (both bikes had only been started and warmed up prior simply to get the carbs tuned correctly) they were taken out for a "brisk" pace around the track once, and then a very aggressive lap with super hard acceleration followed by heavy engine braking into the corners. The track is ideal as you're on and off in the extremes...note, for the straights I varied the gear and RPM's...I would run it up, then back off (Spectators said I looked as if I was having some sort of engine/ignition failure with my erratic speeds ha ha). I only did 2 laps with each bike (staying off the race lines of course). Let them cool down and then they were done. Outcome: Both bikes are rockets, rings seated great, and no smoke/burning oil.

My 5th engine-- Going back to the track:
During my last round this past race season, my primary bike lost oil pressure to the top end (due to my lack of securing the sludge trap/oil strainer)... totally destroyed the cam, cam journals, rockers, valves, glazing the sleeves and destroying the piston rings. It was heartbreaking. Anyways, I've just finished my rebuild. It will be going back to the track to break-in.

If you don't have access to a track, there are options as noted above by lots of great minds...and all seemed to work ok. Personally, I recommend to let the bike warm up, then get on it with hard accelerations up into the high RPM range and very heavy engine braking for as long as your neighbors allow. Oh, and change the oil after the first 100 miles or so. Note: I feel that my results in engine performance wasn't a factor of the break-in process, but rather about the modifications I did to the engine itself.

Edit: Now that I re-read my post...I'm not sure if any of this has been helpful lol.
 
Back
Top